
Refresh Spring Menus with Sweet and Savory Favorites
(Family Features) Whether your favorite springtime meals take you to the patio or have you throwing open the windows to let fresh air in, enjoying the sunshine and warmth with sweet and savory dishes is a perfect way to celebrate the season. Better yet – bring loved ones together with recipes that are as easy to make as they are delicious for refreshing taste without the hassle.
 The uplifting aroma and flavor of Envy Apples offer an invitation to savor small moments around the table, especially when used in simple favorites like muffins, sandwiches, pizza or pies for delicious dishes all day long. Celebrating spring can start with this ultimate apple experience, allowing you to introduce loved ones to new ways to rethink weekly staples.
Wake up with breakfast or brunch on the patio, highlighted by Apple and Date Muffins you can prepare fresh or bake ahead of time then reheat for an easy, breezy morning. Spring often means outdoor activities which require a recharge at lunch like these Apple, Bacon and Brie Cheese Toasties featuring the perfect pairing of sweet with savory.
Wind down the day with Stilton Cheese Pizza, an ultimate family favorite and shareable solution. Finally, cap off the excitement of warming weather and time outdoors with a slice of Classic Apple Lattice Tart served with a scoop of ice cream or custard.
These recipes and more start with the craveable texture and crunch of Envy Apples – a leading apple variety – that provide balanced sweetness with flesh that remains whiter longer, even after cutting, so your favorite meals look as delicious as they taste.
Visit EnvyApple.com to find more patio-perfect recipe inspiration.

Classic Apple Lattice Tart
Servings: 8-10
- 2-3 sheets puff pastry dough
- 5 Envy Apples
- 2 tablespoons sugar
- 1 teaspoon finely grated lemon zest
- 1 tablespoon cornstarch
- 1 egg
- 1 tablespoon milk
- 1 tablespoon cinnamon sugar
- ice cream, custard or cream, for serving (optional)
- Preheat oven to 365 F.
- Use two sheets semi-thawed pastry to line fluted tart pan approximately 10 inches, pressing and trimming neatly to fit; chill 15 minutes.
- Peel, core and thinly slice apples into large bowl; sprinkle with sugar, lemon zest and cornstarch then toss well to evenly coat.
- Arrange apple slices in pastry-lined tart pan, laying flat.
- Beat egg with milk. Brush egg wash around pastry rim.
- Cut 1/2-inch strips from remaining pastry sheet and make lattice pattern over apples, crimping edges once lattice is completed.
- Brush tart with egg wash and sprinkle with cinnamon sugar.
- Bake 35-40 minutes, or until pastry is golden. Allow to cool at least 15 minutes before slicing. Serve with ice cream, custard or cream, if desired.

Apple and Date Muffins
Servings: 12
- 2 Envy Apples
- 1 tablespoon maple syrup
- 1 cup flour
- 1 cup bran flakes
- 3/4 cup brown sugar
- 1/2 cup chopped dates
- 1/2 teaspoon pumpkin pie spice
- 2 teaspoons baking powder
- 1 cup butter, melted
- 1 egg, beaten
- 3/4 cup milk
- butter or powdered sugar, for serving (optional)
- Preheat oven to 375 F and line muffin pan with cupcake papers.
- Peel and core apples and dice finely; toss with maple syrup.
- In large bowl, combine flour, bran flakes, brown sugar, dates, pumpkin pie spice and baking powder; mix well.
- In separate bowl, whisk melted butter, egg and milk.
- Add half maple-apple mixture to dry ingredients.
- Pour wet ingredients into dry and fold together until mixed. Spoon evenly into muffin tin cupcake papers. Add 1 teaspoon remaining maple-apple mixture to top of each muffin.
- Bake 20-25 minutes until muffin mix is set and apple topping is golden. Allow muffins to cool 5 minutes before removing from tin.
- Serve with butter or dust with powdered sugar, if desired.
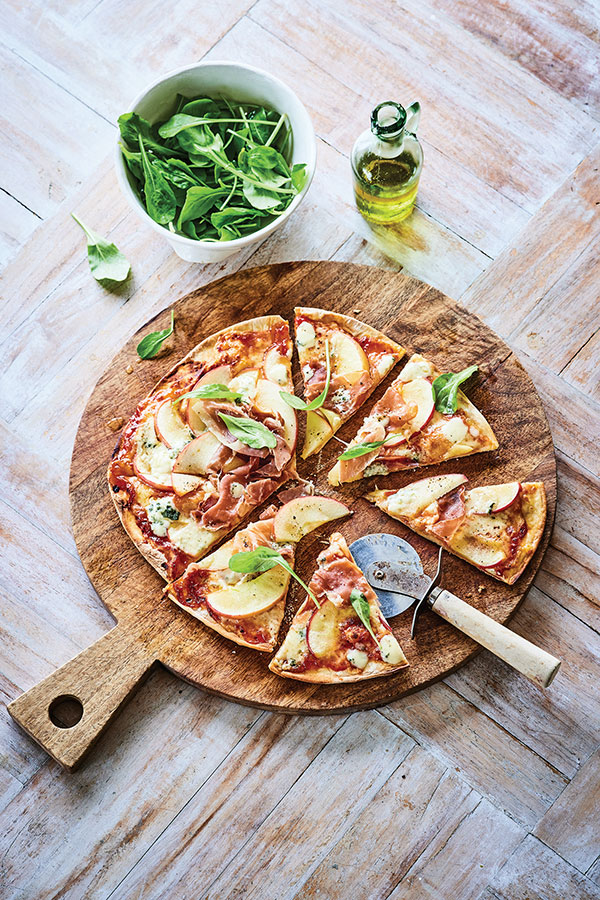
Stilton Cheese Pizza
Yield: 1 pizza
- 1 tablespoon pizza sauce
- 1 tablespoon sweet chili sauce
- 1 storebought pizza crust
- 1/2 cup mozzarella cheese, divided
- 1/3 cup stilton cheese, divided
- 1 Envy Apple
- 4 slices prosciutto
- fresh arugula leaves, for garnish
- fresh basil, for garnish
- toasted walnuts (optional)
- Preheat oven to 450 F.
- Combine pizza sauce and sweet chili sauce. Spread sauce over pizza crust.
- Sprinkle with half of the mozzarella cheese and half of the stilton cheese.
- Cut apple in half then core and slice into thin wedges. Arrange apple over cheese then top with remaining cheese.
- Cook pizza 7-10 minutes until pale golden and starting to bubble. Add prosciutto and cook 2-3 minutes until golden and bubbling.
- Serve with fresh arugula and basil. Sprinkle with toasted walnuts, if desired.
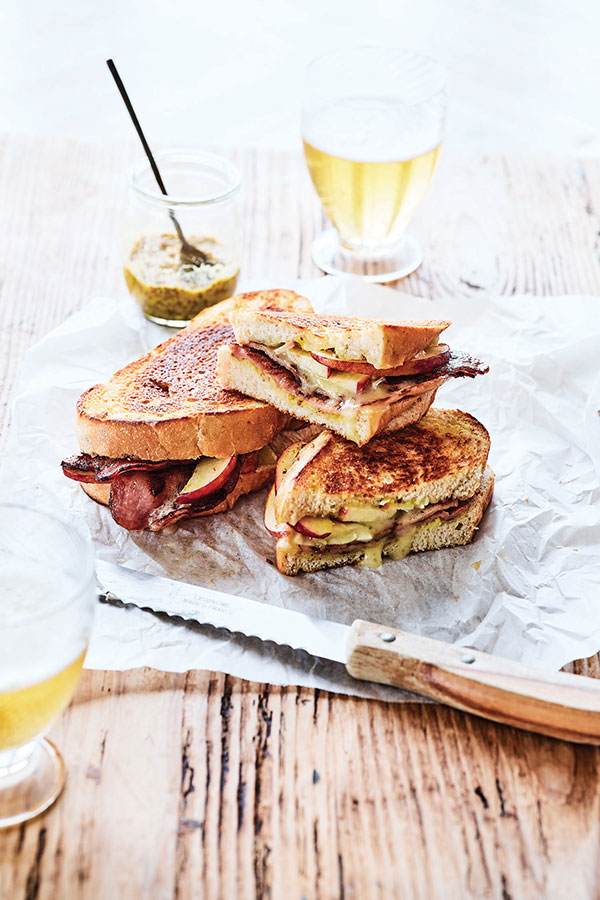
Apple, Bacon and Brie Cheese Toasties
Servings: 2
- 1 tablespoon butter
- 4 slices sourdough bread
- 1 teaspoon honey mustard, plus additional for serving (optional)
- 4 slices cooked bacon
- 1 Envy Apple, peeled, cored and thinly sliced
- 1 3/4 ounces brie cheese, sliced
- side salad, for serving (optional)
- Butter one side of each bread slice.
- Lay out two slices bread, buttered sides down. Top with honey mustard then layer with two bacon slices, apple slices and brie cheese slices. Top with remaining slices bread, buttered sides up, to create two sandwiches.
- Heat grill pan or frying pan and cook sandwiches until golden brown on each side and cheese is beginning to bubble.
- Cut sandwiches in half and serve with side salad or extra honey mustard, if desired.
Source: Envy Apples

Spring Table Spread
(Culinary.net) With spring in the air, it’s the perfect time to invite guests over for a hopping party. It’s also a great opportunity to tackle that dreadful spring cleaning and spruce up your living spaces with vibrant decor for visitors to enjoy alongside a delicious recipe.
With this sweet, colorful table arrangement, your whole family can get into the spring spirit. From festive utensils, a bright centerpiece and cute snacks, your spring setup can be fresh and fabulous.
It’s simple to put together and easy on the budget. Pair it with appetizers or even a main dish for a full spring party spread that’s sure to impress.
Find more springtime recipes at Culinary.net.
Watch video to see how to create this Spring Table Spread!
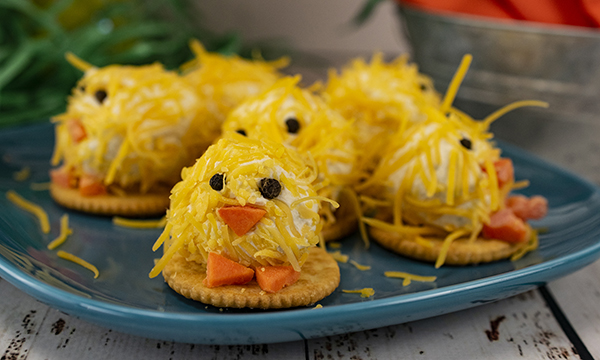
Chick Cheese Balls
Recipe adapted from Hallmark.com
Yield: 10 chicks
- 1 package cream cheese
- 1/4 tablespoon garlic powder
- 1 tablespoon Worcestershire sauce
- 1/2 lemon, juice only
- salt, to taste
- pepper, to taste
- 1 cup finely shredded cheddar cheese
- crackers
- carrots
- whole black peppercorns
- Using mixer, combine cream cheese, garlic powder, Worcestershire sauce and lemon juice. Add salt and pepper, to taste. Refrigerate mixture 1 hour.
- Using fingers, form about 1 tablespoon of cream cheese mixture at a time into balls. Refrigerate 30 minutes on small baking sheet.
- Before serving, roll each ball into shredded cheddar cheese to cover. Place each ball on round cracker.
- Cut small triangles from carrots for beaks and feet. Press carrots onto cheese balls. Add peppercorns for eyes.
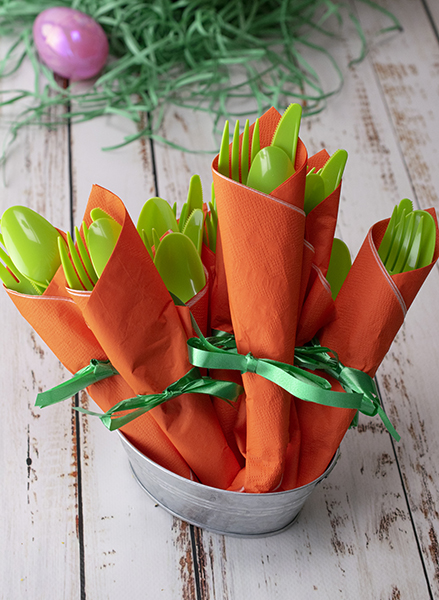
Carrot Utensils
- Orange napkins
- green plastic silverware
- green ribbon
- Lay napkins flat on table. Place one of each utensil in napkin facing top corner. Wrap napkin around utensils. Tie ribbon around middle of napkin. Place in bowl or basket on table.

Spring Table Centerpiece
Recipe adapted from Craftmorning.com
- Jelly beans
- chocolate coated candy eggs
- marshmallow chicks
- fresh or fake flowers
- plastic or dyed eggs (optional)
- Place medium bowl inside large dish. Pour jelly beans and chocolate coated candy eggs around bowl.
- Add marshmallow chicks around dish on top of candies. Arrange fresh or fake flowers in center. Set on table as centerpiece. Place eggs around dish, if desired.

Sweetpotato Power Salad
(Family Features) Bright, beautiful spring days often call for fresh, delicious meals that give you energy to enjoy the great outdoors. Whether you’re hitting the pavement for a run, powering up for an afternoon at the office or picnicking with loved ones, nutrition and flavor can go hand in hand with an easy-to-make salad.
For your next springtime meal, lean on a versatile ingredient like sweetpotatoes as a key ingredient in this Sweetpotato Power Salad, a light yet filling solution that can feed the whole family. Easy to add to a variety of recipes to enhance flavor and nutrition content, sweetpotatoes can be used in sweet, savory, simple or elevated recipes. Plus, they can be prepared on the stove, baked, microwaved, grilled or slow cooked to fit your favorite dishes as a natural sweetener without added sugar.
According to the American Diabetes Association, sweetpotatoes are a “diabetes superfood” because they’re rich in vitamins, minerals, antioxidants and fiber, all of which are good for overall health. Due to their high carbohydrate content, they’re an ideal option for athletes before and after exercising with complex carbohydrates that provide sustained energy. Additionally, the antioxidants help reduce inflammation and aid in muscle repair, meaning sweetpotatoes can help both your endurance and recovery.
Another fun fact: the North Carolina Sweetpotato Commission deliberately spells “sweetpotato” as one word, a spelling officially adopted by the National Sweetpotato Collaborators in 1989 to avoid confusion with the white potato or yam among shippers, distributors, warehouse workers and consumers. However, this spelling isn’t universal; you can help teach others and update dictionary entries by signing the change.org petition to give this superfood its due.
Find more information and springtime recipe inspiration at ncsweetpotatoes.com.
Watch video to see how to make this recipe!
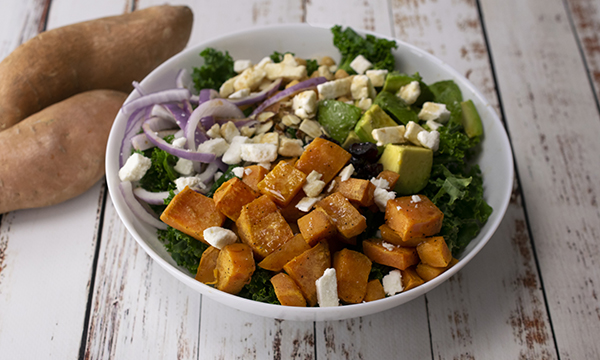
Sweetpotato Power Salad
Recipe courtesy of Carol Brown on behalf of the North Carolina Sweetpotato Commission
Servings: 6
- 4-6 North Carolina Sweetpotatoes, peeled and diced (6 cups)
- 2 teaspoons, plus 1 tablespoon, olive oil, divided
- 3/4 teaspoon salt, divided
- 1/4 teaspoon pepper
- 1 1/2 bunches curly kale, rinsed and chopped (7-8 cups)
- 1/2 large lemon, juice only
- 1 can (15 ounces) garbanzo beans, rinsed and drained
- 1 large avocado, pitted and diced
- 1/2 cup cranberries
- 1/2 cup coarsely chopped almonds
- 1/4 cup red onion, chopped
- 1/2-3/4 cup feta or goat cheese
Dressing:
- 2 tablespoons pure maple syrup
- 2 tablespoons olive oil
- 1/4 cup balsamic or white vinegar
- Preheat oven to 375 F.
- Place sweetpotatoes in large bowl. In small bowl, lightly whisk 2 teaspoons olive oil, 1/2 teaspoon salt and pepper. Toss on sweetpotatoes and place potatoes on large sheet pan. Bake 35-40 minutes until tender, flipping once during baking.
- Place chopped kale in large bowl. In small bowl, lightly whisk remaining olive oil, remaining salt and lemon juice. Pour over kale and massage with hands until mixed, about 1 minute.
- To make dressing: In bowl, whisk syrup, olive oil and vinegar.
- In bowl with kale, add garbanzo beans, avocado, cranberries, almonds, red onion, sweetpotatoes and cheese. Toss with salad dressing and serve.
- Note: Sweetpotatoes can be baked and refrigerated 1 day in advance.

Celebrate Spring Moments with a Taco Feast for the Senses
(Family Features) Busy calendars loaded with holidays, celebrations, parties and reunions make spring a perfect time for gathering with family and friends. Plus, springtime itself is worth celebrating thanks to warmer temperatures and longer days. Making the most of those joyous occasions calls for a menu filled with variety to keep everyone coming back for more.
Few options say “variety” quite like this Epic Taco Party Feast from Ericka Sanchez, creator of “Nibbles and Feasts.” Pay homage to Hispanic-style culinary and cultural traditions by loading your table with an array of family favorites like taquitos, tacos, rice, guacamole, pico de gallo and more. Add in the wholesomeness of Real California dairy like Cotija and Queso Fresco cheeses and cremas for a top-notch feast.
Elevating your dishes starts with these delicious options, but freestyling the menu is what truly makes it your own. Mix up proteins based on your loved ones’ preferences from carne asada and carnitas to shredded chicken and meatless options. Sprinkle, drizzle and layer cheeses according to your own cravings then finish with a range of toppings for customized classics.
Creating a taco and taquito table in your own style doesn’t just give your crowd what they crave; it also celebrates the people, culture and delicious dairy that goes into favorite foods while encouraging guests to connect through food and flavor. Make your own memories this spring by looking for the Real California Milk seal on cheese and dairy brands, which means you’re supporting family farmers by using quality, sustainably sourced dairy to foster family moments.
Find the full recipes, instructions and more ways to celebrate with food at RealCaliforniaMilk.com.
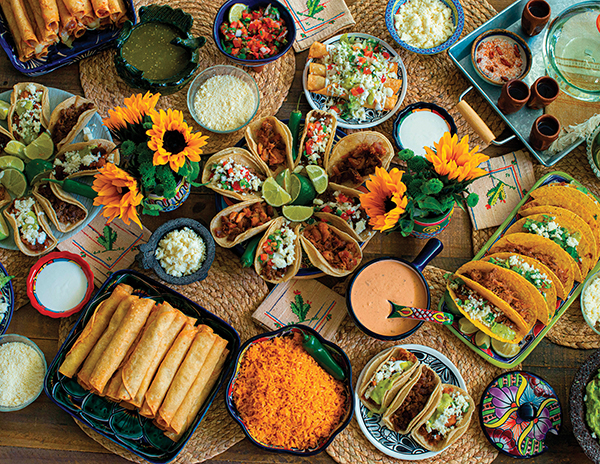
Epic Taco Party Feast
Recipe courtesy of Ericka Sanchez (@nibblesnfeasts) on behalf of Real California Milk
Top Row, Left to Right:
- Cheese taquitos
- Salsa verde
- Real California Cotija Cheese, crumbled
- Pico de gallo
- Potato taquitos
- Real California Queso Fresco, crumbled
- Real California Crema
- Tequila with chili salt (optional)
Middle Row, Left to Right:
- Carne asada tacos
- Real California Queso Fresco, crumbled
- Chicken street tacos
- Real California Chipotle Crema
- Carnitas tacos with hard shells
Bottom Row, Left to Right:
- Real California Cotija Cheese, crumbled
- Real California Crema
- Mexican rice
- Carne asada tacos
- Guacamole
- To assemble top row: Place cheese taquitos in pan, salsa verde in bowl, Cotija cheese in bowl, pico de gallo in bowl, potato taquitos on plate and Queso Fresco in bowl. Garnish potato taqitos with pico de gallo, guacamole, Queso Fresco and crema. Optional: Add tray with tequila, cups and chili salt.
- To assemble middle row: Place carne asada tacos on plate, queso fresco in bowl, chicken street tacos on plate, chipotle crema in bowl and carnitas tacos on serving tray.
- To assemble bottom row: Place Cotija cheese and crema in bowls, potato taquitos on serving tray, Mexican rice in bowl, carne asada tacos on plate and guacamole in bowl.
Photo courtesy of Ericka Sanchez (@nibblesnfeasts)
Source: Real California Milk

Strawberry Mousse
(Culinary.net) A lazy Sunday afternoon cuddled up with family, playing in the rain with your kids and tasting a perfect, sweet treat on a summer day can be some of the simplest yet best parts of life.
Recipes that can be made with clean, fresh ingredients in a matter of minutes make some of the best-tasting dishes, snacks and treats. Sometimes keeping it simple is the best route to take as opposed to confusing prep that takes too much time.
This Strawberry Mousse, which is made with families in mind, is a perfect recipe to make with your little ones or for a date night dessert. It’s great to take for an outing at the park, a neighborhood party or just to snack on throughout the week.
It’s sweet, fluffy and smooth all at the same time. Made to serve a handful of people, it only takes a few moments to complete. Moms love it and kids enjoy the taste and texture.
To start, puree 1 cup of strawberries in blender until smooth.
In a mixing bowl, combine whipping cream and powdered sugar until smooth.
In a different bowl, beat cream cheese until smooth then add the pureed strawberries.
Finally, add the whipped cream mixture to the cream cheese and strawberries. Stir all the components together until they reach the desired consistency before serving with fresh fruit.
It’s easy, fresh and delicious. Your kids can help you combine all the ingredients and excitedly try the sweet result.
Find more sweet recipes at Culinary.net.
If you made this recipe at home, use #MyCulinaryConnection on your favorite social network to share your work.
Watch video to see how to make this recipe!
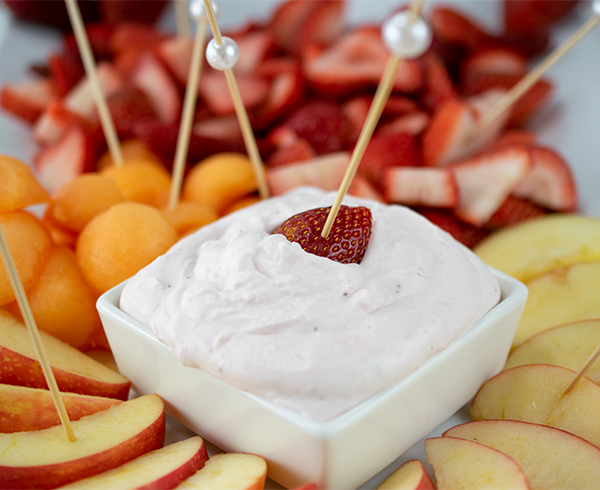
Strawberry Mousse
Servings: 6-8
- 1 cup strawberries, halved
- 2 cups heavy cream
- 1 cup powdered sugar
- 1 package (8 ounces) cream cheese, softened
- assorted fruit, for serving
- In blender, puree strawberries until smooth. Set aside.
- In mixing bowl, whip heavy cream and powdered sugar until fluffy.
- In separate mixing bowl, beat cream cheese until smooth. Add strawberry puree to cream cheese and mix until combined. Add whipped cream and stir until combined.
- Serve in bowl with fruit.

Dreamy Chocolate Mousse
Some of the best memories throughout life stick with you forever as you play them over and over in your head and smile, thinking fondly of those times.
A lot of these good memories are centered around laughs, great conversation and irresistible, mouthwatering food. Family events such as wedding showers or Mother’s Day, or the first day of spring after a bitter winter, can be reasons to celebrate and indulge in something out of the ordinary.
This Dreamy Chocolate Mousse can make those special memories just a little bit sweeter. It’s rich, decedent and full of scrumptious chocolate flavor. Topped with whipped cream and shaved chocolate, it’s the perfect addition to almost any special occasion.
It works as a dessert after a meal or just a special treat. It can be served at a big event or simply a Sunday afternoon at home.
To start, add chocolate, marshmallows and heavy cream to a mixing bowl. Microwave until melted, about 2 minutes. Let cool for 1 hour.
Pour additional heavy cream into a mixer and whip until soft peaks form. Take 1/2 cup of whipped cream and refrigerate for later.
Fold half of the soft whipped cream mixture into the cooled chocolate. Once combined, add the rest of the whipped cream.
Spoon the mousse into serving bowls or ramekins and refrigerate at least 2 hours. Once chilled, add toppings or reserved whipped cream and shaved chocolate, if desired.
It’s easy and requires minimal ingredients, and the results are something smooth, rich and luscious.
Your sense of taste will take you right back to that happy place once you take a small bite. Memories are some of the greatest gifts you get to keep forever.
Find more sweet treat recipes at Culinary.net.
Watch video to see how to make this recipe!
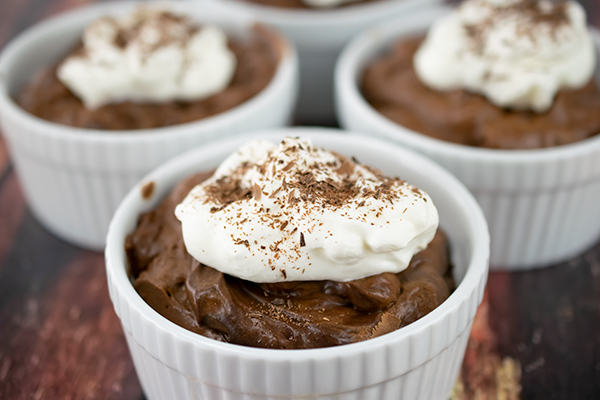
Dreamy Chocolate Mousse
Serves: 4-8
- 8 ounces bittersweet chocolate, chopped, plus chocolate shavings (optional)
- 40 large marshmallows
- 2 1/4 cups heavy cream, divided
- In large bowl, combine chopped chocolate, marshmallows and 1/2 cup heavy cream. Microwave 2 minutes on high, or until marshmallows are melted. Let mixture cool 1 hour.
- Using mixer, whip 1 3/4 cups heavy cream until soft peaks form. Reserve and refrigerate 1/2 cup whipped cream for topping.
- In cooled chocolate mixture, fold in 2 cups whipped cream until combined. Add remaining whipped cream and mix until combined.
- Spoon mousse into ramekins. Refrigerate at least 2 hours.
- To serve, top with 1/2 cup reserved whipped cream and sprinkle with shaved chocolate, if desired.

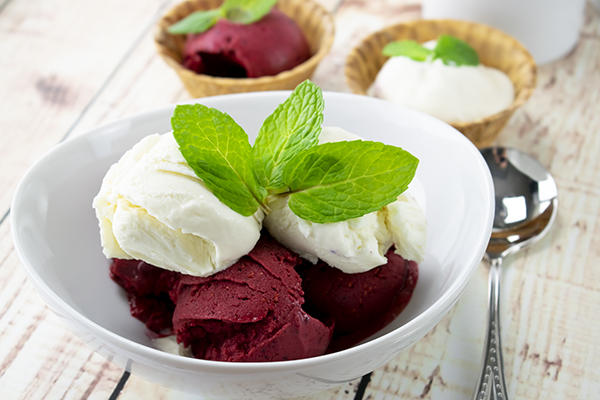
Very Berry and Creamy Coconut Ice cream
Sometimes food can be presented so beautifully, it’s hard to take that first bite. However, once you dig your spoon into the bowl, there is no going back.
Imagine a bite that is chilled, sweet and creamy all at the same time. It’s luscious, fruity and absolutely divine. It’s a summertime ice cream recipe you’ll cherish and make again and again throughout the season.
This delicious Very Berry and Creamy Coconut Ice Cream was created with summertime relaxation in mind. It’s melt-in-your-mouth delicious, especially when it’s made with fresh ingredients right at home for a perfect addition to nearly any poolside event.
This ice cream features the rich tartness of frozen fruit and a sweet creaminess from the coconut milk. The two flavors of ice cream create a unique combination that’s out-of-this-world delicious.
To make the Berry Ice Cream, blend 2 pounds of frozen berries, sweetened condensed milk, honey and salt until smooth then freeze for four hours.
To make the Coconut Ice Cream, beat 2 cups of whipping cream in a mixer until stiff peaks form. In a bowl, combine sweetened condensed milk, coconut milk, salt and 1 cup of the whipped cream. Whisk then add remaining whipped cream and whisk until combined. Place in a dish and freeze for four hours.
Once properly chilled, both ice creams are ready to scoop and serve. Garnish with mint leaves for an extra pop of color, if desired.
Enjoy a delightful treat with your loved ones as you make memories that will last a lifetime. Out in the heat or indoors cooling off, it’s a spoonful of summertime that’s hard to skip.
Find more sweet treats for summer at Culinary.net.
Watch video to see how to make this recipe!
Very Berry and Creamy Coconut Ice Cream
Yield: 11 cups
Berry Ice Cream:
- 2 pounds frozen berries (such as raspberries, blueberries, strawberries and blackberries)
- 1/2 cup sweetened condensed milk
- 1 tablespoon honey
- 1/2 teaspoon salt
Coconut Ice Cream:
- 2 cups heavy whipping cream
- 1/2 cup sweetened condensed milk
- 1/2 cup coconut milk
- 1/2 teaspoon salt
- mint leaves, for garnish (optional)
- To make berry ice cream: In blender, pulse frozen berries, sweetened condensed milk, honey and salt until smooth, scraping down sides.
- Pour mixture into 5-by-9-inch loaf pan. Freeze uncovered 4 hours, or until set.
- To make coconut ice cream: In large mixing bowl, beat whipping cream until stiff peaks form.
- In medium bowl, whisk sweetened condensed milk, coconut milk, salt and 1 cup whipped cream until combined. Add remaining whipped cream and whisk until combined.
- Pour into 5-by-9-inch loaf pan. Freeze uncovered 4 hours, or until set.
- Scoop desired amount of each ice cream into bowls to serve. Garnish with mint leaves, if desired.

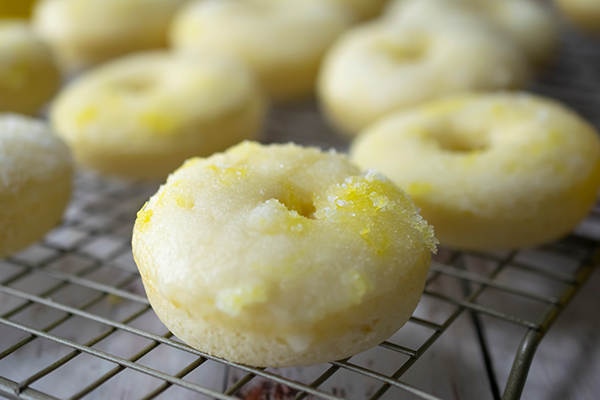
Baked Lemon Donuts
(Culinary.net) Sweets with enhanced fruit flavors are often among the best of the best when it comes to family treats. Fruit can add levels of sweet, tart or even citrus flavor to all kinds of recipes.
From grapefruit to berries and lemons, there are a variety of fruits that can take your delightful desserts to the next level of flavor.
For example, these Baked Lemon Donuts are a unique dessert that can double as a sweet, fruity breakfast. Delicious and packed with lemon zest, they are coated in a lemon-sugar topping for a burst of lemon in every bite.
To make this recipe, start with 2 cups of flour in a mixing bowl. Add sugar, baking powder and salt then whisk everything together.
Then add buttermilk, eggs, melted butter, lemon juice, vanilla extract and lemon zest to the dry ingredients. Stir until all ingredients are combined to form dough.
Use a piping bag or cut a corner off a re-sealable storage bag then pipe the dough into a donut pan and bake at 350 F for 9 minutes.
While the donuts are in the oven, add some lemon zest to a half cup of sugar and mix.
When they are perfectly baked, dip the tops of each one into some melted butter then into a lemon-sugar mixture.
The end result is fluffy little donuts that are filled with light and scrumptious lemon flavor and covered with lemon sugar for a hard-to-resist lemony treat.
Late night or early morning, these donuts can leave you – as well as anyone you choose to share them with – craving “just one more.”
Find more unique recipes at Culinary.net.
Watch video to see how to make this recipe!
Baked Lemon Donuts
Serves: 12
- 2 cups flour
- 3/4 cup sugar
- 2 teaspoons baking powder
- 1 teaspoon salt
- 3/4 cup buttermilk
- 2 eggs
- 2 tablespoons butter, melted
- 2 teaspoons lemon juice
- 1/2 teaspoon vanilla extract
- 1 teaspoon lemon zest
Lemon Sugar Topping:
- 1/2 cup sugar
- 1 teaspoon lemon zest
- 1/2 cup butter, melted
- Heat oven to 350 F.
- In large bowl, whisk flour, sugar, baking powder and salt.
- Add buttermilk, eggs, butter, lemon juice, vanilla extract and lemon zest. Stir until combined.
- Pipe batter into donut pan.
- Bake 9 minutes. Cool on wire rack.
- To make topping: In bowl, combine sugar with lemon zest. In separate bowl, place melted butter.
- Place donut face down in melted butter then face down in lemon sugar topping. Repeat with all donuts.

Marvelous Mother's Day Brunch
(Family Features) Pamper mom on her special day with a wonderful brunch that all the kids can help make.
- Spiced Granola Pancakes include applesauce as a healthy substitution for fat in this recipe.
- Burrito Bites make a simple appetizer that is easy for kids to assemble. No cooking is required!
- Using a store-bought angel food cake makes preparation of this luscious Angel Sherbet Cake simple. It's low in calories and fat and is as pretty as it is delicious.
- Wheat Berry Tuna Salad is a tasty way to enjoy wheat berries. Wheat berries provide the nutritional benefits of the whole grain and are an excellent source of dietary fiber.
- Round out the brunch with favorite salads, side dishes and some fresh fruit. Follow that with lots of love, hugs and kisses!
Please visit the Wheat Foods Council's Web site at www.wheatfoods.org to order this cookbook or to find additional recipes.

Angel Sherbet Cake
Prep time: 30 minutes
Freeze time: at least 1 hour or until hard
Yields: 10 servings
- 1 pint raspberry sherbet
- 1 pint lime sherbet
- 1 Angel Food Cake loaf (store bought, approximately 7 x 3 inches)
- Topping:
- 2 cups heavy whipping cream or 12-ounce container frozen whipped topping, thawed
- 3 teaspoons sugar
- 1 teaspoon lemon juice
- Line two bread pans, approximately the same size as the angel food cake, with plastic wrap. Soften sherbet. Scoop lime sherbet into one pan and raspberry sherbet in the other. Spread sherbet with a metal spatula dipped in hot water. Sherbet should be approximately 1/2 inch deep. Refreeze sherbet in pans for at least 1 hour or until hard.
- Trim edges of angel food cake with a serrated knife to even them; cut cake into three lengthwise slices.
- Remove frozen lime and raspberry sherbet from freezer. Alternate layers, cake, sherbet, cake, sherbet and cake. Cut off any oversized sherbet or cake to ensure that cake and sherbet are even on all sides of the cake. Refreeze until solid; can be frozen up to 3 days if wrapped well in plastic wrap.
- Before serving, prepare cake topping by whipping the cream until very thick. Add sugar and lemon juice and whip mixture until soft peaks form. Spread whipped cream on cake. Refreeze cake until ready to serve.
- Remove cake from freezer and let soften 5 to 10 minutes. Slice with an electric knife. If desired, place cake slices on pools of strawberry or raspberry sauce and top with a lemon twist and mint leaves.
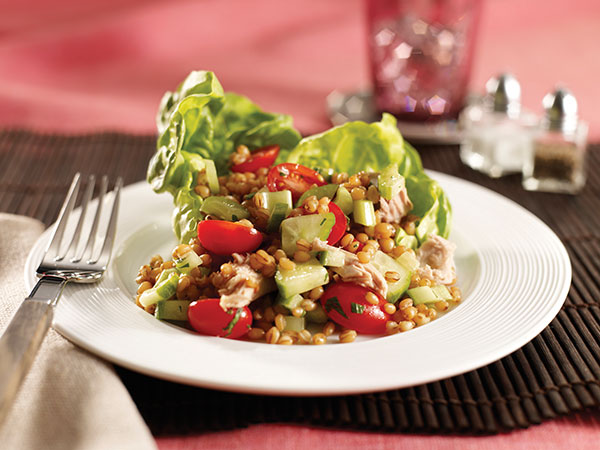
Wheat Berry Tuna Salad
Prep time: 15 minutes
Cook time: 60 to 90 minutes
Yields: 4 to 6 servings
Serving size: 1 1/2 cups
- 1 cup wheat berries
- 4 cups water
- 1/2 teaspoon salt
- 1 cup cherry tomatoes, diced
- 1/2 cup celery, diced
- 1/2 cup cucumber, diced
- 2 cans Albacore tuna packed in water, drained
- 2 eggs, hard boiled, chopped (optional)
- 2 tablespoons flat leaf parsley, coarsely chopped
- 1/2 cup Italian dressing
- 1/8 teaspoon salt
- 1/8 teaspoon fresh ground pepper
- Place wheat berries, water and salt in a sauce pan and simmer for 60 to 90 minutes until tender when you bite down on them.
- Drain well and allow to cool.
- In a large bowl, toss together with the remaining ingredients. Serve chilled.

Burrito Bites
Prep time: 10 minutes
Chill time: 30 minutes
Yields: 4 servings
Serving size: 1 tortilla roll-up
- 4 (9-inch) whole wheat tortillas
- 6 tablespoons smooth peanut butter or reduced-fat cream cheese
- 1 cup fresh spinach or torn romaine leaves
- 1 large stalk celery, cut into thin 3- to 4-inch sticks (12 sticks total)
- 1/2 cup carrots, shredded or matchstick
- 1/2 cup fat-free plain yogurt or low-fat ranch dressing (optional)
- Spread 1 1/2 tablespoons peanut butter or reduced-fat cream cheese on each tortilla, leaving 1 inch of clean space at the top edge of each tortilla. Layer spinach leaves on top of peanut butter. Place three celery sticks across the middle on top of the spinach; sprinkle with shredded carrot.
- Keeping the clean edge at the top, roll tortillas up tightly from the bottom, folding in the sides after the first roll. Wrap each burrito tightly in plastic wrap and refrigerate for at least 30 minutes. Remove plastic wrap. Cut each roll into 1/2-inch slices, inserting a toothpick into the burrito before each cut is made.
- Serve with yogurt or ranch dressing.
Spiced Granola Pancakes
Prep time: 10 minutes
Cook time: 15 minutes
Yields: 12 servings
Serving size: 1 pancake
- 1 cup fat-free milk
- 1/2 cup applesauce
- 1 tablespoon fat-free vanilla yogurt
- 2 eggs
- 2 teaspoons grated orange peel
- 1 cup all-purpose flour
- 1 cup low-fat granola
- 1/2 cup whole wheat flour
- 2 tablespoons sugar
- 1 teaspoon baking powder
- 1/2 teaspoon baking soda
- 1 teaspoon ground ginger
- 1 teaspoon ground cinnamon
- 1 teaspoon salt
- In large bowl, combine milk, applesauce, yogurt, eggs and orange peel. In medium bowl, combine remaining ingredients. Stir the dry ingredients into the wet ingredients and mix just until dry ingredients are moistened. Do not over mix.
- Heat nonstick griddle to 350°F. For each pancake, pour 1/4 cup of pancake batter onto hot griddle. Cook each side until puffed and dry around edges. Turn and cook 1 to 2 minutes longer or just until golden brown.

A Savory Springtime Brunch
(Family Features) Warm breezes, blooming flowers, pretty pastels - when spring is in the air, there's plenty of reason to celebrate. It's the perfect time to bring family and friends together for a welcoming brunch.
When planning your menu, be sure to have plenty of savory dishes on hand to satisfy your guests. And rest easy, you don't have to spend hours in the kitchen to prepare your feast. Using ingredients already full of flavor, such as Johnsonville Breakfast Sausage, lets you create memorable brunch dishes without a lot of work.
These recipes are simple yet satisfying - and leave you plenty of time to enjoy the company gathered around your table.
For more savory brunch recipes, visit www.johnsonville.com.

Amazing Muffin Cups
Prep Time: 20 minutes
Cook Time: 25 minutes
Yield: 12 servings
- 3 cups refrigerated shredded hash browns
- 3 tablespoons melted butter
- 1/8 teaspoon salt
- 1/8 teaspoon pepper
- 12 links Johnsonville Original
- Breakfast Sausage
- 6 eggs
- 2 cups (8 ounces) shredded 4-cheese
- Mexican blend cheese
- 1/4 cup chopped red bell pepper
- Chopped fresh chives or green onions, for garnish
- Place 12 paper liners in a muffin pan; spray liners with cooking spray.
- In bowl, combine hash browns, butter, salt and pepper. Press hash brown mixture into the bottom and up the sides of the muffin cups.
Bake at 400°F for 12 minutes or until lightly browned. - Meanwhile, cook sausage according to package directions; cut into 1/2-inch pieces. Divide sausage between muffin cups.
- Combine eggs, cheese and bell pepper. Pour over sausage. Sprinkle with chives. Bake for 13 to 15 minutes or until set.
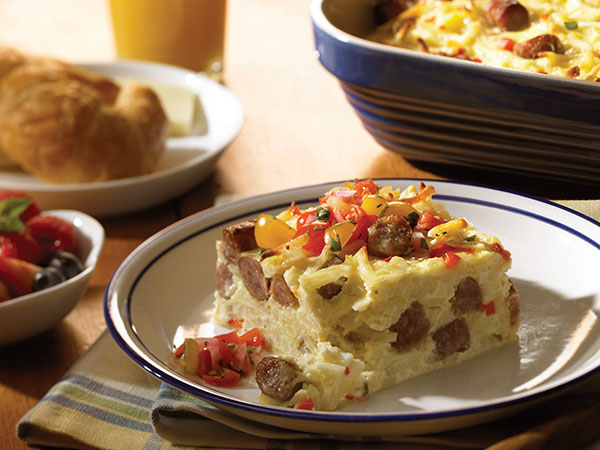
Sunrise Breakfast Casserole
Prep Time: 30 minutes
Bake Time: 70 minutes
Yield: 12 to 15 servings
- 2 packages (12 ounces each) Johnsonville Breakfast Sausage Links
- 9 eggs
- 3 cups milk
- 1 1/2 teaspoons ground mustard
- 1 teaspoon salt
- 1/2 teaspoon pepper
- 2 packages (20 ounces each) refrigerated shredded hash browns
- 2 cups (8 ounces) shredded cheddar cheese
- 1/2 cup diced sweet red pepper
- 1/3 cup thinly sliced green onions
- 2 cups salsa or picante sauce, optional
- Place sausage on a 15 x 10 x 1-inch baking pan. Bake at 375°F for 15 to 20 minutes or until sausage is no longer pink, turning once; drain and slice into 1/4-inch coins.
- In large bowl, combine eggs, milk, mustard, salt and pepper. Add hash browns, sausage, cheese, sweet red pepper and green onions; mix well. Pour into a greased 13 x 9 x 2-inch baking dish. Cover and refrigerate overnight.
- Remove from the refrigerator 30 minutes before baking. Bake, uncovered, at 350°F for 65 to 70 minutes or until set and golden brown.
Let stand 10 minutes before serving. - Serve with salsa or picante sauce if desired.
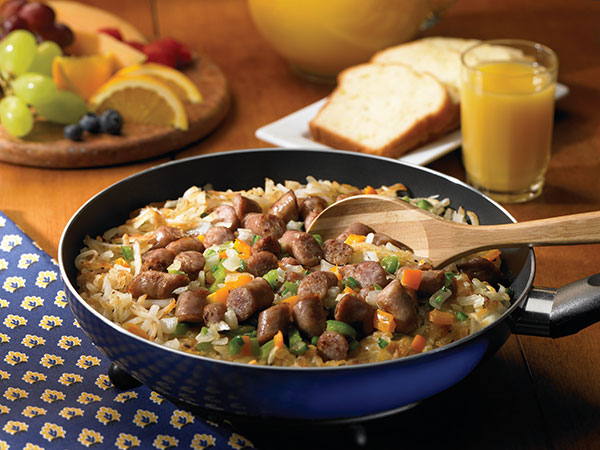
Blue Ribbon Skillet
Prep Time: 15 minutes
Cook Time: 15 minutes
Yield: 3 servings
- 7 links Johnsonville Original Breakfast Sausage
- 3 tablespoons canola oil
- 4 cups refrigerated shredded hash browns
- 1/4 cup chopped onion
- 1/4 cup chopped green pepper
- 1/4 cup chopped orange bell pepper
- 1 jalapeño pepper, seeded and chopped
- 1/8 teaspoon salt
- 1/8 teaspoon pepper
- 1 cup (4 ounces) shredded 4-cheese Mexican blend cheese
- In large skillet, cook sausage per package directions. Cut links into 1-inch pieces and set aside.
- In the same skillet, heat oil over medium-high heat. Add hash browns, onion, green and orange peppers, jalapeños, salt and pepper. Cook for about 10 minutes until hash browns are lightly browned and tender, turning occasionally.
- Return sausage to skillet and sprinkle with cheese. Cover skillet for 2 minutes until cheese is melted.
Option: This recipe can be doubled to make a "2-Skillet Breakfast." Cook sausage in one skillet and hash browns, onion and peppers in another skillet.
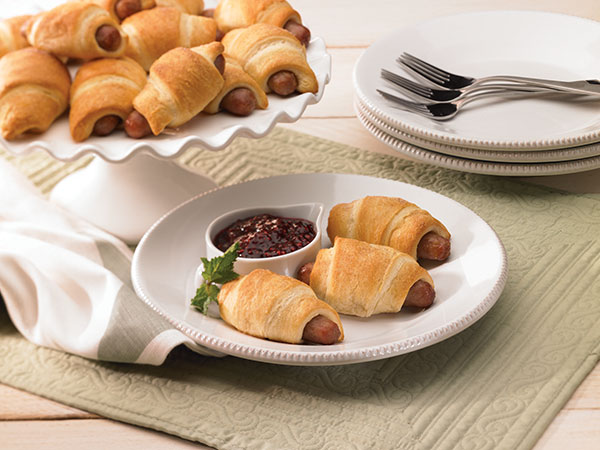
Easy Sausage Roll-Ups
Prep Time: 15 minutes
Cook Time: 15 minutes
Yield: 16 roll-ups
- 1 package (12 ounces) Johnsonville Breakfast Sausage Links
- 2 containers refrigerated crescent rolls (16 rolls total)
- 1/2 teaspoon cinnamon
- 2 tablespoons sugar
- Prepare sausage according to package directions. Drain and set aside.
- Unroll crescent roll dough according to directions on package. Place one cooked sausage onto one end of a dough triangle. Roll dough around sausage according to directions on dough package and place on jelly-roll pan with the seam side down. Repeat with remaining sausage and dough. (You will have 2 extra rolls. Bake and enjoy with jam.)
- Mix cinnamon and sugar together and sprinkle evenly over roll-ups. Bake according to directions on dough package. Serve hot.
Suggestion: Serve with warm maple syrup, honey or your favorite preserves for dipping.
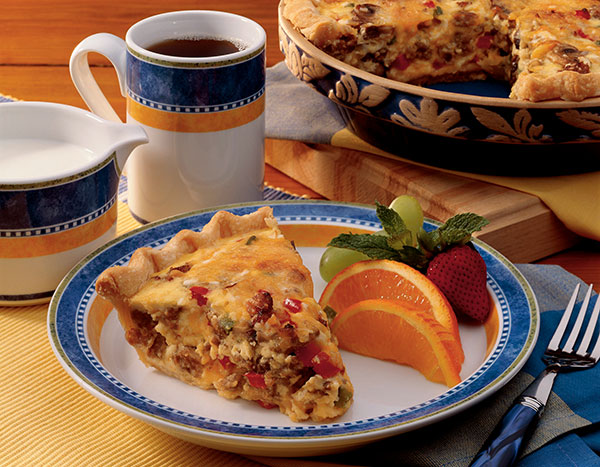
Sausage Mushroom Quiche
Yield: 8 servings
- 1 package (12 ounces) Johnsonville Original Breakfast Sausage Patties
- 1 1/2 cups sliced fresh mushrooms
- 1/4 cup chopped onion
- 1/4 cup chopped sweet red pepper
- 1/4 cup chopped green pepper
- 1 package (3 ounces) cream cheese, softened
- 4 eggs
- 1/3 cup half-and-half cream
- 1 cup (4 ounces) shredded Monterey Jack cheese
- 1 cup (4 ounces) shredded cheddar cheese
- 1/4 teaspoon salt
- 1/4 teaspoon pepper
- Dash ground nutmeg
- 1 pastry shell (9 inches), baked
- In skillet, cook sausage over medium-high heat for 3 minutes, chopping into small pieces. Add mushrooms, onion and peppers. Cook and stir 5 minutes longer or until sausage is no longer pink and the vegetables are tender; drain well and set aside.
- In mixing bowl, beat cream cheese until smooth. Gradually beat in eggs and cream.
- Stir in cheeses, salt, pepper, nutmeg and sausage mixture. Pour into baked pastry shell. Bake, uncovered, at 350°F for 40 to 45 minutes or until a knife inserted near center comes out clean. If necessary, cover edges of crust with foil to prevent over-browning. Let stand 10 minutes before serving.
Source: Johnsonville