
Entertain Guests with a Fresh Al Fresco Favorite
(Family Features) If you and your loved ones yearn for new, stimulating experiences to feel connected to the outdoors, look no further than enjoying mealtime al fresco. Inspired by the Mediterranean tradition of “eating in the open air,” al fresco dining offers passionate home cooks a fresh way to enjoy their favorite recipes outside with friends and family.
Consider these two tried-and-true al fresco tips from television personality and culinary icon Rachael Ray the next time you enjoy dinner on the deck or lunch on the patio.
Gather the right tools: On those buggy days and nights during the warm season when you’re dining al fresco, grab a food mesh tent. Not only will it protect your food, but it also looks good and goes with a variety of table settings.
Plan the decor: When hosting friends and family, up your floral game by reaching into the garden and adding some fresh herbs – it’s aesthetically pleasing and smells delicious.
Ideal al fresco meals typically take advantage of in-season produce, offer easy preparation so you can focus on entertaining and are simple enough to eat outdoors. Skip complicated cooking steps and turn to a delicious option like Yellowfin Tuna and Artichoke Pasta, which can be served as an appetizer, side dish or on its own as a light main course.
This dish practically calls for ingredients like Genova Yellowfin Tuna in Olive Oil, which features cuts of wild-caught tuna, hand-filleted in just the right amount of olive oil. Savory, rich and flavorful with a perfect texture, the tuna elevates the dish with a uniquely rich and savory flavor stemming from Mediterranean inspiration.
To find more al fresco dining inspiration and recipe ideas, visit GenovaSeafood.com.
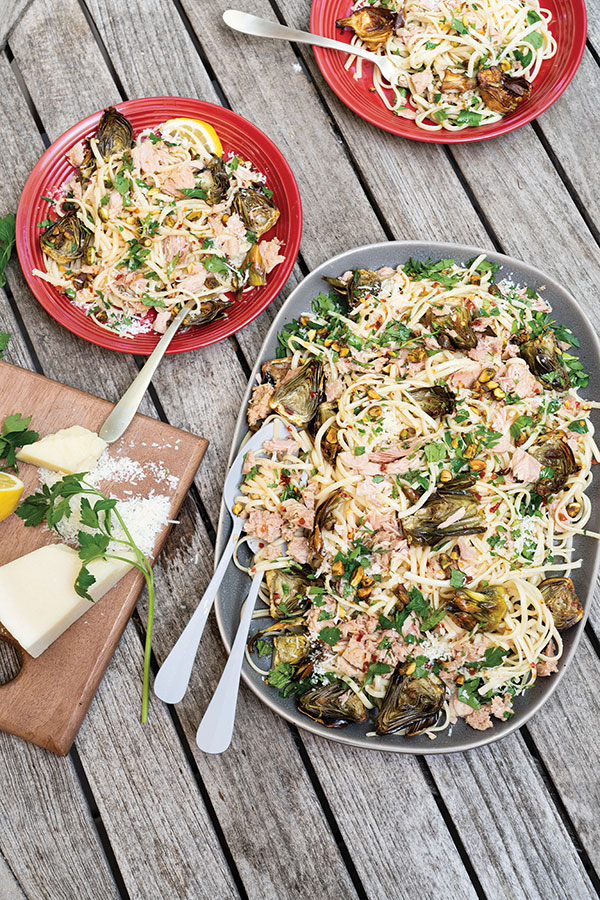
Yellowfin Tuna and Artichoke Pasta
Recipe courtesy of Rachael Ray on behalf of Genova Tuna
Prep time: 15 minutes
Cook time: 40 minutes with fresh artichokes (25 minutes with canned)
Servings: 4
Artichokes:
- Cold water
- 12 small, fresh artichokes or 2 cans artichoke hearts in water
- 2 lemons
- 3 tablespoons extra-virgin olive oil
- salt, to taste
- pepper or red pepper, to taste
Pasta:
- Water
- 2 cans (5 ounces each) Genova Yellowfin Tuna in Olive Oil
- 2 tablespoons extra-virgin olive oil
- 4 tablespoons butter, cut into tabs
- 4 cloves garlic, chopped
- 1 teaspoon crushed red pepper (optional)
- salt, to taste
- 1/2 cup white wine, chicken stock or vegetable stock
- 1 pound spaghetti or linguine
- 1 lemon, juice only
- 1 cup grated Pecorino Romano cheese
- 1/4 cup chopped fresh Italian parsley, divided
- 1 small handful fresh mint, chopped, divided
- 1/4 cup toasted pistachios or pine nuts, chopped
- To make artichokes: Preheat oven to 425 F.
- Fill bowl with cold water and juice of one lemon.
- If using fresh artichokes, trim tops of artichokes and tougher outer leaves. Using vegetable peeler or small paring knife, trim stems. Once prepped, cut fresh artichokes in half. If using canned artichokes, drain well and quarter lengthwise.
- Place artichokes in lemon water.
- Let soak 2-3 minutes, drain and pat dry with kitchen towel.
- In casserole or baking dish, arrange artichokes and add juice of remaining lemon, quarter lemon and add lemon wedges to dish.
- Add olive oil and salt and pepper, to taste.
- Roast 25-30 minutes, or until tender.
- To make pasta: Bring large pot of water to boil.
- While water is coming to boil, place large skillet over medium heat and add olive oil and butter. Add garlic; red pepper, if desired; and salt, to taste, and swirl 1 minute. Add white wine or stock and let reduce by half.
- When water comes to boil, salt water, add pasta and cook 1 minute less than directions. Reserve 1/2 cup pasta water before draining.
- Add artichokes to large skillet with tuna with its oil and gently break up with back of wooden spoon or paddle.
- Add lemon juice and reserved pasta water to skillet along with drained pasta, cheese and half the parsley, mint and pistachios. Toss to combine, top with remaining parsley, mint and pistachios and serve.
Source:

Dial Up Flavor with Summer Favorites
(Family Features) Turn up the heat this summer and spice your way to delicious warm-weather recipes by using subtle ingredients that bring out bold flavors in your favorite foods. Adding a taste-enhancing option to your repertoire – Tajín Fruity Chamoy Sauce – can make your summer get-togethers the talk of the neighborhood.
Cool off while enjoying mildly spicy dishes. Made with 100% natural chiles, lime juice, sea salt and a hint of apricot, Tajín Fruity Chamoy Sauce offers a unique sweet-and-spicy flavor without too much heat. Perfect for drizzling over fresh fruits and veggies like mango, pineapple, watermelon and more, it’s also commonly used to bring fruity, subtle spice to a wide variety of recipes including beverages and snacks, like smoothies, mangonadas, ice pops and cold drinks.
For example, in this Savory Mango Chamoy Daiquiri, the apricots create a fruity, tangy flavor that’s a nice, refreshing twist on a traditional drink.
Bringing a touch of heat to summer cookouts can be a breeze with mild hot sauces added to dishes like these Spiced Pork Ribs, which can be created start-to-finish in the oven or taken outside to sear on the grill. Just a handful of ingredients are required to season the ribs to spicy perfection before wrapping them in foil and letting your oven do the work.
The key ingredient for the right touch of subtle heat without being overwhelming is Tajín Mild Hot Sauce, a unique, flavorful addition to your cabinet that pairs well with savory snacks like tortilla chips, chicken wings, pizza and even micheladas. The lime is what makes it different from other hot sauces.
Made with 100% natural mild chiles, lime juice and sea salt without added sugars or coloring, it can be enjoyed by the whole family as a versatile way to enhance favorite foods with a mild but wild flavor.
Both recipes can be easily enhanced with a simple concept: just pair Tajín Clásico seasoning with either or both of the sauces to create unique flavor combinations, a tasty “mix it” tactic to add to your warm-weather menu and make it uniquely yours.
Find more recipes that crank up the heat this summer by visiting Tajín.com/us.
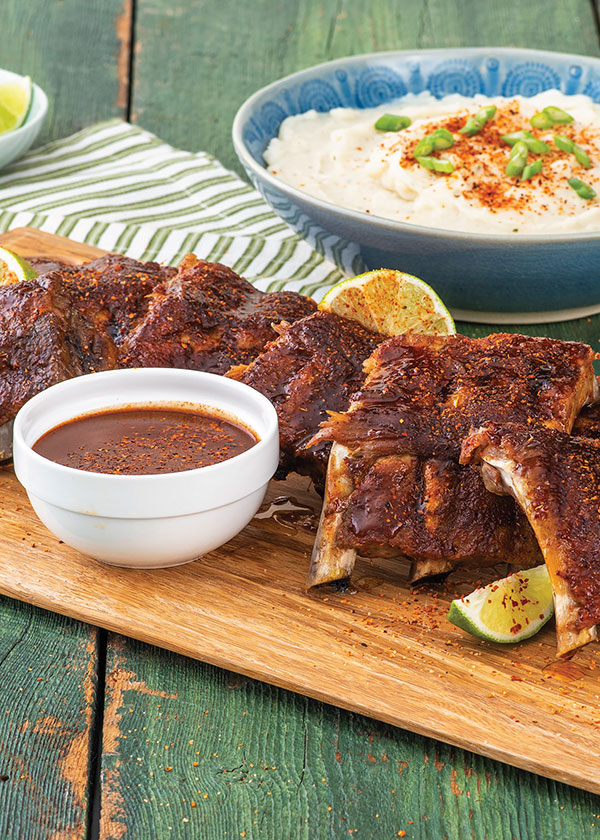
Spiced Pork Ribs
Total time: 3 hours, 10 minutes
Servings: 6
- 2 racks (about 4 pounds) baby back ribs
- 1/4 cup Tajín Clásíco Seasoning
- 1/4 cup Tajín Mild Hot Sauce, plus additional for serving, divided
- 2 tablespoons olive oil
- 2 tablespoons brown sugar
- lime wedges, for serving
- mashed potatoes or steamed rice, for serving (optional)
- Rub ribs with seasoning. Marinate at least 4 hours or overnight in refrigerator.
- Preheat oven to 300 F. Combine hot sauce, oil and brown sugar; brush over both rib racks.
- Line baking sheet with double layer of aluminum foil with enough overhang to wrap foil around ribs.
- Lay ribs, bone side down, on foil-lined baking sheet. Wrap foil around ribs and seal. Place on baking sheet.
- Fill large baking dish or roasting pan with 2 inches of boiling water. Place on lower oven rack to keep ribs moist as they bake. Place ribs on middle oven rack.
- Bake 2 1/2-3 hours, or until meat is tender and just starting to fall off bone.
- Preheat broiler. Unwrap ribs and place on foil-lined baking sheet. Broil 4-6 minutes on middle oven rack, or until lightly charred and caramelized.
- Serve with lime wedges and additional hot sauce.
- Serve with mashed potatoes or steamed white rice, if desired.

Savory Mango Chamoy Daquiri
Total time: 15 minutes
Servings: 2
Rim Glass:
- 2 tablespoons Tajín Fruity Chamoy Hot Sauce
- 2 tablespoons Tajín Clásico Seasoning
Drink:
- 4 tablespoons Tajín Fruity Chamoy Hot Sauce, divided
- 1 cup frozen mango cubes, plus additional for garnish, divided
- 1/3 cup natural syrup
- 3 ice cubes
- 1/3 cup orange juice
- 1 tablespoon Tajín Clásico Seasoning, for garnish
- To rim glass: Rim glass in chamoy hot sauce then seasoning.
- To make drink: Blend 3 tablespoons chamoy hot sauce, mango cubes, syrup, ice cubes and orange juice.
- In glass, pour remaining chamoy hot sauce.
- To serve, garnish with additional mango cubes and sprinkle with seasoning.
Source: Tajín

Vegan Brownies
(Family Features) The next time a healthy conscience keeps you from enjoying that sweet treat you’re craving, remember that making healthy swaps is all it takes to make those favorite desserts a little better for you.
These Vegan Brownies, for example, are perfect for chocolate lovers looking for a sweet they can enjoy without ditching healthy eating habits. By using versatile California Prunes as a natural sweetener, you can replace processed sugar, fats and eggs in all kinds of recipes. Plus, prunes also add nutrients important for bone and gut health to your everyday diet.
With copper that aids in bone structure along with boron and polyphenols that help with the regulation of bone building and bone breakdown, you can feel good enjoying your family’s favorites while staying on track with health goals. Prunes are also known as a “good gut food,” meaning a single serving (4-5 prunes) can help support a healthy microbiome. High in vitamin K, they can also help improve calcium balance and promote bone mineralization.
Visit californiaprunes.org to find more delicious, better-for-you desserts.
Watch video to see how to make this recipe!
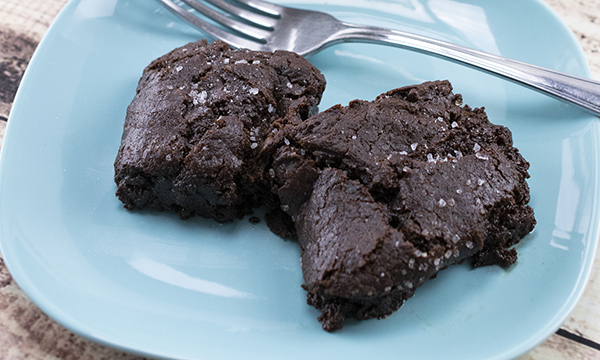
Vegan Brownies
Prep time: 10 minutes
Cook time: 25 minutes
Servings: 9
Prune Puree:
- 16 ounces pitted California prunes
- 1/2 cup hot water
Brownies:
- 2 teaspoons vanilla extract
- 1/4 cup cocoa powder
- 1 tablespoon baking powder
- 1 1/2 cups all-purpose flour
- 10 ounces California prune puree
- 2 cups light brown sugar
- 1/2 cup California extra-virgin olive oil
- 6 ounces unsweetened chocolate
- nonstick cooking spray
- flaky sea salt, for garnish
- To make prune puree: In blender, combine prunes and water. Pulse to combine then blend until smooth, pourable consistency forms, scraping sides, if necessary.
- Store puree in airtight container in fridge up to 4 weeks.
- To make brownies: Preheat oven to 350 F. Line 9-by-9-inch baking pan with parchment paper then lightly grease with nonstick cooking spray.
- Using double boiler, melt chocolate and olive oil. Whisk in sugar and prune puree; mix until dissolved.
- Into large bowl, sift flour, baking powder and cocoa powder. Gently fold in chocolate and prune mixture then add vanilla.
- Spread batter in prepared pan, sprinkle with flaky sea salt and bake 20-25 minutes, or until top starts to look dry and brownies are just beginning to pull away from sides of pan.
- Cool in pan. Remove then cut brownies into 3-inch squares.
Source: California Prunes

Sweet Ideas for Celebrating Parents All Year Round
(Family Features) Regardless of the occasion, any excuse to celebrate moms and dads is a worthy one. From birthdays and holidays to regular weekends at home, one of the best gifts you can give them is time spent together.
The entire family – including little ones – can get involved when the celebration calls for easy yet delicious recipes. Start a day of celebrating on a high note with these Apple Cinnamon Waffles for a sweet breakfast in bed. As the day goes on, keep everyone energized with Apple, Peanut Butter and Honey Sandwiches or Apple Berry Salsa served with chips, apples or graham crackers. Finally, as the day winds to a close, finish off the festivities with Apple Blondie Cupcakes for one last reminder of how much Mom and Dad mean to you.
These recipes and more family-friendly breakfast, lunch, dinner, dessert and snack ideas are enhanced by the satisfying texture and taste of Envy Apples for a consistently balanced, refreshing sweetness coupled with crisp, elegant crunch. Easy to spot by their large, sharable size and crimson red skin that sometimes features a golden blush, they offer a fresh flavor perfect for snacking.
Try serving them as a tasty snack next time your loved ones gather for time together to watch an exciting family-friendly show like “Strawberry Shortcake.” Enjoy seasonal stories about her and her pals discovering hidden treasures while on vacation, encountering mysterious monsters and tangling with out-of-control spring flowers as she’s ready to “bake the world to a better place” all year round.
Visit EnvyApple.com to find more recipes the entire family can enjoy together.
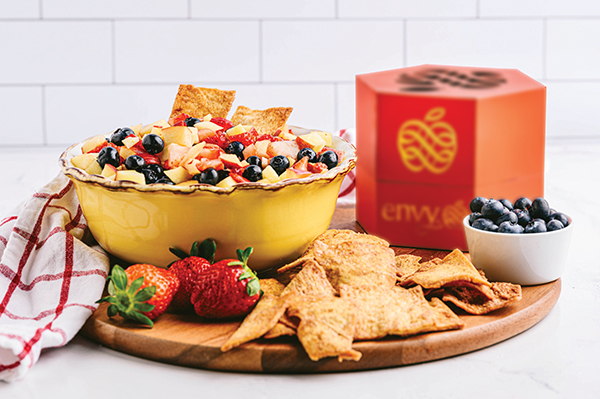
Apple Berry Salsa
Prep time: 15 minutes
Servings: 4-6
- 2 Envy Apples, cored and chopped
- 1 pound strawberries, hulled and chopped
- 1 pint blueberries
- 1/2 teaspoon kosher salt
- 2 tablespoons honey
- 2 tablespoons fresh lime juice
- tortilla chips, pita chips, apple chips or graham crackers, for serving
- In medium bowl, combine apples, strawberries, blueberries and salt.
- In small bowl, whisk honey and lime juice. Pour honey and lime juice over fruit mixture. Stir together to combine.
- Serve immediately with tortilla chips, pita chips, apple chips or graham crackers, or refrigerate until ready to serve.
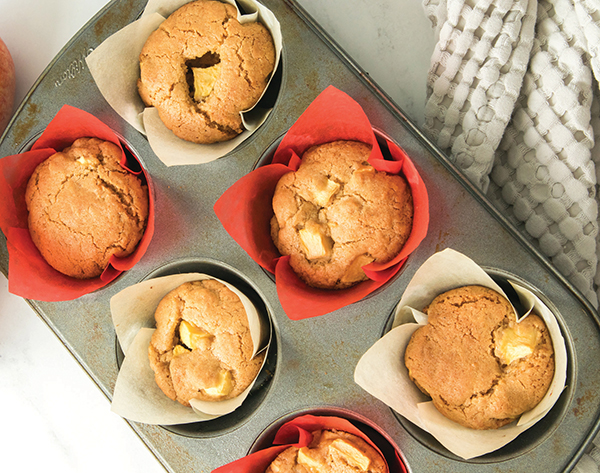
Apple Blondie Cupcakes
Prep time: 15 minutes
Cook time: 20 minutes
Servings: 12
- 1 1/4 cups all-purpose flour
- 1/2 teaspoon baking powder
- 1/2 teaspoon kosher salt
- 1/2 teaspoon cinnamon
- 1/4 teaspoon nutmeg
- 1/2 cup unsalted butter (1 stick), melted and cooled
- 1 cup light brown sugar, packed
- 1 teaspoon vanilla extract
- 1 large egg, at room temperature
- 2 Envy Apples, peeled, cored and 1/4-inch diced
- Preheat oven to 350 F. Line 12-count muffin pan with cupcake liners and set aside.
- In medium bowl, whisk flour, baking powder, salt, cinnamon and nutmeg.
- In large bowl, whisk butter and brown sugar 2 minutes, or until well combined. Add vanilla and egg; whisk until incorporated.
- Add flour mixture to large bowl of wet ingredients. Stir until just combined; be careful to not overmix.
- Fold in diced apples.
- Spoon batter evenly into cupcake liners.
- Bake 18-22 minutes, or until toothpick inserted into center of cupcake comes out clean. Let cool and serve.
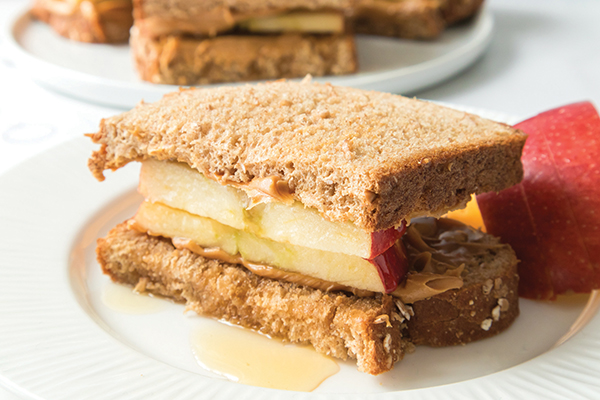
Apple, Peanut Butter and Honey Sandwiches
Prep time: 5 minutes
Servings: 2 (1 sandwich per serving)
- 1 Envy Apple
- 6 tablespoons peanut butter
- 4 slices of bread
- 2 tablespoons honey
- Core apple and thinly slice.
- Spread 3 tablespoons peanut butter on two slices of bread, reserving two slices of bread for sandwich tops.
- Layer apple slices on top of peanut butter.
- Drizzle 1 tablespoon honey over apple slices on each sandwich half.
- Top each sandwich half with reserved slice of bread.
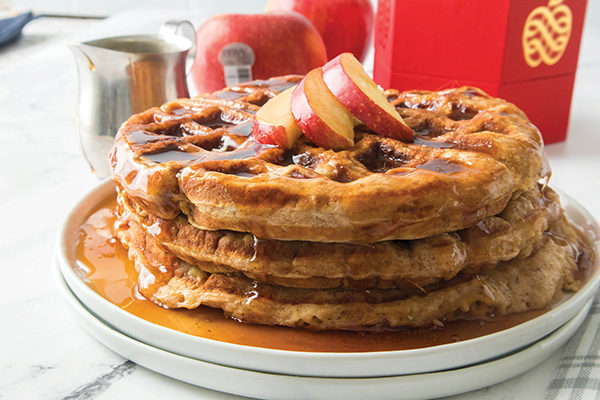
Apple Cinnamon Waffles
Prep time: 5 minutes
Cook time: 5 minutes
Servings: 4
- 1 cup all-purpose flour
- 1/2 teaspoon kosher salt
- 1 teaspoon cinnamon
- 2 teaspoons baking powder
- 2 tablespoons brown sugar
- 2 eggs
- 1 cup milk
- 4 tablespoons unsalted butter (1/2 stick), melted
- 1 Envy Apple, peeled and cored
- nonstick cooking spray
- 4 tablespoons unsalted butter (1/2 stick), at room temperature
- maple syrup, to taste
- In large bowl, whisk flour, salt, cinnamon, baking powder and brown sugar.
- In smaller bowl, whisk eggs, milk and melted butter.
- Make well in dry ingredients then mix in wet ingredient mixture until just combined.
- Using cheese grater, grate apple. Fold grated apple into batter.
- Prepare waffle iron with nonstick cooking spray.
- Ladle 1/4 of batter mixture into waffle iron and cook according to manufacturer's instructions. Repeat with remaining batter.
- Top each waffle with 1 tablespoon room temperature butter and maple syrup, to taste.
Source: Envy Apples

Better, Healthier Baking
(Family Features) Olive oil is a flavorful and versatile cooking oil that is often trusted in popular cooking methods such as sauteing, stir-frying, dressing, marinating and grilling. It can also earn your trust when it comes to baking.
With seven olive oil varieties to fit almost any need, each Filippo Berio olive oil has its own distinct color, aroma and flavor characteristics. Among those seven, the Extra Light Olive Oil offers a delicate aroma and subtle flavor that can complement your favorite baked goods. Its high smoke point helps keep those goodies moist, and with strong flavors like chocolate, it also lets the sweetness come through.
Additionally, it provides high levels of mono-unsaturated fat (“good” fat) and low levels of saturated fat (“bad” fat), making it a more nutritional choice when compared to butter or margarine. Because you need less olive oil than butter in baking, you’ll save calories as well.
One easy way to incorporate olive oil in your baked goods is during the prep work: where recipes call for buttering or flouring pans, instead brush the pan with olive oil and dust with flour for the same effect as butter.
Avoid Olive Oil Enemies
Maintain olive oil’s flavor and quality by avoiding exposure to heat, light and air. Be sure to store olive oil in a cool, dark place and not over or near the oven.
Explore more tips and recipes using olive oil at filippoberio.com.
Dark Chocolate Souffle
Prep time: 10 minutes
Cook time: 18 minutes
Servings: 2
- 1/2 tablespoon Filippo Berio Extra Light Olive Oil, plus additional for coating pan
- 1/4 cup granulated sugar, plus additional for coating pan
- 4 ounces 70 percent cocoa dark chocolate
- 1 ounce 30 percent heavy cream
- 3 egg whites
- 2 egg yolks
- pinch of cream of tartar
- Heat oven to 375° F. Grease two 6-ounce ramekins with olive oil and dust with sugar.
- In double boiler, melt chocolate, 1/2 tablespoon olive oil and cream; let cool. Using electric mixer, beat egg whites until soft peaks form.
- Whisk egg yolks into cooled chocolate mixture; fold in egg whites, 1/4 cup sugar and cream of tartar. Pour into prepared ramekins; bake 15 minutes.
Tips: This recipe can be easily doubled. Garnish with fresh berries, if desired.
Double-Chocolate Olive Oil Cake with Salted Chocolate Caramel Icing
Recipe courtesy of Chef Sharon Sanders
Prep time: 15 minutes
Cook time: 35 minutes
Servings: 8-10
- 1/2 cup, plus 2 tablespoons, Filippo Berio Extra Light Olive Oil, divided, plus additional for coating pan
- 1 cup all-purpose flour
- 1 cup granulated sugar
- 1/4 cup unsweetened cocoa
- 1/2 teaspoon baking powder
- 1/4 teaspoon baking soda
- 1/4 teaspoon table salt
- 1/2 cup half-and-half
- 1 teaspoon pure vanilla extract
- 1 large egg, lightly beaten
- 1/4 cup, plus 1/3 cup, mini dark chocolate chips, divided
- 1 cup canned dulce de leche
- flaky sea salt (optional)
- Position rack in center of oven and heat to 350° F. Lightly coat 9-inch round cake pan with olive oil and line bottom with parchment paper. Lightly coat parchment with olive oil.
- In large mixing bowl, combine flour, sugar, cocoa, baking powder, baking soda and salt. Stir in half-and-half, 1/2 cup olive oil and vanilla. With electric mixer, beat in egg until well blended. Scrape batter into prepared cake pan and sprinkle top with 1/4 cup mini chips.
- Bake cake 25-30 minutes, or until toothpick inserted into center comes out clean. Place cake on cooling rack 10 minutes then turn cake out onto rack and let cool completely.
- In medium saucepan, heat dulce de leche over medium heat, stirring occasionally, until softened. Add remaining olive oil and chocolate chips and stir until chocolate has melted and mixture is smooth. Remove pan from heat.
- Transfer cake to serving plate. Pour icing over cooled cake, sprinkle with flaky salt, if desired, and serve.

Double-Chocolate Biscotti
Prep time: 30 minutes
Cook time: 25 minutes
Servings: 40
- 3 cups all-purpose flour
- 1/2 cup cocoa powder
- 1 1/2 teaspoons baking powder
- 1/4 teaspoon ground cinnamon
- 1/4 teaspoon salt
- 1/2 cup Filippo Berio Extra Light Olive Oil, plus 1 tablespoon for coating pans
- 1 cup packed light brown sugar
- 2 eggs, plus 1 egg yolk
- 1/3 cup milk
- 1 tablespoon balsamic vinegar
- 1 cup semisweet or bittersweet chocolate morsels
- On sheet of waxed paper, combine flour, cocoa powder, baking powder, cinnamon and salt; set aside.
- Using electric mixer, beat olive oil with sugar until smooth and light. Add eggs and egg yolk, one at a time, beating until smooth. Add milk and vinegar; beat until smooth. With mixer on low speed, gradually add flour mixture, beating until just combined. Stir in chocolate morsels with large spoon; cover with plastic wrap. Refrigerate at least 4 hours.
- Heat oven to 325° F. Grease two large baking sheets with 1/2 tablespoon olive oil each. On lightly floured surface, divide dough into quarters. Roll each piece of dough into log, about 1 1/2 inches in diameter. Place logs on baking sheets, leaving space in between. Bake about 30 minutes, or until golden and set. Transfer to rack; let cool 10 minutes.
- Reduce oven temperature to 300° F. On cutting board using serrated knife, cut each log into 3/4-inch-wide slices diagonally. Place slices, cut-side down, on baking sheets. Bake 15-18 minutes, or until toasted. Transfer to racks; let cool.
Source: Filippo Berio

Entertaining with Ease
Impress guests with elegant appetizers
(Family Features) Bringing an element of elegance to your holiday celebration is easy when you start with party-pleasing ingredients, and great tasting food often starts with dairy. Foods like milk, cheese and yogurt not only enhance the flavor and texture of dishes everyone loves, but they also add high-quality nutrients to support the health and wellbeing of your guests.
Each of these recipes features a different variety of cheese as the essential ingredient for success. These decadent, elegant apps, which can be prepared in minutes, are sure to be party favorites. Find more ideas for serving up an elegant, yet simple menu your guests will love at MilkMeansMore.org.

Holiday Baked Brie
Recipe created by Foxes Love Lemons on behalf of United Dairy Industry of Michigan
Prep time: 10 minutes
Cook time: 14 minutes
Servings: 8
- 2 tablespoons unsalted butter
- 8 ounces button mushrooms, sliced
- kosher salt
- ground black pepper
- 1 Brie round (8 ounces)
- 3 tablespoons honey
- 1/4 cup pomegranate arils
- 1/4 cup shelled pistachios
- crackers or toasted bread
- Heat oven to 350° F.
- In large skillet, heat butter over medium-high heat. Add mushrooms; cook 8-10 minutes, or until deep golden brown, stirring frequently. Season with salt and pepper; remove from heat.
- Place Brie on parchment paper-lined rimmed baking pan; drizzle with honey. Transfer to oven and bake 5-7 minutes, or until inside of cheese is softened, but outside remains intact.
- Transfer Brie to serving platter; top with pomegranate arils, pistachios and mushrooms. Serve immediately with crackers or bread.

Butternut Squash Queso Dip
Recipe created by Rachel Cooks on behalf of Milk Means More
Prep time: 5 minutes
Cook time: 15 minutes
Servings: 10
- 12 ounces butternut squash puree, frozen
- 1 teaspoon extra-virgin olive oil
- 1/2 finely diced red onion
- 1 clove garlic, minced
- 1 can (10 ounces) petite diced tomatoes and green chiles
- 1/2 teaspoon ground cumin
- 1/2 teaspoon chili powder
- 8 ounces Monterey Jack cheese, shredded
- Place unwrapped squash in microwave safe bowl and heat in microwave 5 minutes at 50 percent power, or until thawed.
- In large saucepan, heat oil over medium heat. Add onion and cook 4-5 minutes, or until translucent. Add garlic and cook 1 minute, or until fragrant.
- Add squash, tomatoes, cumin and chili powder, and bring to boil over medium-high heat.
- Reduce heat to low and add cheese. Stir until melted and serve immediately.

Parmesan Crisps with Basil and Sun-Dried Tomato
Recipe created by Art From My Table on behalf of Milk Means More
Prep time: 10 minutes
Cook time: 15 minutes
Servings: 8
- 6 ounces shredded Parmesan cheese
- 1/2 cup balsamic vinegar
- 2 tablespoons sugar
- 8 basil leaves
- 8 sun-dried tomatoes, jarred
- Heat oven to 375° F.
- On baking sheet, make eight flat circles out of 1 1/2 tablespoons cheese each. Bake cheese 5 minutes, or until just beginning to turn golden.
- Using metal spatula, remove crisps from pan immediately, placing on rack or plate to cool.
- Place vinegar and sugar in small saucepan and boil until mixture is reduced to about 1/4 cup and is thickened.
- Top each crisp with 1 fresh basil leaf and 1 sun-dried tomato. Drizzle balsamic reduction over top.

Spinach and Artichoke Stuffed Mushroom Caps
Recipe created by The Lemon Bowl on behalf of Milk Means More
Prep time: 20 minutes
Cook time: 25 minutes
Servings: 24
- 24 large mushrooms, stemmed and reserved
- 1 tablespoon olive oil
- 1 clove garlic, grated
- 1 teaspoon salt
- 1/2 teaspoon black pepper
- 2 cups chopped frozen spinach, thawed and drained
- 1 can artichoke hearts, roughly chopped
- 2 cups crumbled feta cheese
- 1/2 cup minced onion
- 1 pinch chili flakes
- 1 pinch minced scallions
- Heat oven to 350° F and place mushroom caps in single layer on baking sheet lined with foil.
- Mince reserved mushroom stems and heat olive oil in large saute pan over medium-high heat. Add garlic and mushroom stems to pan along with salt and pepper. Saute 2-3 minutes, or until mushrooms are softened. Add spinach and artichoke hearts to pan and cook until heated through, about 3-4 minutes. Remove from heat and place mixture in large mixing bowl. Stir in feta cheese and onion. Adjust seasoning, to taste.
- Using small cookie scoop, add 2 tablespoons filling to each mushroom cap. Bake mushrooms 20-25 minutes, or until mushroom caps are softened. Sprinkle with chili flakes and minced scallions to serve.
Source: United Dairy Industry of Michigan

Decadent Treat-Filled Desserts

(Family Features) Creating one-of-a-kind desserts doesn’t have to take hours in the kitchen or even exceptional baking skills. With a little imagination and the right tools, you can whip up surprisingly delicious sweets that will surprise and delight your friends and family.
Focus on flavor
If your baking repertoire typically consists of white cake and chocolate frosting, spice things up a bit by experimenting with new fillings and flavor combinations. Opt for complementary or contrasting tastes for a truly delectable dessert. For example, pair fudgy chocolate cake with tangy berries, or see how a bold flavor like lemon adds a new dimension to a mild vanilla.
Add a special touch
Infusing new flavors into your favorite cake or brownie recipe is surprisingly easy when you use bakeware made for the purpose. Baker’s Advantage Fillables Bakeware helps home bakers easily create “treat-filled” desserts. Each bakeware set comes with two pans: One pan creates the bottom half of the cake and forms indentations in the cake you can fill with fruit, puddings, candy and more, while the second pan creates the top half of the cake, which hides the surprise fillings.
Shape it up
Artfully applied frosting and other decorations can instantly dress up a basic cake, but another option is upgrading the shape of the cake itself. In addition to traditional square, round and sheet cake pans, the Baker’s Advantage Fillables Bakeware collection includes mini heart cakes, fluted cakes, mini loaf cakes and a cake cones pan. These special shapes make it easy to create enviable desserts out of classic recipes.
Bake In the Fun
Making a cake with a treat hidden inside is as easy as 1-2-3 with Fillables Bakeware from Baker’s Advantage. Because the bakeware does all of the work for you, there are no special baking skills required; just pour in the batter and bake. Then, fill the pockets in the cake with any treat you like and spread icing to cover the surprise. Next, add the top cake layer, ice the whole cake, slice and serve.
Find more surprisingly easy dessert ideas at FillablesbyBakersAdvantage.com.

Brownie Cake Cones
Recipe courtesy of Baker’s Advantage/Alissa Wallers
- 3 ounces unsweetened chocolate
- 2 sticks butter
- 1/2 cup cocoa powder
- 2 1/2 cups sugar
- 3 eggs
- 1 tablespoon vanilla extract
- 1 1/2 cups flour
- 1/2 teaspoon salt
- 2 teaspoons baking powder
- nonstick cooking spray
- Vanilla Frosting (recipe below) or ice cream
- Heat oven to 350° F.
- In double boiler, melt chocolate and butter.
When melted, place in large bowl and whisk in cocoa powder until smooth. Add sugar and mix. - Combine eggs and vanilla; gently mix with fork or whisk to break up eggs. Add eggs and vanilla to batter.
- Sift together flour, salt and baking powder. Fold in flour until just combined.
- Spray Fillables 8 Cup Cake Cone Pan with nonstick cooking spray. Fill bottom pan with batter to line in middle of pan then place insert on top and snap together.
- Place on middle of rack in oven and bake 15-18 minutes. Allow to cool before removing from pan.
Filling suggestions:
• Graham crackers, chocolate chips and marshmallows
• Whipped cream and berries
• Ice cream or pudding
- Add fillings inside cone, top with Vanilla Frosting or ice cream, and serve.
Vanilla Frosting
Recipe courtesy of Baker’s Advantage/Alissa Wallers
- 3 sticks butter, unsalted and at room temperature
- 6 cups powdered sugar
- 2 teaspoons vanilla extract
- 1/2 teaspoon salt
- 1/4 cup heavy cream
- Using handheld or stand mixer, cream butter on high, about 3 minutes.
- Add powdered sugar 1/2 cup at a time, mixing on medium between each addition.
- Scrape bowl well. Add remaining ingredients; mix on low until incorporated.
- Turn mixer to high and beat frosting until light and fluffy, about 5 minutes.
- Use immediately or store in airtight container in refrigerator.
Note: Frosting must be at room temperature prior to using.

Berries and Cream Fluted Pound Cake
Recipe courtesy of Baker’s Advantage/Alissa Wallers
- 4 sticks butter, room temperature
- 3 cups sugar
- 6 eggs
- 4 teaspoons vanilla extract
- 3 1/2 cups flour
- 2 teaspoons baking powder
- 1 teaspoon salt
- 1/2 cup milk, at room temperature
- nonstick cooking spray
- Heat oven to 350° F.
- With stand or handheld mixer, cream butter and sugar until light and fluffy. Add eggs one at a time, scraping between each egg. Add vanilla extract.
- Sift flour, baking powder and salt together. Add flour mixture to mixing bowl and slowly add milk while mixing. Mix until just combined.
- Spray Fillables Fluted Cake Pan with nonstick cooking spray. Fill bottom of both pans with batter to three-quarters full.
- Bake on middle rack in oven 20-25 minutes. Allow to cool before removing from pan.
Filling suggestions:
• Blueberries, plus additional for topping
• Raspberries, plus additional for topping
• Strawberries, stem removed and cut into small pieces, plus additional for topping
• Vanilla Frosting (recipe below)
- Fill pockets in bottom layer of pound cake with different berries.
- Carefully spread Vanilla Frosting over top of berries and cake.
- Place top layer of cake on top of frosting.
- Drizzle warmed up Vanilla Frosting over top of cake.
- Decorate top with berries.
Vanilla Frosting
Recipe courtesy of Baker’s Advantage/Alissa Wallers
- 3 sticks butter, unsalted and at room temperature
- 6 cups powdered sugar
- 2 teaspoons vanilla extract
- 1/2 teaspoon salt
- 1/4 cup heavy cream
- Using handheld or stand mixer, cream butter on high, about 3 minutes.
- Add powdered sugar 1/2 cup at a time, mixing on medium between each addition.
- Scrape bowl well. Add remaining ingredients; mix on low until incorporated.
- Turn mixer to high and beat frosting until light and fluffy, about 5 minutes.
- Use immediately or store in airtight container in refrigerator.
Note: Frosting must be at room temperature prior to using.
Source: Lifetime Brands

Sweet Shortcuts
Easy ideas for award-winning desserts
(Family Features) No matter the season or the reason, no party is complete without dessert. The trick to making the most out of your celebrations is finding ways to trim your kitchen time so you can enjoy the festivities, without sacrificing quality or flavor in your favorite sweet treats.
Many dessert recipes require multiple time-consuming steps, but using canned fruit can help cut down on prep work and provide you and your guests with a refreshing, delicious treat.
Fresh fruits are popular ingredients for desserts, but it can be difficult to know whether you’re choosing a ripe, sweet fruit. For example, pineapples have several potential indicators of ripeness, such as a sweet smell coming from the bottom of the fruit, the rind yielding slightly to pressure or a yellow, golden color rising toward the crown. An alternative such as Dole Canned Pineapple lets you know you’re getting pineapple that is at its sweetest, because the canning process locks in flavor when the fruit is perfectly ripe.
In addition to baked recipes, canned fruit is also well-suited for other desserts, such as fruit salads, baked muffins and breads, or even as a dessert topping. Whether you’re creating a blue ribbon recipe for a local competition – such as one of the most famous award-winning desserts, Pineapple Upside Down Cake – or delivering a delicious dessert to the family table, Dole Canned Fruit is the perfect ingredient.
Find more tips for your next gathering from the expert chefs at Dole Packaged Foods’ test kitchen at dolesunshine.com.

Old-Fashioned Upside Down Cake
Prep time: 20 minutes
Total time: 35 minutes
Servings: 8
- 2/3 cup margarine, divided
- 2/3 cup packed brown sugar, divided
- 1 can (20 ounces) Dole Pineapple Slices
- 10 maraschino cherries
- 3/4 cup granulated sugar, divided
- 2 eggs, separated
- 1 teaspoon grated lemon peel
- 1 teaspoon lemon juice
- 1 teaspoon vanilla extract
- 1 1/2 cups all-purpose flour
- 1 3/4 teaspoons baking powder
- 1/4 teaspoon salt
- 1/2 cup sour cream
- Heat oven to 350° F.
- In 10-inch cast-iron skillet, melt 1/3 cup margarine. Remove from heat. Add brown sugar and stir until blended.
- Drain pineapple slices; reserve 2 tablespoons syrup. Arrange pineapple slices in sugar mixture. Place cherry in center of each slice.
- Beat remaining 1/3 cup margarine with 1/2 cup granulated sugar until light and fluffy. Beat in egg yolks, lemon peel, lemon juice and vanilla. Combine flour, baking powder and salt. Blend into creamed mixture alternately with sour cream and reserved pineapple syrup.
- Beat egg whites to soft peaks. Gradually beat in remaining 1/4 cup granulated sugar to make stiff meringue. Fold into batter. Pour over pineapple in skillet.
- Bake 35 minutes, or until toothpick inserted comes out clean. Let stand 10 minutes then invert onto serving plate. Serve warm or cold.

Chocolate Mandarin Orange Cake
Prep time: 10 minutes
Total time: 45 minutes
Servings: 12
- 2 cans (15 ounces) Dole Mandarin Oranges, divided
- 1 box (2 layer) devil’s food cake mix
- 3 eggs
- 1/2 cup vegetable oil
- 1 orange, peel grated (optional)
- 1 package (4-serving size) vanilla flavor instant pudding
- 2 cups frozen whipped topping, thawed
- 1 cup heavy whipping cream
- 1 cup semisweet chocolate
- Heat oven to 350° F. Spray two (9-inch) cake pans with cooking spray. Drain mandarin oranges, keeping fruit and syrup reserved separately.
- In large bowl, combine cake mix, juice from one can of mandarin oranges, eggs, oil and orange peel; beat 2 minutes.
- Pour cake mix into prepared pans. Layer mandarin oranges from one can over each cake and gently submerge them into cake batter.
- Bake 25-30 minutes, or until toothpick inserted in center comes out clean. Cool in pan 10 minutes. Remove from pan onto wire rack; cool completely.
- Pour 1/2 cup reserved juice from second can of oranges in bowl with pudding mix; whisk 2 minutes, or until pudding mix is completely dissolved. Remove 12 orange slices from second can and dry with paper towel; set aside. Fold in whipped topping and remaining mandarin oranges. Spread mandarin frosting on top of first layer of cake and out to edges. Place second layer on top of first layer.
- In small saucepan, heat cream until just beginning to steam, but do not boil. Remove from stove and stir in chocolate. Stir until well-blended. Pour chocolate mixture over cake and garnish with reserved mandarin oranges. Refrigerate half hour before serving.

Fabulous Carrot Cake
Prep time: 15 minutes
Total time: 40 minutes
Servings: 16
- 1 1/2 cups butter, softened, divided
- 1 cup packed brown sugar
- 1 cup granulated sugar
- 4 eggs
- 1 can (20 ounces) Dole Crushed Pineapple, drained
- 4 cups shredded carrots
- 1 cup Dole Seedless Raisins
- 2 teaspoons vanilla extract
- 3 cups all-purpose flour
- 2 teaspoons baking soda
- 1 teaspoon ground cinnamon
- 1 teaspoon ground ginger
- 1/2 teaspoon salt
- 1 package (8 ounces) cream cheese, softened
- 1 1/2 cups powdered sugar
- 1 teaspoon grated lemon peel
- 1 tablespoon lemon juice
- Heat oven to 350° F. Grease and flour two (9-inch) round pans.
- In large bowl, beat 1 cup butter and sugars until light and fluffy. Beat in eggs. Fold in crushed pineapple, carrots, raisins and vanilla.
- In medium bowl, stir together flour, baking soda, cinnamon, ginger and salt. Gradually add to pineapple mixture and fold until well-blended. Pour into prepared pans.
- Bake 35-40 minutes, or until toothpick inserted comes out clean. Cool in pans 15 minutes. Remove from pans; cool completely on wire racks.
- Beat cream cheese with remaining 1/2 cup butter until smooth. Beat in powdered sugar, lemon peel and lemon juice until smooth. Frost completely cooled cake. Garnish with additional crushed pineapple and grated carrots, if desired.
Note: Cake can be baked in 13-by-9-inch pan. Bake 50-60 minutes at 350° F. Cool completely in pan on wire rack.
Source: Dole