
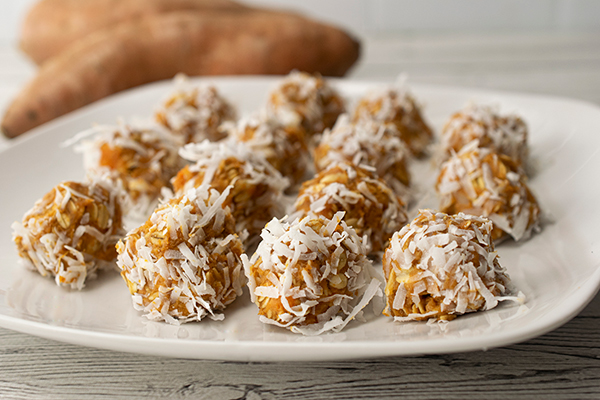
No-Bake SweetPotato Coconut Ginger Energy Bites
(Family Features) Whether you’re a runner, a workout warrior or simply looking for a quick pick-me-up before heading to the office, grab-and-go foods can supply the energy you need for an active day.
Skipping salty snacks and opting for nutritious options can put you ahead of the game. Due to their high carbohydrate content, sweetpotatoes provide a sustaining option both before and after exercise sessions. Plus, with antioxidants that help reduce inflammation and aid in the muscle repair process, they help both your endurance and recovery.
According to the American Diabetes Association, sweetpotatoes are a “diabetes superfood”
because they are rich in vitamins, minerals, antioxidants and fiber, all of which are good for overall health and may help prevent disease. Additionally, they offer a “sweet” flavor without the added sugar.
Another fun fact: the one-word spelling of “sweetpotato” was adopted by the National Sweetpotato Collaborators in 1989 in an effort to avoid confusion with the potato and yam among shippers, distributors, warehouse workers and consumers.
As a versatile veggie that’s easy to add to a multitude of recipes for flavor enhancement and nutritional content, they are a key ingredient in these No-Bake Sweetpotato Coconut Ginger Energy Bites from the North Carolina SweetPotato Commission. It takes just 45 minutes to turn cooked sweetpotatoes into tasty treats for much-needed fuel for breakfast or an afternoon snack.
Find more nutritious recipe ideas at ncsweetpotatoes.com.
Watch video to see how to make this recipe!
No-Bake Sweetpotato Coconut Ginger Energy Bites
Recipe courtesy of Sarah Schlichter, MPH, RDN, on behalf of the North Carolina
SweetPotato Commission
Total time: 45 minutes
Yield: 14 bites (1 bite per serving)
- 1 cup cooked sweetpotato
- 3/4 cup rolled oats
- 1/2 cup peanut butter (or desired nut butter)
- 3 tablespoons honey
- 1/2 teaspoon ground ginger
- 1/2 teaspoon cinnamon
- 1/2 cup unsweetened shredded coconut
- In large bowl, combine sweetpotato, oats, peanut butter, honey, ginger and cinnamon; stir until well combined.
- Refrigerate bowl about 20 minutes to firm.
- Line baking sheet with parchment paper.
- Remove dough and portion into snack-sized bites. Gently roll bites in shredded coconut and refrigerate 15-20 minutes or freeze 10 minutes.
- Remove from refrigerator or freezer and serve.
Nutritional information per serving: 115 calories; 7 g fat (11% daily value); 3 g saturated fat (19% daily value); 1 g polysaturated fat; 2 g monosaturated fat; 49 mg sodium (2% daily value); 129 mg potassium (4% daily value); 11 g carbohydrates (4% daily value); 2 g fiber (8% daily value); 5 g sugar (6% daily value); 3 g protein (6% daily value); 1,348 IU vitamin A (27% daily value); 1 mg vitamin C (1% daily value); 11 mg calcium (1% daily value); 1 mg iron (6% daily value); 9 g net carbohydrates.

Add Grapes to Your Holiday Gatherings
(Family Features) Add a special touch this holiday season with simple yet stunning small plates that add beauty and flavor to gatherings with friends and family.
Available into January, California grapes offer a way to make the season special as an ingredient in your favorite recipes or as decoration for a festive centerpiece. Pops of red, green and black provide a seasonal touch and they’re perfect as an easy, fresh, healthy snack.
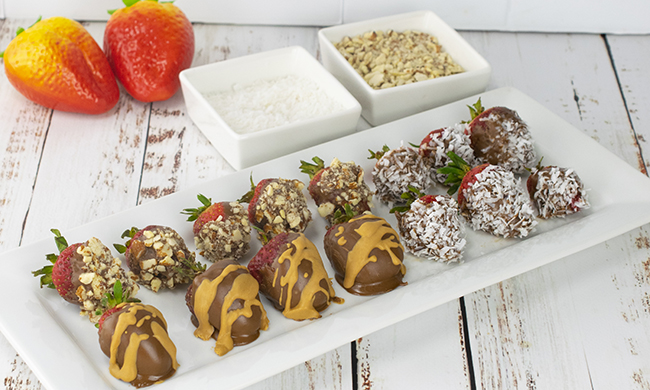
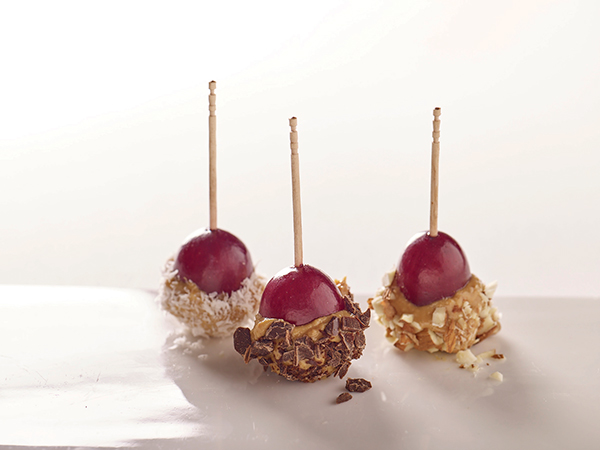
Plus, you can dip grapes in nut butter and finish with coatings of coconut, dark chocolate and almonds to make these Peanut Butter Grape Bites for a holiday treat that’s simply divine – without spending hours in the kitchen.
Visit grapesfromcalifornia.com to find more holiday recipe inspiration.
Watch video to see how to make this recipe!

Peanut Butter Grape Bites
Prep time: 10 minutes
Cook time: 5 minutes
Yield: 12 pieces
12 California grapes, chilled
1/3 cup natural peanut or almond butter
1/4 cup shredded coconut
1/4 cup chopped dark chocolate
1/4 cup chopped almonds
Place sheet of wax paper on baking sheet. Dip each grape in nut butter to coat half then dip in either coconut, dark chocolate or chopped almonds. Transfer to sheet then chill until ready to serve.
Nutritional analysis per serving: 70 calories; 2 g protein; 4 g carbohydrates; 5 g fat (64% calories from fat); 1.5 g saturated fat (19% calories from saturated fat); 0 mg cholesterol; 25 mg sodium; 1 g fiber.

A Show-Stopping Strawberry Snack
(Culinary.net) When you are craving something sweet, sometimes you just can’t get it off your mind until you have just one bite. You need something small, delicious and something that will ease your cravings. This recipe for Chocolate Coated Strawberry Treats is not only fun to make, but will give you that perfect little snack you have been longing for.
The recipe begins with fresh strawberries and ends with a drizzle of mouthwatering peanut butter sauce. This is a great recipe for little ones looking to help out in the kitchen. These strawberries are fun to dip and even more enjoyable to devour.
This snack can also be perfect for date night, a romantic date or just a picnic in the park with friends. They are easy to transport from place to place and don’t leave a huge mess behind to clean up afterwards.
It’s also simple to just melt, whisk, dip and repeat. The red, ripe berries are bursting with color and the chocolate is glazed right across the top for the perfect bite.
The best part is you can be creative and dip these strawberries into a number of your favorite ingredients you already have in your pantry at home. This includes, sprinkles, small candies, white chocolate drizzle and different kinds of nuts. The possibilities are endless.
Next time you can’t get chocolate off your mind, enjoy something delightful, rich and a show-stopping snack.
Find more snack recipes at Culinary.net.
If you made this recipe at home, use #MyCulinaryConnection on your favorite social network to share your work.
Watch video to see how to make this recipe!
Chocolate Coated Strawberry Treats
Servings: 5
- 1 1/4 baking chocolate chips
- 1/2 baking peanut butter chips
- 3 tablespoons coconut oil, divided
- 1 pound fresh strawberries
- shredded coconut
- crushed almonds
- In saucepan, add baking chocolate chips and two tablespoons of coconut oil. Melt on low to medium heat and whisk until smooth.
- In a small bowl, add baking peanut butter chips and 1 tablespoon of coconut oil. Microwave in 30 second intervals until melted. Whisk together until smooth.
- Line a baking sheet with parchment paper.
- Dip all strawberries into melted chocolate. Then, dip 1/3 in coconut, 1/3 in almonds and 1/3 just chocolate and lay on tray.
- Drizzle the melted peanut butter over the plain chocolate strawberries.
- Put in the fridge for at least 30 minutes or until strawberry treats are chilled.
Source: Culinary.net

Energy Bites
Having enough energy and fuel to make it through a long day can be challenging. No matter if you’re a stay-at-home parent, corporate worker or small business owner, having a high energy level that lasts throughout the day is important for both you and those around you.
Having enough energy helps you stay alert and attentive to what is going on around you, whether that’s cleaning up after your little ones or filing a report your boss asked for.
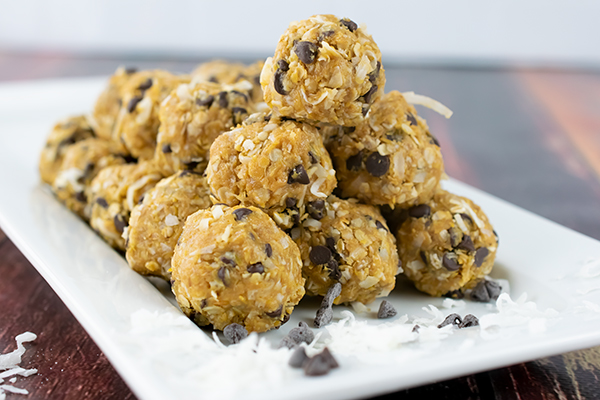
When it comes to snacking during the day, these delicious, mouth-watering Energy Bites can give you the boost you need. They are made with creamy peanut butter and honey to curb your sweet cravings but still provide plenty of texture with shredded coconut and raw oats.
They are a perfect snack time nosh, rolled into simple balls, that can help you finish the task at hand.
Not only can they be that 2 p.m. pick-me-up, they are also simple to make and simply delightful to eat. You can store them in the refrigerator in a container for anytime snacking. Plus, the recipe makes 20 servings, which means it’s easy to prep your snacks for the entire week ahead of time.
Stop settling at snack time for stale crackers or high-calorie dips. Eating something that can make your body feel good and energize you for the rest of the day keeps you prepared for what’s to come.
Find more snack recipes at Culinary.net.
If you made this recipe at home, use #MyCulinaryConnection on your favorite social network to share your work.
Watch video to see how to make this recipe!
Energy Bites
Servings: 20
- 1/2 cup creamy peanut butter
- 1/3 cup honey
- 1 teaspoon vanilla extract
- 1 cup raw oats
- 1/2 cup sweetened shredded coconut
- 1/2 cup flaxseed meal
- 6 tablespoons mini chocolate chips
- In medium mixing bowl, stir peanut butter, honey and vanilla extract until combined.
- Add oats, coconut, flaxseed meal and chocolate chips. Mix until combined.
- Shape into 1-inch balls. Store in airtight container in refrigerator until ready to serve.

Kid-Friendly Brain Food for Busy School Days
(Family Features) Starting a new school year, whether in the classroom or online, brings excitement for kids of all ages. Opportunities to see friends, make new acquaintances and explore new areas of interest abound.
Along with the exciting times can also come early mornings with hectic moments getting ready, including making sure that lunches and snacks are packed for the day ahead. Keep fresh grapes from California on hand as an easy, fresh staple ready to drop into lunches and pack as a portable snack – no need to peel, cut or slice.
Heart-healthy grapes are brain food too, and a healthy choice any time of day to help fuel young minds in the classroom or after school.
Grapes also pair well with other healthy ingredients to create fun and tasty snacks such as these Peanut Butter Grape Bites. Involving your kids in the process can be beneficial, and is as simple as asking them to complete one of several child-friendly tasks: rinsing grapes, measuring ingredients or, perhaps the most fun part, dipping grapes in peanut butter, coconut, dark chocolate or almonds.
Providing children with ways to help in the kitchen can give them a sense of accomplishment while teaching them important skills like math and how to follow instructions.
To find more back-to-school recipes for kids and families, visit GrapesFromCalifornia.com .
Peanut Butter Grape Bites
Prep time: 10 minutes
Bake time: 5 minutes
Yield: 12 pieces
- 12 California grapes, any color, chilled
- 1/3 cup natural peanut or almond butter
- 1/4 cup shredded coconut
- 1/4 cup chopped dark chocolate
- 1/4 cup chopped almonds
- Place wax paper sheet on baking sheet. Dip each grape in peanut butter or almond butter to coat half then dip in either coconut, dark chocolate or almonds, alternating with each grape.
- Transfer grapes to baking sheet then chill until ready to serve.
Nutritional information per serving: 70 calories; 2 g protein; 4 g carbohydrates; 5 g fat (64% calories from fat); 1.5 g saturated fat (19% calories from saturated fat); 0 mg cholesterol; 25 mg sodium; 1 g fiber.

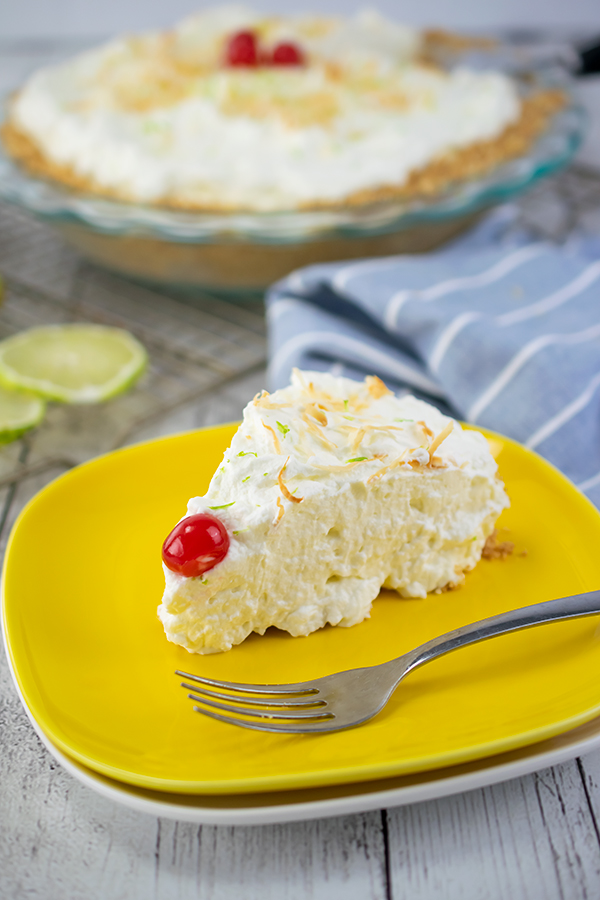
Coconut Key Lime Cream Pie
(Culinary.net) Summer is the time to relax, refresh and indulge in sweet and heavenly treats. While you’re lounging poolside and watching the kids play, enjoy a cool, creamy and absolutely divine dessert that’s perfect on a hot day.
This luscious Coconut Key Lime Cream Pie has a smooth texture with toasted shredded coconut on top. It’s sweet, but not too sweet, and will leave your taste buds wanting more as soon as you take your first bite.
Fresh out of the refrigerator, it’s ideal for everyone to share on those days when it’s just too warm outside to not have a chilled snack.
Also topped with lime zest and maraschino cherries, visually this pie is a winner with fun pops of color that will leave your mouth watering.
To make this cool, creamy creation, add vanilla wafers to a blender to make crumbs. Add melted butter and blend. Add crumb mixture to the bottom of a pie pan and press against the sides. Refrigerate to make crust.
In another large bowl, beat cream cheese, condensed milk and coconut extract.
In a different large bowl, beat whipping cream until it starts to thicken. Add powdered sugar and lime juice. Reserve 1 cup of the whipped topping.
Add lime juice, coconut flakes and the reserved whipped topping to the cream cheese mixture then stir to combine.
Add cream cheese mixture to the pie crust and smooth it out. Top with whipped topping then garnish with toasted coconut, lime zest and maraschino cherries.
It’s the perfect pie to enjoy whether you’re outside enjoying some sunshine or inside, taking a break from the summer fun. After being chilled, all of the flavors combine to leave you with a delicious, one of a kind treat.
Find more summer recipes at Culinary.net.
If you made this recipe at home, use #MyCulinaryConnection on your favorite social network to share your work.
Watch video to see how to make this recipe!
Coconut Key Lime Cream Pie
Servings: 6-8
- 1 package (11 ounces) vanilla wafers
- 1/3 cup butter, melted
- 2 cups heavy whipping cream
- 1/4 cup confectioners’ sugar
- 1/2 cup Key lime juice, divided
- 1 package (8 ounces) cream cheese, softened
- 1 can (14 ounces) sweetened condensed milk
- 1 teaspoon coconut extract
- 1 cup shredded coconut
- 1/4 cup toasted shredded coconut
- lime zest
- maraschino cherries
- In blender, pulse vanilla wafers into crumbs. Add melted butter and pulse until combined. Press crumbs into bottom and up sides of greased 9 1/2-inch deep-dish pie plate. Refrigerate 30 minutes.
- In large bowl, beat whipping cream until it thickens. Add confectioners’ sugar and 1 tablespoon lime juice; beat until stiff peaks form. Remove 1 cup; set aside.
- In separate large bowl, beat cream cheese until smooth. Add sweetened condensed milk and coconut extract; beat until blended. Add remaining lime juice and shredded coconut; stir until combined. Add reserved whipped cream. Stir until combined. Pour into crust.
- Refrigerate 4 hours.
- Before serving, garnish with toasted coconut, lime zest and maraschino cherries.

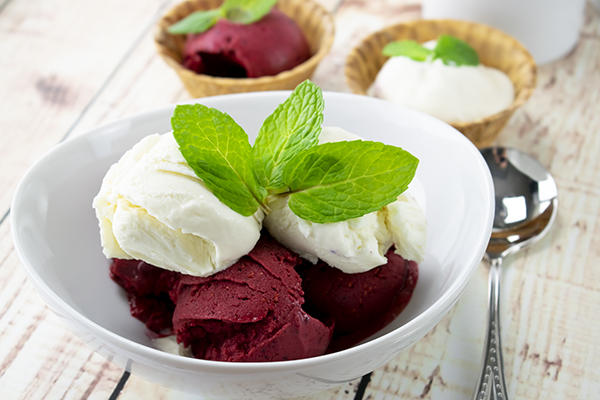
Very Berry and Creamy Coconut Ice cream
Sometimes food can be presented so beautifully, it’s hard to take that first bite. However, once you dig your spoon into the bowl, there is no going back.
Imagine a bite that is chilled, sweet and creamy all at the same time. It’s luscious, fruity and absolutely divine. It’s a summertime ice cream recipe you’ll cherish and make again and again throughout the season.
This delicious Very Berry and Creamy Coconut Ice Cream was created with summertime relaxation in mind. It’s melt-in-your-mouth delicious, especially when it’s made with fresh ingredients right at home for a perfect addition to nearly any poolside event.
This ice cream features the rich tartness of frozen fruit and a sweet creaminess from the coconut milk. The two flavors of ice cream create a unique combination that’s out-of-this-world delicious.
To make the Berry Ice Cream, blend 2 pounds of frozen berries, sweetened condensed milk, honey and salt until smooth then freeze for four hours.
To make the Coconut Ice Cream, beat 2 cups of whipping cream in a mixer until stiff peaks form. In a bowl, combine sweetened condensed milk, coconut milk, salt and 1 cup of the whipped cream. Whisk then add remaining whipped cream and whisk until combined. Place in a dish and freeze for four hours.
Once properly chilled, both ice creams are ready to scoop and serve. Garnish with mint leaves for an extra pop of color, if desired.
Enjoy a delightful treat with your loved ones as you make memories that will last a lifetime. Out in the heat or indoors cooling off, it’s a spoonful of summertime that’s hard to skip.
Find more sweet treats for summer at Culinary.net.
Watch video to see how to make this recipe!
Very Berry and Creamy Coconut Ice Cream
Yield: 11 cups
Berry Ice Cream:
- 2 pounds frozen berries (such as raspberries, blueberries, strawberries and blackberries)
- 1/2 cup sweetened condensed milk
- 1 tablespoon honey
- 1/2 teaspoon salt
Coconut Ice Cream:
- 2 cups heavy whipping cream
- 1/2 cup sweetened condensed milk
- 1/2 cup coconut milk
- 1/2 teaspoon salt
- mint leaves, for garnish (optional)
- To make berry ice cream: In blender, pulse frozen berries, sweetened condensed milk, honey and salt until smooth, scraping down sides.
- Pour mixture into 5-by-9-inch loaf pan. Freeze uncovered 4 hours, or until set.
- To make coconut ice cream: In large mixing bowl, beat whipping cream until stiff peaks form.
- In medium bowl, whisk sweetened condensed milk, coconut milk, salt and 1 cup whipped cream until combined. Add remaining whipped cream and whisk until combined.
- Pour into 5-by-9-inch loaf pan. Freeze uncovered 4 hours, or until set.
- Scoop desired amount of each ice cream into bowls to serve. Garnish with mint leaves, if desired.

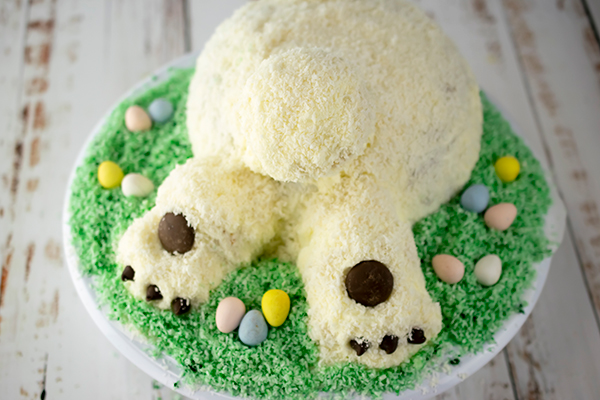
Easter Bunny Butt Cake
Warmer days at the start of spring mean Easter is almost here, and the big bunny himself will be hopping around in no time delivering goodies.
This Easter, celebrate with your loved ones with a delicious and colorful Easter Bunny Butt Cake. It can bring smiles and laughter while putting everyone in a light, joyful mood.
This cake is fun and bright with a fluffy, moist interior. Complete with chocolate candy eggs, shredded coconut and chocolate chips for little bunny toes, this recipe goes all out to paint a picture of the Easter bunny.
Start by combining whole eggs, egg whites, cream of coconut, crushed pineapple, coconut extract and vanilla extract.
In a food processor, pulse flour, sugar, baking powder and salt. Then add butter gradually, 6 tablespoons at a time, for a total of 12 tablespoons.
Add dry mixture to a mixing bowl then add egg mixture half at a time. Beat until cake batter is formed.
Fill muffin tins 2/3 full and bake 18-20 minutes. The remaining batter goes into an oven-safe bowl to bake for 1 hour, 40 minutes.
The buttercream frosting is made with powdered sugar, butter, milk, vanilla extract and coconut extract.
Assemble the cake using pretzel sticks to blend it together to make the bunny butt shape. Frost the cake and spread shredded coconut over it to create a textured appearance. Stick chocolate chips on the bunny’s feet to create toes. Place your favorite Easter or bunny candies around the cake for extra garnish.
This cake is worth every step. It’s delicious and as cute as can be, plus it’s perfect for dessert after a big Easter dinner.
Find more creative and scrumptious holiday recipes at Culinary.net.
Watch video to see how to make this recipe!
Easter Bunny Butt Cake
Servings: 10-12
- Nonstick cooking spray
- 2 eggs, plus 4 egg whites, at room temperature
- 3/4 cup cream of coconut
- 1/2 cup crushed pineapple, drained
- 2 teaspoons coconut extract
- 1 teaspoon vanilla extract
- 2 1/4 cups flour
- 1 cup sugar
- 2 teaspoons baking powder
- 1/2 teaspoon salt
- 12 tablespoons unsalted butter, at room temperature
Buttercream Frosting:
- 3 cups powdered sugar
- 2 sticks unsalted butter, softened
- 3 tablespoons milk
- 1 teaspoon vanilla extract
- 1/2 teaspoon coconut extract
- 4 thin pretzel sticks
- 1 bag (10 ounces) sweetened shredded coconut
- 8 drops green food coloring
- 2 large round chocolate candy melts
- 6 chocolate chips
- mini candy-coated chocolate eggs, for garnish
- Heat oven to 325 F.
- Line muffin pan with four paper liners. Spray oven-safe glass bowl with nonstick cooking spray.
- In large bowl, whisk eggs, egg whites, cream of coconut, pineapple, coconut extract and vanilla extract until combined.
- In food processor, pulse flour, sugar, baking powder and salt until combined. Add 6 tablespoons butter. Pulse until combined. Add remaining butter. Pulse until coarse meal forms.
- In large mixing bowl, add coarse flour butter meal. Add half of egg mixture. Beat 1-2 minutes. Add remaining egg mixture; beat until combined.
- Fill each muffin cup 2/3 full. Bake 18-20 minutes, or until done. Cool completely.
- Pour remaining batter into prepared oven-safe bowl. Bake 1 hour, 40 minutes, or until done. Cool completely.
- To make buttercream frosting: In large bowl, add powdered sugar and butter; beat until fluffy. Add milk, vanilla extract and coconut extract; beat until creamy.
- Turn bowl upside-down on cake stand until cake removes from bowl. If cake needs leveled, turn cake over and trim to flatten. Frost cake.
- Remove wrappers from cupcakes. Using two pretzel sticks, press into base of cupcakes
- and anchor to bottom rim of bowl cake to create bunny feet. Frost feet.
- Take third cupcake and cut muffin top off. Cut muffin top in half. Using one pretzel stick, anchor one muffin top half at bottom of full cupcake to form toes. Repeat with second muffin top half for other foot. Frost toes.
- Attach final cupcake with remaining pretzel stick to butt area of cake to make tail. Frost tail.
- Apply 1 1/2 cups shredded coconut all over cake. Press chocolate candy melts into bottoms of bunny feet to resemble foot pads. Add chocolate chips to resemble pads for toes.
- Place remaining coconut in plastic bag. Add green food coloring. Toss in bag until coconut is colored. Spread around base of cake for grass. Decorate grass with chocolate eggs.
Tips: Spoon flour into dry measuring cup and level off excess. Scooping directly from bag compacts flour, resulting in dry baked goods. Add 1 tablespoon additional milk if frosting is too stiff. Keep adding until desired consistency.

Power Family Meals with Protein-Packed Peanuts
(Family Features) Starting fresh with a new year is a chance to hit the reset button for many people, and your family can use this opportunity to rethink homemade meals while striving for nutritious (and still delicious) dishes. From snacks to the main course each evening, the options are nearly endless for planning a revamped menu with healthier ingredients.
Dinnertime can be a cinch with Peanut Butter Chicken, a simple dish that takes less than 20 minutes to make when busy evenings call for a quick solution. If a veggie-based option aligns better with your family's desires, try Veggie Sammies with Peanut Butter Satay Sauce or go full-on comfort food with Very Vegan Peanut Butter Jackfruit Chili. Snacking doesn't have to mean forgoing your dedication to nutritious choices either - these Peanut Granola Bars can be your made-at-home masterpiece for adults and children to enjoy.
These recipes from the Georgia Peanut Commission are powered by peanuts, a nutrient-rich superfood that delivers 19 vitamins and 7 grams of protein per serving for a health benefit punch in each bite.
Discover more nutritious recipe ideas at gapeanuts.com.
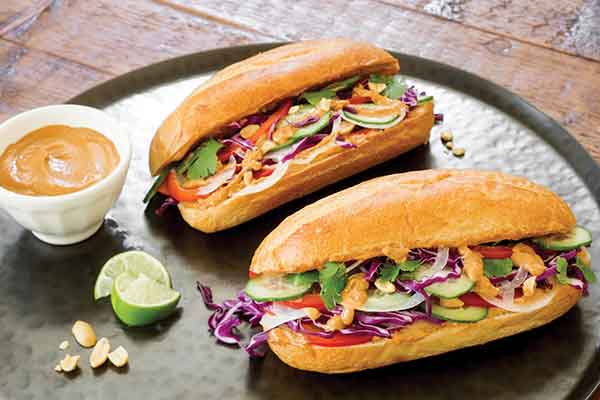
Veggie Sammies with Peanut Butter Satay Sauce
Prep time: 30 minutes
Servings: 2
- 4 tablespoons creamy peanut butter
- 3 tablespoons lime juice
- 2 tablespoons water
- 4 teaspoons hoisin sauce
- 2 teaspoons soy sauce
- 2 teaspoons sriracha
- 2 French baguette rolls (6 inches each)
- 1/2 cup cucumber, sliced
- 1/2 cup white onion, sliced into thin strips
- 1/2 cup red bell pepper, sliced into thin strips
- 1/2 cup purple cabbage
- 1/2 cup fresh cilantro
- In small bowl, combine peanut butter, lime juice, water, hoisin sauce, soy sauce and sriracha; mix well.
- Spread sauce on both sides of each roll then layer with cucumber, onion and bell pepper. Top with cabbage and cilantro.
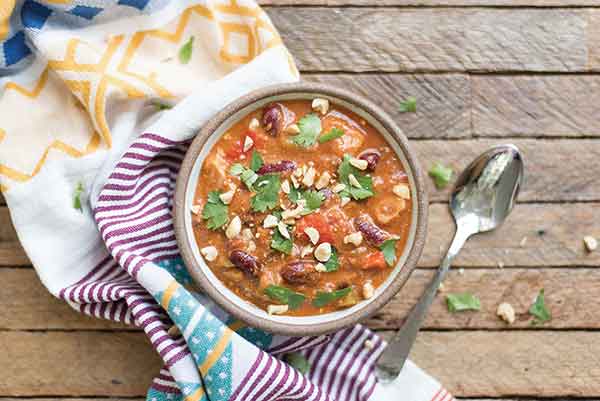
Very Vegan Peanut Butter Jackfruit Chili
Recipe courtesy of the National Peanut Board
Prep time: 5 minutes
Cook time: 35 minutes
Servings: 8
- 2 teaspoons oil
- 1/2 large white onion, chopped
- 1/2 green bell pepper, chopped
- 1/2 red bell pepper, chopped
- 2 garlic cloves, chopped
- 1/2 teaspoon salt
- 1 teaspoon cumin
- 1 teaspoon chili powder
- 1 tablespoon tomato paste
- 1 can crushed tomatoes
- 1 can whole tomatoes
- 2 cups water
- 1 can red kidney beans, drained and rinsed
- 1 can green jackfruit, drained and chopped
- 1/4 cup peanut butter
- cornbread (optional)
- tortilla chips (optional)
- cinnamon rolls (optional)
- eat large, heavy-bottomed pot over medium heat. Add oil, onion and peppers; cook 3 minutes, stirring often. Add garlic, salt, cumin, chili powder and tomato paste, stirring to coat. Cook 1-2 minutes, stirring constantly, then stir in crushed tomatoes, whole tomatoes, water, kidney beans and jackfruit; bring to boil then reduce heat to medium-low. Simmer 25-30 minutes. Stir in peanut butter and simmer 5 minutes.
- Serve with cornbread, tortilla chips or cinnamon rolls, if desired.
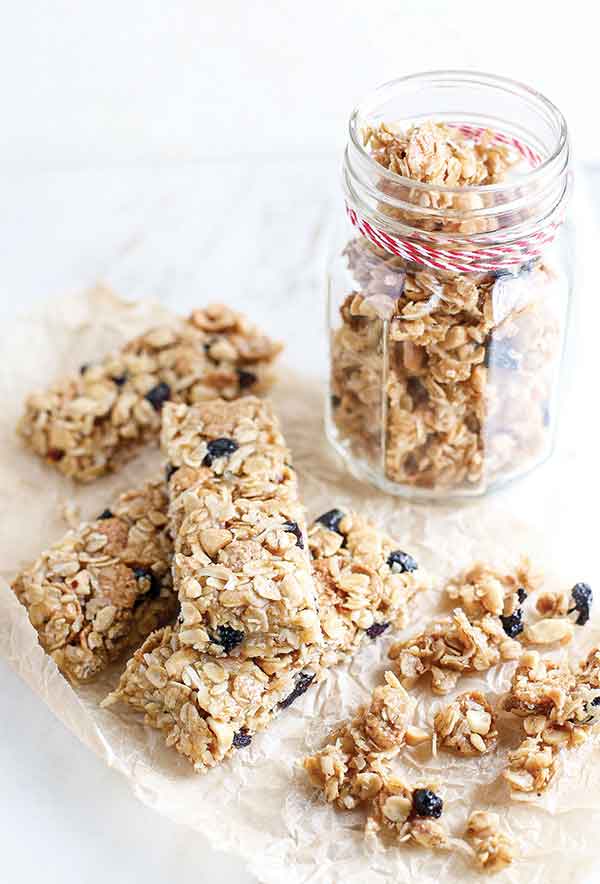
Peanut Granola Bars
Prep time: 10 minutes
Cook time: 6 minutes, plus 30-45 minutes cooling time
Servings: 12-14
- 1/2 cup honey
- 6 tablespoons unsalted butter
- 2 tablespoons creamy peanut butter
- 1/2 cup light brown sugar, firmly packed
- 1 teaspoon vanilla
- 1/4 teaspoon salt
- 2 cups rolled oats (quick or regular)
- 1 cup bran flakes
- 1 cup sweetened coconut flakes
- 1 cup dried fruit (raisins, blueberries or cranberries)
- 1 cup roasted peanuts, chopped
- In large, shallow, microwavable dish, combine honey, butter, peanut butter, brown sugar, vanilla and salt. Microwave at 50% power 2 minutes then whisk to combine and microwave at 50% power 2 minutes.
- Add oats, bran flakes, coconut flakes, dried fruit and peanuts; stir to combine. Microwave on high 1 minute. Stir and microwave 30 seconds.
- Press mixture into 13-by-9-inch baking dish lined with parchment or wax paper with some extra hanging over edges to easily lift bars out. Use bottom of glass wrapped with plastic wrap to press granola mixture firmly into pan. Allow to cool completely 30-45 minutes. Cut into 12-14 bars.
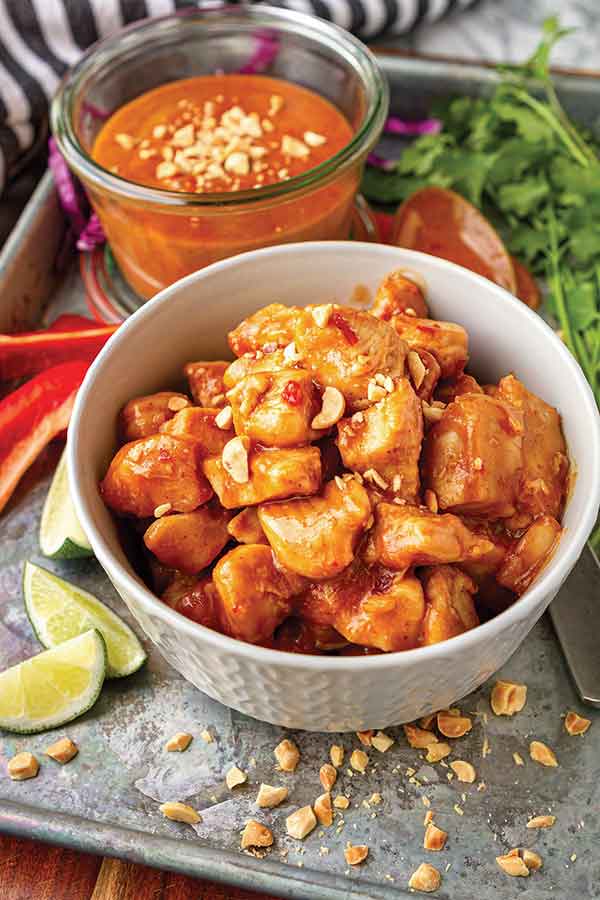
Peanut Butter Chicken
Recipe courtesy of "Unsophisticook"
Prep time: 5 minutes
Cook time: 12 minutes
Yield: 6 cups
Peanut Sauce:
- 1/2 cup creamy natural peanut butter
- 3 tablespoons sweet red chili sauce
- 1 tablespoon apple cider vinegar
- 1 tablespoon soy sauce
- 1 tablespoon honey
- 1/8-1/4 cup hot water (optional)
- chopped unsalted roasted peanuts (optional)
- 2 tablespoons olive oil or avocado oil
- 1 1/2 pounds boneless skinless chicken breasts, diced into 1-inch cubes
- 1 tablespoon soy sauce
- 3/4 cup peanut sauce
- cooked brown rice
- assorted bell peppers, sliced
- chopped unsalted roasted peanuts (optional)
- To make peanut sauce: In small glass bowl, whisk peanut butter, sweet red chili sauce, apple cider vinegar, soy sauce and honey until blended smoothly.
- Thin sauce with hot water to desired consistency. Garnish with chopped unsalted roasted peanuts, if desired.
- To make chicken: In large skillet over medium-high heat, drizzle oil. Add diced chicken then pour soy sauce over top. Saute about 10-12 minutes until chicken is fully cooked.
- Serve with peanut sauce, brown rice and colorful sliced veggies. Garnish with chopped unsalted roasted peanuts, if desired.
Source: Georgia Peanut Commission

Popping Up Festive Holiday Fun
(Family Features) During a holiday season that may not quite feel the same for many families, you can add a magic touch to at-home festivities with activities and treats that get everyone involved. Creating decorative holiday sweets allows little ones and grown-ups alike to take part in the fun, and the end result is delicious desserts for all to enjoy.
Start with a main ingredient like whole-grain, freshly popped popcorn. At 30 calories a cup, it’s naturally low in fat, non-GMO and gluten-free for a nutritious alternative to traditional holiday indulgences. It’s a clever way to create artsy representations of the season at hand that celebrate festive flavors like peppermint, coconut, chocolate and other sweet eats.
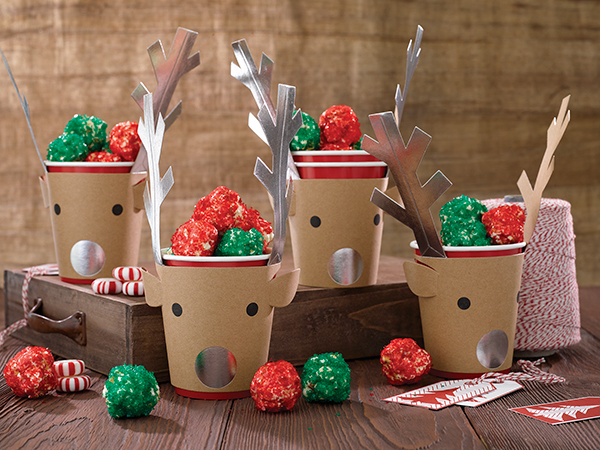
For example, Coconut Popcorn Snowballs add fun and flavor to wintertime with a coat of sweetened coconut “snow” and candy cane handle while easy-to-construct Holiday Popcorn Snowmen are sure to be a hit with your children. Add to the holiday spirit throughout your home with wintery Jingle Balls that call for colored sugars to create a magical sparkling effect then take the creativity to the next level by encouraging kids to make their own red-nosed, sleigh-pulling team of Chocolate Popcorn Reindeer.
Discover more decorative dessert recipes at popcorn.org.
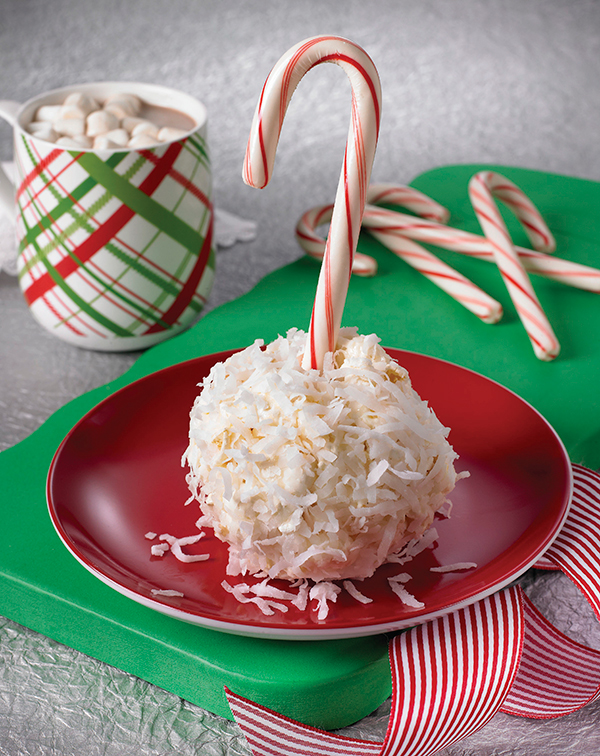
Coconut Popcorn Snowballs
Yield: 8 balls (4 inches)
- 2 cups shredded or flaked sweetened coconut
- nonstick cooking spray
- 3 quarts popped popcorn
- 4 tablespoons (1/2 stick) butter or margarine
- 3 cups miniature marshmallows
- 1 teaspoon coconut or vanilla extract
- 8 candy canes or candy cane sticks (about 3-4 inches)
- Place large sheet wax or parchment paper over work surface. Spread coconut on paper.
- Spray large mixing bowl lightly with nonstick cooking spray and place popcorn inside.
- In medium saucepan, melt butter over low heat. Stir in marshmallows until melted and mixture is smooth. Pour over popcorn and mix well until coated.
- Spray hands with cooking spray and press mixture firmly to form into balls. Place balls on coconut; roll and press coconut to coat. While holding popcorn balls, gently press candy cane into each ball.
- Serve immediately or wrap individually in plastic wrap for storage.
Jingle Balls
Yield: 12 cups
- Nonstick cooking spray
- 12 cups popped popcorn
- 6 tablespoons butter or margarine
- 3 cups mini marshmallows
- 1/2 teaspoon peppermint extract
- assorted colored sugars
- Spray large mixing bowl lightly with nonstick cooking spray. Add popcorn.
- Spread plastic wrap on cookie sheet; set aside.
- In medium saucepan, melt butter and marshmallows; stir until mixture is smooth. Stir in peppermint extract. Pour over popcorn, mixing until well coated. Let cool 2 minutes.
- Spray hands with nonstick cooking spray and form popcorn mixture into 3-inch balls. Gently press colored sugar onto balls. Let sit on prepared cookie sheet until cool and set.

Chocolate Popcorn Reindeer
Servings: 8
- 8 cups unsalted, unbuttered, popped popcorn
- 2 1/2 cups mini marshmallows
- 1/2 cup chopped dark chocolate or dark chocolate chips
- 2 tablespoons butter or light olive oil
- 1/4 teaspoon salt
- 16 pretzel sticks
- 16 eyeball candies
- 8 red candy-coated
- chocolate candies
- Place popcorn in large mixing bowl.
- In saucepan over medium heat, heat marshmallows, chocolate, butter and salt, stirring often, until smooth. Toss marshmallow mixture with popcorn until well combined.
- Scoop 3/4 cup popcorn mixture into ball. Repeat with remaining mixture to make eight balls. Place each ball in paper muffin cup liner.
- Insert one pretzel stick on each side of ball to resemble antlers, attach two eyeball candies for “eyes” and one red chocolate candy for “nose.” Repeat with remaining balls. Let cool completely.
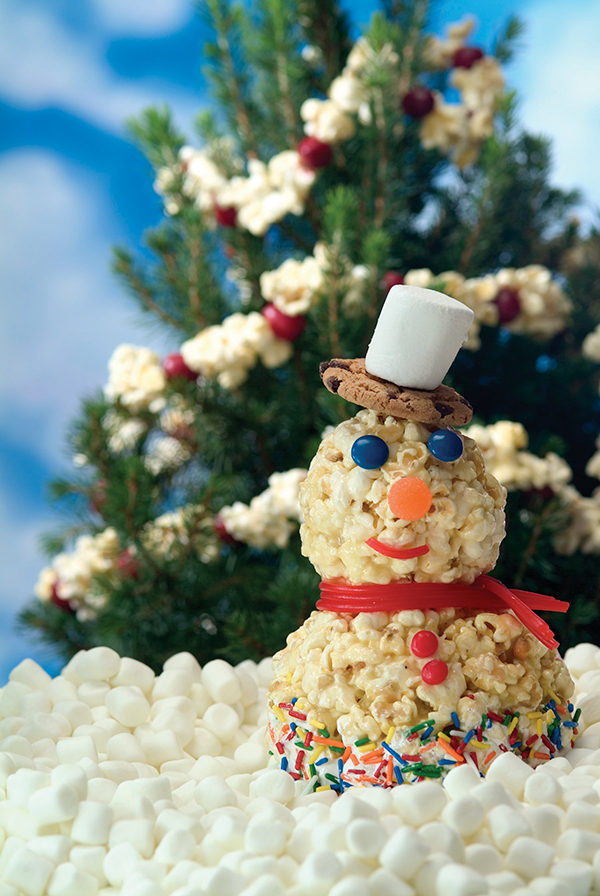
Holiday Popcorn Snowmen
Yield: 5 snowmen
- 1 package (1 pound) large marshmallows
- 1/4 cup (1/2 stick) butter or margarine, plus additional for greasing hands
- 1 teaspoon vanilla
- 10 cups popped popcorn
- sprinkles (optional)
- licorice (optional)
- gum drops (optional)
- cinnamon candies (optional)
- In large saucepan, melt marshmallows and 1/4 cup butter. Remove from heat and stir in vanilla. Let stand 5 minutes.
- Pour marshmallow mixture over popcorn and stir. Butter hands well and form into balls.
- Decorate with sprinkles, licorice, gum drops and cinnamon candies, if desired.
Popcorn Board