
A Creative Twist on Halloween Carvings
(Family Features) When it comes to Halloween, carving the same pumpkin designs each year can become routine. This year, save a pumpkin and carve your spooky masterpiece into a watermelon instead.
Nutrient-rich watermelon can be a healthy alternative to other sweet treats full of added sugar during Halloween festivities as it’s a source of vitamins A and C as well as the antioxidant lycopene and the amino acid citrulline.
Because they are made up of 92% water, watermelons can be an effective way to stay hydrated during trick-or-treating, and creations like a Mummy or Jack O’Melon can help satisfy sweet cravings while keeping friends and family members frightfully delighted.
To get started, consider these carving tips and tricks:
- To make cutting and slicing easier, the watermelon should be at room temperate when carving.
- Cut a small, thin, flat piece from the bottom of the watermelon to provide a stable base for carving.
- Draw the design on the watermelon rind with a dry-erase marker before cutting. If you make a mistake, this can make it easier to wipe off.
- Use a sharp knife with a pointed tip for easier, cleaner cuts. Consider a paring knife with a smaller tip for ease of detail.
- Blend scraps of watermelon that are too messy for dicing or slicing to create an easy juice.
For more watermelon carving ideas, visit watermelon.org.
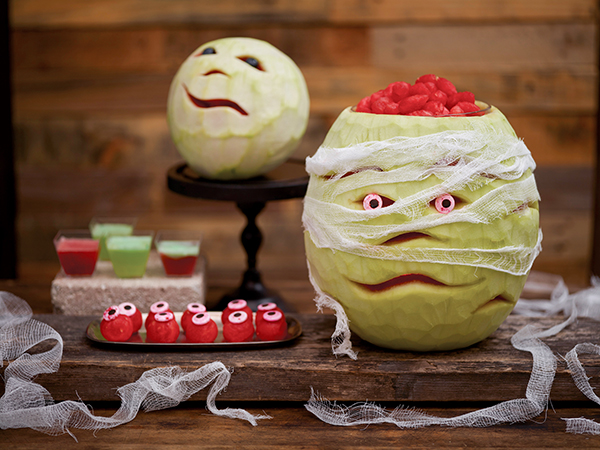
Mummy
Supplies and Tools:
- Watermelon
- Cutting board
- Kitchen knife
- Dry-erase marker
- Paring knife
- Melon baller
- Scoop
- Vegetable peeler
- Cheesecloth or gauze
- Straight pin (optional)
- Battery-operated candle or light
- Small bowl
- Blueberries or bloody candy eyes
- Toothpicks, pins or glue
- Wash watermelon under cool running water and pat dry.
- On cutting board, place watermelon on its side and use kitchen knife to cut off 1/4-1/2-inch of rind from bottom to provide sturdy base, being careful not to cut too deep into white part of rind. Cut 1-2 inches from stem end to create opening for bowl to be added.
- Using dry-erase marker, draw eyes, nose and mouth, along with wavy slits around carving. Use paring knife to cut them out, being sure to cut through to red flesh to let more light flow through.
- Use melon baller to hollow out inside of watermelon. Reserve watermelon balls. Use scoop to remove remaining watermelon.
- Using vegetable peeler, remove green skin off outside of watermelon, similar to peeling cucumber.
- Wrap thin strips cheesecloth or gauze around mummy carving and secure with straight pin, if needed.
- Place battery-operated candle or light inside carving and fit small bowl into top of carving. Trim away excess rind to make bowl fit securely.
- Fill bowl with melon balls. Attach candy eyes or blueberries using a toothpicks, pins or glue.
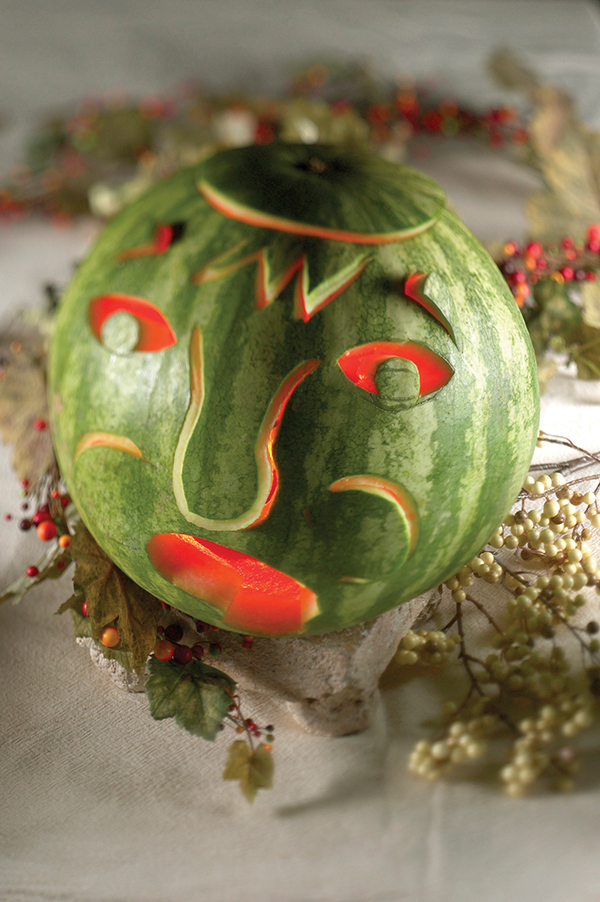
Jack O'Melon
Supplies and Tools:
- Knife
- Round watermelon
- Melon baller
- Dry-erase marker
- Toothpicks (optional)
- Battery-operated light
- Using knife, cut thin slice from bottom of watermelon to provide stable base.
- Cut circular piece of rind from top of watermelon big enough to reach into and remove flesh. Carefully remove top section and reserve for use as “lid.”
- Remove flesh from inside watermelon using melon baller, reserving melon balls for snacking. Hollow out remaining watermelon flesh and use blender to juice scraps and excess juice.
- Using dry-erase marker, draw outlines of eyes, nose, mouth, hair, ears and other features on side of watermelon. If mistake is made with marker, wipe off using paper towel to start over. Following outlines, carve features into watermelon and remove excess rind.
- Safe, battery-operated light can be firmly placed inside watermelon to provide haunting glow.
- Place circular piece of rind back on top of watermelon.

Sensational Snacktivities at Home
(Family Features) Getting creative with snack time is an activity the whole family can enjoy. And when it comes to making delicious, fun and contemporary treats, the Jellymongers have turned fun into an art form.
The Jellymongers, Sam Bompas and Harry Parr, are big fans of JELL-O gelatin and are masters when it comes to using it to create spectacular works of art. They have achieved worldwide recognition for their eye-catching sculptures and monuments from their native England. According to Bompas and Parr, making JELL-O creations is a perfect way to have fun in the kitchen. They have put together a few quick tips for some sensational snacks that can be tried at home:
- Everyday home items can be used to create fun shapes — the only limit is your creativity! Try setting JELL-O in ice cube trays, cupcake pans or reusable plastic containers.
- When making the gelatin, stir in fruit or substitute juice for some of the water for an extra fruity creation.
- Looking to give your gelatin a firmer set? Try adding KNOX gelatin to help your shapes and molds keep their form. Perfect for bite-sized snacks!
- To easily release a masterpiece from its mold, dip mold in a bowl of hot water for a few seconds. Wet a sturdy plate, place on top of the mold and invert. The JELL-O will slip out onto the plate for display.
“JELL-O gelatin has a great collection of snack ideas that are fun to make, and even more fun to eat,” says Bompas. “These everyday snacks are easy to do at home and take 20 minutes or less to prepare.”
The classic JELL-O JIGGLERS recipe serves as a wonderful “snacktivity” for small hands. From moons and stars to racecars and footballs, you can create endless, fun shapes with a pan of gelatin and cookie cutters. Finger Gelatin is another bite-sized snack idea, perfect for parties or an afternoon treat.
It’s mix and match time! Unleash inner creativity with Jellin’-Melon, by combining your favorite fruit and gelatin flavor. Try chilling lime gelatin in a hollowed out cantaloupe for a refreshing citrus treat. With all the possible combinations, this makes for an extra special snack time treat.
For more information, creative recipe ideas and special savings, visit www.jello.com.

“Jellin’-Melon” Snacks
Prep Time: 15 min. plus refrigerating
Makes: 8 servings
- 1 cantaloupe, or other melon, cut lengthwise in half
- 3/4 cup boiling water
- 1 pkg. (3 oz.) JELL-O Lime Flavor Gelatin
- 1/2 cup cold water
- REMOVE seeds from melon halves; cut thin slice from bottom of each half. Scoop out melon flesh, leaving 1-inch-thick shells. Place upside-down on paper towels to drain.
- ADD boiling water to gelatin mix; stir 2 min. until completely dissolved. Stir in cold water. Refrigerate 15 min. or until slightly thickened. Pour into melon shells.
- REFRIGERATE 3 hours or until gelatin is set. Cut into wedges.

JELL-O JIGGLERS
Prep Time: 10 min.
Total Time: 3 hours 10 min. (incl. refrigerating)
Makes: 2 doz. or 24 servings, 1 JIGGLER each
- 2 1/2 cups boiling water (Do not add cold water)
- 2 pkg. (6 oz. each) JELL-O Gelatin, any flavor
- STIR boiling water into dry gelatin mix in large bowl at least 3 min. until completely dissolved. Pour into 13x9-inch pan.
- REFRIGERATE at least 3 hours or until firm.
- DIP bottom of pan in warm water 15 sec. Cut into 24 decorative shapes using 2-inch cookie cutters, being careful to cut all the way through gelatin to bottom of pan. Lift JIGGLERS from pan. Reserve scraps for snacking. Store in tightly covered container in refrigerator.

Finger Gelatin
Prep Time: 20 min.
Total Time: 1 hour 20 min.
Makes: 12 servings, about 12 squares each
- 3 pkg. (4-serving size each) JELL-O Raspberry Flavor Gelatin
- 4 envelopes KNOX Unflavored Gelatin
- 4 cups boiling water
- MIX both gelatins in large bowl; stir in boiling water until completely dissolved.
- POUR into 13x9-inch pan. Refrigerate 1 hour or until firm.
- CUT gelatin mixture into small squares. Store in tightly covered container in refrigerator.
Layered Mousse Bites
Prep Time: 10 min.
Total Time: 3 hours 10 min.
Makes: 9 servings
- 2 1/2 cups boiling water
- 2 pkg. (3 oz. each) JELL-O Strawberry Flavor Gelatin
- 2 cups thawed COOL WHIP Whipped Topping
- ADD boiling water to gelatin mixes in medium bowl; stir with whisk for 2 minutes until completely dissolved. Stir in COOL WHIP until well blended.
- POUR into 8-inch square pan.
- REFRIGERATE for 3 hours or until firm. Cut into 36 pieces.
Patriotic Parfaits
Prep Time: 10 min.
Total Time: 4 hours 10 min.
Makes: 9 servings
- 2 cups boiling water
- 1 pkg. (6 oz.) or 2 pkg. (3 oz. each) JELL-O Berry Blue Flavor Gelatin
- 2 cups cold water
- 1 tub (8 oz.) COOL WHIP Whipped Topping, thawed, divided
- 1 cup fresh strawberries, halved
- ADD boiling water to gelatin mix in large bowl; stir for 2 minutes until completely dissolved. Stir in cold water. Pour into 9 parfait or dessert glasses.
- REFRIGERATE for 4 hours or until firm.
- SPOON 2 cups COOL WHIP over desserts; top with berries and remaining COOL WHIP.
Juicy Gelatin
Prep Time: 5 min.
Total Time: 4 hours 5 min.
Makes: 4 servings
- 1 cup boiling water
- 1 pkg. (4-serving size) JELL-O Strawberry Flavor Sugar Free Gelatin
- 1 cup cold orange juice
- STIR boiling water into gelatin in medium bowl for at least 2 minutes until completely dissolved. Stir in orange juice.
- REFRIGERATE for 4 hours or until firm.
Source: JELL-O