
Entertain Guests with a Fresh Al Fresco Favorite
(Family Features) If you and your loved ones yearn for new, stimulating experiences to feel connected to the outdoors, look no further than enjoying mealtime al fresco. Inspired by the Mediterranean tradition of “eating in the open air,” al fresco dining offers passionate home cooks a fresh way to enjoy their favorite recipes outside with friends and family.
Consider these two tried-and-true al fresco tips from television personality and culinary icon Rachael Ray the next time you enjoy dinner on the deck or lunch on the patio.
Gather the right tools: On those buggy days and nights during the warm season when you’re dining al fresco, grab a food mesh tent. Not only will it protect your food, but it also looks good and goes with a variety of table settings.
Plan the decor: When hosting friends and family, up your floral game by reaching into the garden and adding some fresh herbs – it’s aesthetically pleasing and smells delicious.
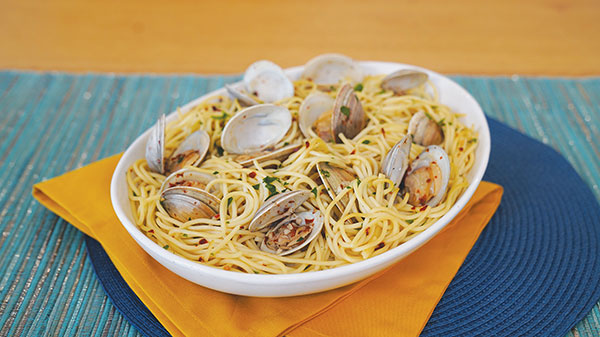
Ideal al fresco meals typically take advantage of in-season produce, offer easy preparation so you can focus on entertaining and are simple enough to eat outdoors. Skip complicated cooking steps and turn to a delicious option like Yellowfin Tuna and Artichoke Pasta, which can be served as an appetizer, side dish or on its own as a light main course.
This dish practically calls for ingredients like Genova Yellowfin Tuna in Olive Oil, which features cuts of wild-caught tuna, hand-filleted in just the right amount of olive oil. Savory, rich and flavorful with a perfect texture, the tuna elevates the dish with a uniquely rich and savory flavor stemming from Mediterranean inspiration.
To find more al fresco dining inspiration and recipe ideas, visit GenovaSeafood.com.
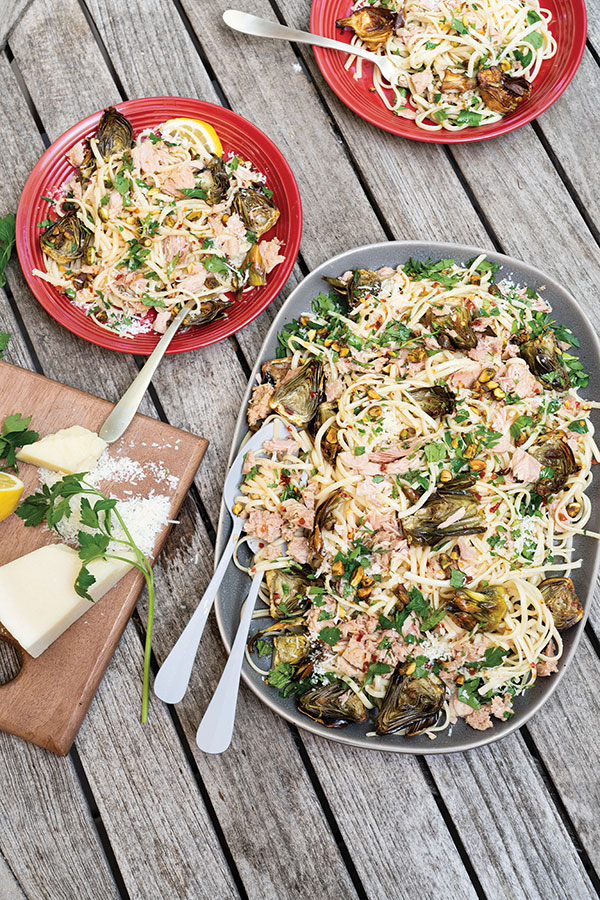
Yellowfin Tuna and Artichoke Pasta
Recipe courtesy of Rachael Ray on behalf of Genova Tuna
Prep time: 15 minutes
Cook time: 40 minutes with fresh artichokes (25 minutes with canned)
Servings: 4
Artichokes:
- Cold water
- 12 small, fresh artichokes or 2 cans artichoke hearts in water
- 2 lemons
- 3 tablespoons extra-virgin olive oil
- salt, to taste
- pepper or red pepper, to taste
Pasta:
- Water
- 2 cans (5 ounces each) Genova Yellowfin Tuna in Olive Oil
- 2 tablespoons extra-virgin olive oil
- 4 tablespoons butter, cut into tabs
- 4 cloves garlic, chopped
- 1 teaspoon crushed red pepper (optional)
- salt, to taste
- 1/2 cup white wine, chicken stock or vegetable stock
- 1 pound spaghetti or linguine
- 1 lemon, juice only
- 1 cup grated Pecorino Romano cheese
- 1/4 cup chopped fresh Italian parsley, divided
- 1 small handful fresh mint, chopped, divided
- 1/4 cup toasted pistachios or pine nuts, chopped
- To make artichokes: Preheat oven to 425 F.
- Fill bowl with cold water and juice of one lemon.
- If using fresh artichokes, trim tops of artichokes and tougher outer leaves. Using vegetable peeler or small paring knife, trim stems. Once prepped, cut fresh artichokes in half. If using canned artichokes, drain well and quarter lengthwise.
- Place artichokes in lemon water.
- Let soak 2-3 minutes, drain and pat dry with kitchen towel.
- In casserole or baking dish, arrange artichokes and add juice of remaining lemon, quarter lemon and add lemon wedges to dish.
- Add olive oil and salt and pepper, to taste.
- Roast 25-30 minutes, or until tender.
- To make pasta: Bring large pot of water to boil.
- While water is coming to boil, place large skillet over medium heat and add olive oil and butter. Add garlic; red pepper, if desired; and salt, to taste, and swirl 1 minute. Add white wine or stock and let reduce by half.
- When water comes to boil, salt water, add pasta and cook 1 minute less than directions. Reserve 1/2 cup pasta water before draining.
- Add artichokes to large skillet with tuna with its oil and gently break up with back of wooden spoon or paddle.
- Add lemon juice and reserved pasta water to skillet along with drained pasta, cheese and half the parsley, mint and pistachios. Toss to combine, top with remaining parsley, mint and pistachios and serve.
Source:

A Full, Fresh Menu Fit for a Brunch Feast
(Family Features) Birthdays, holidays or just casual Saturdays are all perfect excuses to enjoy brunch with your favorite people. Bringing everyone together with quiches, pastries, appetizers, desserts and more offers an easy way to kick back and relax on a warm weekend morning.
These recipes for Easy Brunch Quiche, Savory Cheese Balls and Lemon Blueberry Trifle provide a full menu to feed your loved ones from start to finish, regardless of the occasion.
Find more brunch inspiration by visiting Culinary.net.
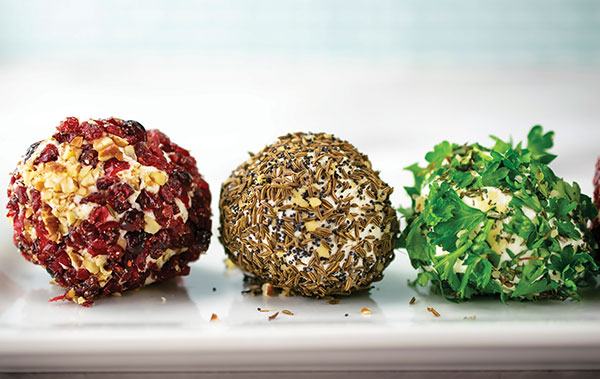
A Savory Way to Start the Celebration
Serving up exquisite flavor doesn’t have to mean spending hours in the kitchen. You can bring the cheer and favorite tastes with simple appetizers that are equal measures delicious and visually appealing.
These Savory Cheese Balls are easy to make and perfect for get-togethers and brunch celebrations. Texture and color are the name of the game with this recipe, and the result is a beautiful array of red, gold and green, all on one plate.
To find more recipes fit for brunch, visit Culinary.net.
Savory Cheese Balls
Servings: 6-12
- 2 packages (8 ounces each) cream cheese
- 2 tablespoons caraway seeds
- 1 teaspoon poppy seeds
- 2 cloves garlic, minced, divided
- 1/4 cup parsley, chopped
- 2 teaspoons thyme leaves, chopped
- 1 teaspoon rosemary, chopped
- 1/4 cup dried cranberries, chopped
- 2 tablespoons pecans, chopped
- crackers (optional)
- fruit (optional)
- vegetables (optional)
- Cut each cream cheese block into three squares. Roll each square into ball.
- In small bowl, combine caraway seeds, poppy seeds and half the garlic.
- In second small bowl, combine parsley, thyme, rosemary and remaining garlic.
- In third small bowl, combine cranberries and pecans.
- Roll two cheese balls in seed mixture, two in herb mixture and two in cranberry mixture.
- Cut each ball in half and serve with crackers, fruit or vegetables, if desired.
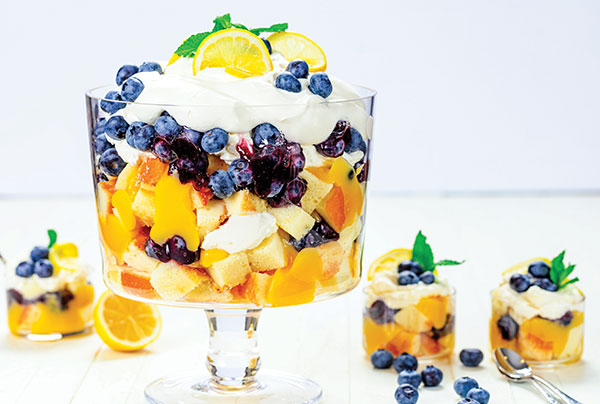
Finish Brunch with a Light, Layered Treat
After enjoying eggs, bacon, French toast and pancakes or any other brunch combination you crave, it’s tough to top a fresh, fruity treat to round out the meal. Dish out a delicious dessert to cap off the morning and send guests out on a sweet note that’s perfectly light and airy.
The zesty zip of lemon curd in this Lemon Blueberry Trifle brings out the sweetness of whipped cream made with Domino Golden Sugar, fresh blueberries and cubed pound cake for a vibrant, layered bite. Plus, it’s a bright, beautiful centerpiece you can feel proud of as soon as guests try their first bite.
Find more dessert recipes fit for brunch and other favorite occasions at DominoSugar.com.
Lemon Blueberry Trifle
Prep time: 45 minutes
Servings: 8-10
Lemon Curd:
- 1 cup Domino Golden Sugar
- 2 tablespoons cornstarch
- 1/4 cup freshly squeezed lemon juice
- 1 tablespoon lemon zest
- 6 tablespoons water
- 1/4 teaspoon salt
- 6 egg yolks
- 1/2 cup (1 stick) unsalted butter, at room temperature, cut into 1/2-inch cubes
Whipped Cream:
- 2 cups heavy whipping cream, cold
- 2 tablespoons Domino Golden Sugar
- 2 teaspoons pure vanilla extract
Trifle:
- 1 cup blueberry jam
- 12 ounces fresh blueberries, plus additional for garnish, divided
- 1 pound cake, cubed
- lemon slices, for garnish
- mint, for garnish
- To make lemon curd: In medium saucepan, stir sugar and cornstarch. Stir in lemon juice, lemon zest, water and salt. Cook over medium heat, stirring constantly, until thickened. Remove from heat and gradually stir in three egg yolks; mix well until combined. Stir in remaining egg yolks. Return to heat and cook 2 minutes, stirring constantly. Remove from heat.
- Stir in butter; mix until incorporated. Cover with plastic wrap, touching surface of lemon curd to prevent curd forming skin. Refrigerate until completely cool.
- To make whipped cream: In large bowl, beat cream, sugar and vanilla until soft peaks form. Do not overbeat.
- To make trifle: Mix blueberry jam with 12 ounces fresh blueberries. Place one layer cubed pound cake in bottom of trifle dish. Top with layer of blueberries. Add dollops of lemon curd and whipped cream. Repeat layering ending with whipped cream.
- Decorate trifle with lemon slices, fresh blueberries and mint.
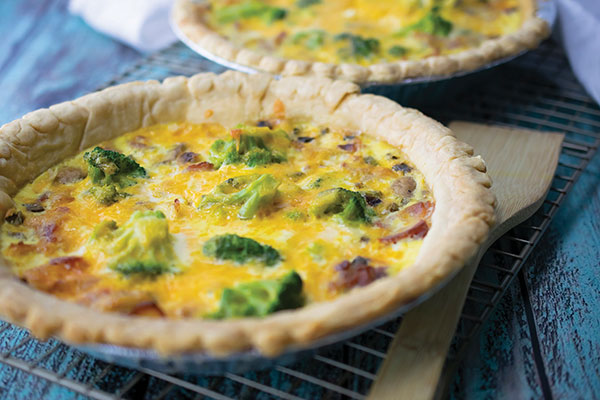
Say Goodbye to Basic Brunch
The same old brunch menu can become tiresome and dull. Adding something new to the table with fresh ingredients and simple instructions can enhance your weekend spread and elevate brunch celebrations.
Try this Easy Brunch Quiche that is sure to have your senses swirling with every bite. This quiche is layered with many tastes and a variety of ingredients to give it crave-worthy flavor, from broccoli and bacon to mushrooms, eggs and melty cheese.
Visit Culinary.net to find more brunch recipes.
Easy Brunch Quiche
Serves: 12
- 1 package (10 ounces) frozen broccoli with cheese
- 12 slices bacon, chopped
- 1/2 cup green onions, sliced
- 1 cup mushrooms, sliced
- 4 eggs
- 1 cup milk
- 1 1/2 cups shredded cheese, divided
- 2 frozen deep dish pie shells (9 inches each)
- Heat oven to 350 F.
- In medium bowl, add broccoli and cheese contents from package. Microwave 5 minutes, or until cheese is saucy. Set aside.
- In skillet, cook chopped bacon 4 minutes. Add green onions; cook 2 minutes. Add mushrooms; cook 4 minutes, or until bacon is completely cooked and mushrooms are tender. Drain onto paper towel over plate. Set aside.
- In medium bowl, whisk eggs and milk until combined. Add broccoli and cheese mixture. Add 1 cup cheese. Stir to combine. Set aside.
- In pie shells, divide drained bacon mixture evenly. Divide broccoli mixture evenly and pour over bacon mixture. Sprinkle remaining cheese over both pies.
- Bake 40 minutes.
- Cool at least 12 minutes before serving.
Note: To keep edges of crust from burning, place aluminum foil over pies for first 20 minutes of cook time. Remove after 20 minutes and allow to cook uncovered until completed.
Source:

Cooking Clean: A reliable energy source can make cooking nutritious meals quick and easy
(Family Features) With many people focused on achieving a cleaner and healthier lifestyle, taking actionable steps such as recycling, using less hot water and eating nutritious foods can help lower your carbon footprint. Another step for a clean lifestyle: cooking with an environmentally friendly, clean energy source like propane.
Propane is already powering more than 12 million homes with reliable energy people can count on. Plus, gas-powered cooktops are preferred by 96% of professional chefs, including nutritionist and chef Dean Sheremet of “My Kitchen Rules,” who partnered with the Propane Education & Research Council (PERC) to educate homeowners on the benefits of cooking with gas.
“There is a lot of misinformation about cooking with gas in the news,” Sheremet said. “It’s important to remember, the act of cooking itself impacts indoor air quality, regardless of the energy that powers the stove. Having a qualified technician install and perform regular service for the stove, maintaining proper ventilation using a hood or opening doors or windows and following common sense safety measures can ensure the safe use of any stove.”
Because ventilation when cooking is key, it’s important to note that cooking with propane results in lower carbon dioxide (CO2) emissions than electric cooking, on average. That’s because more than 60% of electricity production comes from natural gas or coal generation plants, which release more CO2 emissions as part of the generation process.
Beyond the environmental benefits, propane-powered cooking appliances provide convenience, modern design and performance in kitchens, allowing home chefs to prepare healthy meals for their families in a short amount of time. Sheremet values the efficiency of a propane cooktop when creating nutritious meals like Skirt Steak with Salsa Verde and Spaghetti and Clams, which can be whipped up in minutes using a clean energy source.
“Chefs, and parents like me, prefer gas for a variety of reasons,” Sheremet said. “My son, Atlas, is often in the kitchen when I’m cooking, and we know sometimes kids don’t listen when we tell them to not touch a pan or the stove. Propane cooktops allow for greater control of heat levels and their instant flame turnoff capabilities help them cool faster than traditional electric stoves, which can remain dangerously hot for a period after they have been turned off.”
Learn more about cooking with propane and find recipes from Sheremet at Propane.com/ChefDean.
Do’s and Don’ts of Cooking with Gas
Cooking with a reliable and environmentally clean energy source like propane can take your home chef skills to the next level. However, there are steps to take to ensure safety while maximizing the benefits of cooking with your gas range.
Do:
- Follow the manufacturer’s installation and operating instructions.
- Keep pot handles turned inward to protect against accidents like knocking the pot off the stove or little ones reaching for the handles.
- Keep the range surface clean.
- Keep flammable materials away from burner flames.
Don’t:
- Do not cover the oven bottom with foil as it can restrict air circulation.
- Never use gas ranges for space heating.
- Do not allow children to turn burner control knobs.
Do not leave food unattended on the cooktop.
Spaghetti and Clams
Recipe courtesy of chef Dean Sheremet on behalf of PERC
- Salt
- 8-12 littleneck or other small clams in shell, scrubbed
- 1/4 pound spaghetti noodles
- 2 tablespoons extra-virgin olive oil
- 1/2-1 garlic clove, minced
- 1/2 dried red chile pepper
- 1/3 cup vermouth or white wine
- 1-2 tablespoons chopped fresh Italian parsley
- Bring large pot of lightly salted water to boil. Soak clams in cold water.
- Add spaghetti to boiling water and cook until slightly underdone. In large saucepan over medium-low heat, add olive oil, garlic and chile pepper. Saute gently, reducing heat, if necessary, so garlic does not brown.
- Add vermouth and clams; cover. Clams should open in about 2 minutes. Add hot drained pasta, cover and shake pot gently. Simmer 1-2 minutes until spaghetti is cooked to taste.
- Discard unopened clams. Add half the parsley and shake pan to distribute evenly. Transfer to plate or bowl and sprinkle with remaining parsley.
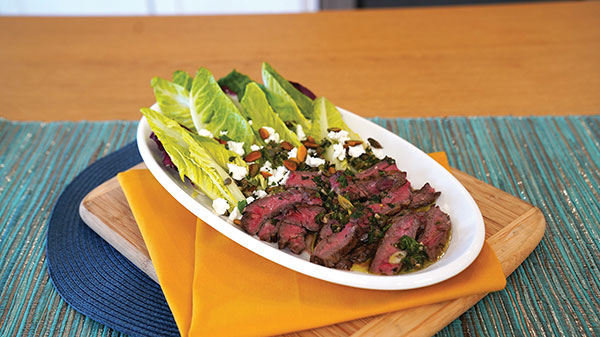
Skirt Steak with Salsa Verde
Recipe courtesy of chef Dean Sheremet on behalf of PERC
- 1/2 cup extra-virgin olive oil
- 1/4 cup red wine vinegar
- 2 thinly sliced scallions
- 3 tablespoons capers, drained and roughly chopped
- 3 garlic cloves, minced
- 1/2 teaspoon kosher salt, plus additional, to taste, divided
- 1/2 teaspoon black pepper, plus additional, to taste, divided
- 1 1/2 pounds skirt steak
- 2 tablespoons chopped parsley
- 2 tablespoons chopped fresh mint, divided
- 1/4 cup pistachios
- 1 romaine heart
- 1 radicchio
- 1/2 cup crumbled goat cheese
- Whisk olive oil, vinegar, scallions, capers, garlic, 1/2 teaspoon salt and 1/2 teaspoon pepper. Pour about 1/3 of dressing (about 1/3cup) over steak and turn to coat.
- Add parsley and 1 tablespoon mint to reserved dressing; stir and set aside until ready to use. Cover and refrigerate steak 30 minutes, or up to 24 hours.
- In small saute pan over medium heat, toast pistachios, tossing often, until golden brown, about 3 minutes. Set aside.
- Set grill to medium-high heat or heat grill pan on stovetop over medium-high heat. Grill steak about 5 minutes per side. Transfer to plate and rest 10 minutes.
- Cut romaine hearts lengthwise into quarters. Arrange romaine and radicchio in layers on large platter, leaving room on one side for steak. Sprinkle with goat cheese, pistachios and remaining mint.
- Slice steak into 3-inch pieces then slice against grain to cut steak into wide strips. Add sliced steak to platter. Drizzle reserved dressing on romaine and steak.
Source: Propane Education & Research Council

Create Healthy Habits in the New Year
(Family Features) The changing of the calendar to a new year is a perfect opportunity to look toward the future and create better health and wellness habits.
Setting yourself up with a strong foundation is key to long-term success. Consider these tips as you look to build healthy habits this year:
Set reasonable goals. It’s important to take an honest look at your lifestyle and assess any changes you can make to improve wellness. Whether your goal is to lose weight, eat healthier, exercise more frequently or something else entirely, start with an attainable target – like losing 1 pound a week – and know you can always challenge yourself further once you’ve sustained the change for an extended period of time.
 Eat well. A well-balanced diet includes fruits, vegetables, legumes, nuts and whole grains.You can create lower-calorie versions of some of your favorite dishes by substituting low-calorie fruits and vegetables in place of higher calorie ingredients. An option like watermelon is more than a raw fruit or snack; it can be an ingredient in a wide variety of recipes, including appetizers, mocktails (or cocktails), entrees, sauces or salsa. For example, these recipes for Watermelon Chia Seed Muffins and Watermelon and Pistachio Salad can help satisfy cravings any time of day. Consisting of 92% water, watermelon is cholesterol-free, fat-free and offers an excellent source of vitamin C (25% daily value) while also containing vitamin A (8%) and vitamin B6 (6%).
Get active. Proper nutrition is just one part of making healthy lifestyle choices. Adults should aim for at least 160 minutes of moderate physical activity each week, according to the Centers for Disease Control and Prevention. If you want to lose weight, increase aerobic activities like walking or running. If your goal is adding strength, start resistance training such as lifting weights.
Find more healthy recipes and tips to help keep you on track all year long at watermelon.org.
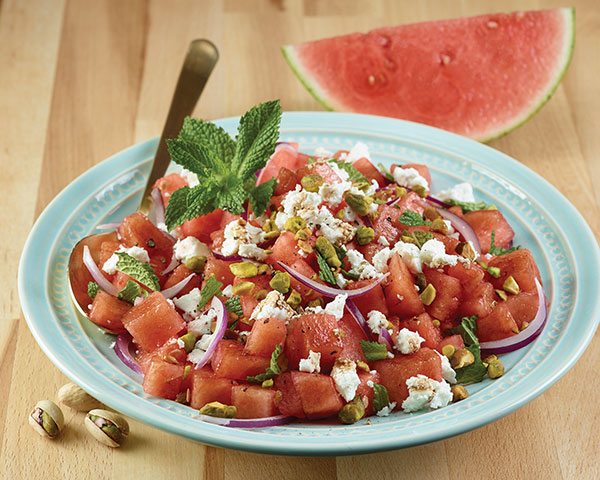
Watermelon and Pistachio Salad
Servings: 3
- 3 cups watermelon cubes
- 1/2 red onion, thinly sliced
- 1/3 cup balsamic vinegar
- 1/4 cup pistachios
- 4 ounces feta
- 1-2 tablespoons chopped fresh mint
- Place watermelon and onion in large bowl. Add balsamic vinegar and toss to combine.
- Add pistachios, feta and mint, reserving small amount of mint to sprinkle on top. Toss.
- Serve on large platter and sprinkle with remaining mint.
Watermelon Chia Seed Muffins
Yield: 12 muffins
- 1 can nonstick cooking spray
- 1/2 cup sugar
- 1/3 cup sucralose
- 1 1/2 tablespoons lemon zest
- 2 cups flour
- 3/4cup chia seeds
- 1 teaspoon baking soda
- 2 teaspoons baking powder
- 1/4 teaspoon salt
- 4 tablespoons canola oil
- 1/3 cup plain, nonfat Greek yogurt
- 3/4 cup liquefied watermelon juice
- 1/2 cup egg substitute
- 1 cup dried tart cherries
- 1 lemon, juice only
- 2 teaspoons vanilla extract
- 2 tablespoons sugar
- Heat oven to 375 F. Spray 12-piece muffin pan with nonstick cooking spray.
- In large bowl, combine sugar, sucralose and lemon zest. Use fingers to rub zest into sugar until fragrant. Add flour, chia seeds, baking soda, baking powder and salt; thoroughly mix. Set aside.
- In medium bowl, whisk oil, yogurt, watermelon juice and egg substitute until thoroughly blended. Add cherries, lemon juice and vanilla.
- Add liquid mixture to flour mixture. Gently toss until incorporated. Avoid overbeating or muffins will be flat and tough. Spoon evenly into muffin pan. Top each muffin with 1/2 teaspoon sugar.
- Bake 15-17 minutes, or until toothpick inserted in middle comes out clean. Remove from oven, allow to sit 5 minutes then transfer muffins to cooling rack.

A Secret Ingredient for Winter Wellness
Support your immune system with 100% orange juice
(Family Features) While winter rushes in with brisk breezes and chilly temperatures, staying indoors to avoid the weather shouldn’t mean forgoing healthy habits. One step toward wellness is maintaining nutritional value in meals from morning to night, even when comfort foods call your name.
As a key source of nutrients that supports a healthy lifestyle year-round, especially during cold and flu season, one 8-ounce serving of Florida Orange Juice provides more than 100% of your daily value of vitamin C and is a good source of potassium, folate and thiamin. Fortified juice also contains 15% of the daily value of vitamin D, which plays an important role in regulating immune response and helps cells fight off bacteria and viruses that enter the body.
Additionally, 100% orange juice is virtually the only dietary source of a unique, powerful phytonutrient (naturally occurring plant compound) called hesperidin, which may also help support a healthy immune system. According to the USDA, the flavonoid hesperidin is highly concentrated in citrus and rarely found in other foods.
“Maintaining a well-balanced diet is one way to help support your immune system in the colder months,” said Dr. Rosa Walsh, scientific research director at the Florida Department of Citrus. “For example, 100% orange juice contains vitamin C, vitamin D (in fortified juice) and phytonutrients like flavonoids and colorful carotenoids, making it a nutritional powerhouse.”
This Orange Honey Glazed Carrots recipe offers a warming yet nutritional, naturally sweet way to incorporate orange juice into your winter menu. Orange juice is also a go-to ingredient for popular non-alcoholic drinks like this Orange Juice Mint Mocktail, a perfect pairing for winter meals.
Visit floridajuice.com to find more recipes for winter wellness.

Orange Honey Glazed Carrots
- 2 cups sliced carrots
- 1/4 cup Florida Orange Juice
- 1 teaspoon honey
- 1 teaspoon cornstarch
- 1/8 teaspoon salt
- 1/8 teaspoon ground ginger
- fresh parsley, for garnish
- fresh chives, for garnish
- Steam carrots until tender.
- In saucepan over medium heat, whisk orange juice, honey, cornstarch, salt and ginger.
- Cover, whisking constantly until sauce thickens.
- Pour sauce over steamed carrots. Top with parsley and chives.

Orange Juice Mint Mocktail
- 2 cups Florida Orange Juice
- 1/4 cup lemon juice
- 1/4 cup water
- ice cubes
- 1/2 cup carbonated water
- 2-3 mint leaves
- In pitcher, stir orange juice, lemon juice and water.
- Divide mocktail evenly among ice-filled glasses and top with carbonated water.
- Garnish with mint leaves.
Source: Florida Department of Citrus

Holiday Entertaining is Back with Sweet, Savory and Oh So Cheesy Ideas
Real California Milk helps impress guests with the California Cheese Centerpiece and Cookie Exchange Board
(Family Features) This holiday season, entertaining is back on the table and that means endless opportunities to showcase Instagram-worthy ideas. For those looking to impress friends and family, Real California Milk has two unique culinary ideas to take holiday traditions to the next level: The Cheese Centerpiece and Cookie Exchange Board. From fresh food as bountiful décor to camera-ready cookie presentations, incorporating California dairy into your entertaining is a winning holiday strategy.
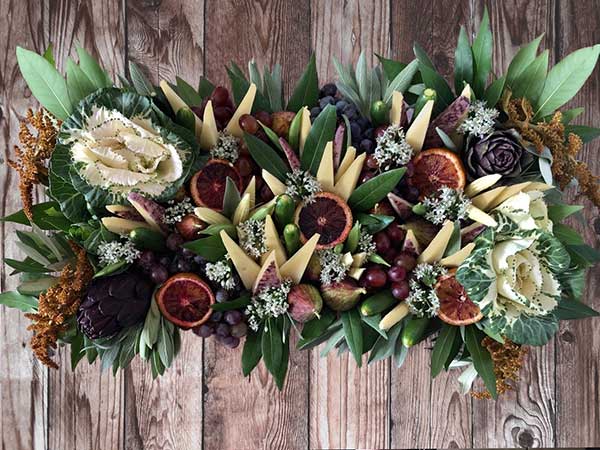
California Cheese Centerpiece
The mission? Create a holiday centerpiece but make it delicious. Real California Milk partner Jessica Lawrenz, Founder of Monger, Mold and Milk, took the challenge with the California Cheese Centerpiece, the ultimate in edible entertaining with a beautiful display of Real California Cheeses, salami, fruits and vegetables arranged with fragrant herbal garnishes in a display sure to impress family and friends. As a bonus, it creates less waste than a stand-alone floral bouquet (and you’ll have less to clean up!).
Find additional cheese displays and holiday recipes at realcaliforniamilk.com.
INGREDIENTS:
Variety of firm to medium (semi-firm) Real California Cheeses (find them here: https://www.realcaliforniamilk.com/cheese-makers)
Shown in arrangement:
- Real California Dry Jack cheese wedges
- Real California Wine-soaked Cheddar wedges
- Real California Triple Cream cheese wedges
- Salumi or salami, made into roses
Fresh fruits and vegetables:
- Mini clementines or kumquats
- Grapes or currants (both shown)
- Fresh figs
- Gooseberries
- Cucamelons or mini cucumbers
- Cherry tomatoes (tiger stripe tomatoes shown but any small tomato works)
Garnishes:
- Bay leaf stems
- Olive leaf stems
- Rosemary branches
- Lavender stems
- Sage bunches
- Chive or garlic flowers or any edible flower with a stem
Tools and Materials:
- Circular tray or plate
- Craft or flora foam (half sphere shape that is at least 1-inch smaller in diameter than your tray)
- Double-sided tape
- Plastic wrap
- Toothpicks, U-shape bamboo toothpicks (optional)
- Cookie cutter shapes (optional)
DIRECTIONS:
- Cover foam in plastic wrap to protect food from making contact with the foam.
- Use double-sided tape to secure the foam to the tray.
- Now you can start assembling the centerpiece. Start from the bottom and work your way up to the top of the sphere.
- Use the bulk of your leafy garnishment (bay leaf stems, olive leaf stems, sage bunches) on the bottom layer to create a base and coverage by poking the stems into the foam. If needed you can trim the bottom of the stem in a diagonal direction to create a more pokey end OR use a toothpick to pierce a hole in the place where you want to insert stems.
- For best visual appeal, fruits like grapes and currants should be arranged to kind of flow over the edge of the tray near the bottom as well. PRO TIP: Use “U” shaped bamboo toothpicks to secure the stems of the hanging fruits into the foam.
- From here use toothpicks to secure cheese wedges, salumi roses, fruits and vegetables into the foam. Cut shorter, triangular pieces of cheese (as opposed to longer triangular pieces used for a long/rectangular centerpiece). Use any tall wedges near the bottom where they will be easy to grab but not sticking out too far if placed near the top. You can use cookie cutter shapes as well for the cheeses, if desired.
- Finally, take any of the smaller garnish pieces you have (lavender, chive flowers, rosemary ends, loose leaves) to fill in the spaces between all the items.

Holiday Cookie Exchange Board
If a cookie exchange is on the docket for this year’s holiday or you’re simply looking to upgrade your dessert table, take some tips from this stunning cookie exchange presentation. Mix and match Real California Milk cookie recipes to create a mouthwatering arrangement and decorate with mini candy canes, holiday lollipops, various holiday décor and lights. Add napkins, cookie bags for take-away, and recipe cards for sharing, and let your guests go to town.
- Hot cocoa or coffee
- Milk shooters
- Coconut Walnut Cake Bars
- Chocolate Mint Cookies
- Stroopwafel Cookies
- Mini Gingerbread Cupcakes
- Madeleines
Dipped in melted dark chocolate and rolled in crushed peppermint candies or Holiday sprinkles
Leave out ice cream, exchange holiday sprinkles for rainbow sprinkles, and dip in melted white chocolate with color for extra festivity
California is the nation’s leading milk producer and is responsible for producing more butter, ice cream and nonfat dry milk than any other state. The state is the second-largest producer of cheese and yogurt. California milk and dairy foods can be identified by the Real California Milk seal, which certifies they are made exclusively with milk from the state’s dairy farm families.
About Real California Milk/California Milk Advisory Board
The California Milk Advisory Board (CMAB), an instrumentality of the California Department of Food and Agriculture, is funded by the state’s dairy farm families who lead the nation in sustainable dairy farming practices. With a vision to nourish the world with the wholesome goodness of Real California Milk, the CMAB’s programs focus on increasing demand for California’s sustainable dairy products in the state, across the U.S. and around the world through advertising, public relations, research, and retail and foodservice promotional programs. For more information and to connect with the CMAB, visit RealCaliforniaMilk.com, Facebook, YouTube, Twitter, Instagram and Pinterest.
Source: Real California Milk

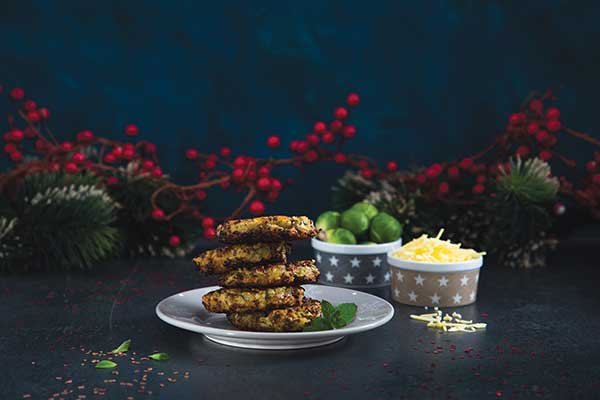
Add Cheer to the Holidays with Cheesy Plant-Based Appetizers
(Family Features) Reconnecting with family and friends over the holidays means food takes center stage. Perhaps nothing says “happy holidays” quite like a plate of seasonal appetizers. Make your traditional recipes extra special this year with a plant-based twist that starts with cheese.
Holiday plant-based cheese dishes combine cheesiness that people love with fresh vegetables so your hors d’oeurve tray can be enjoyed by everyone no matter their lifestyle or dietary needs. Start holiday eating with a batch of Vegan Stuffed Mushrooms loaded with a colorful assortment of vegetables like onions, zucchini, tomatoes and spinach, and generously topped with plant-based cheese shreds to make an especially cheesy, indulgent and satisfying snack. Or try frying up a plate of Vegan Brussels Sprouts Fritters stuffed with melty, creamy plant-based cheddar cheese for a delicious bite of seasonal comfort.
Try the full range of Violife vegan cheeses to bring these party starters to life. There is no sacrificing taste to enjoy delectable holiday recipes made with melty, stretchy and flavorful vegan cheese. These cheeses are free from dairy, soy, nuts, gluten, preservatives and lactose and are non-GMO. They are made with plant-based ingredients and come in a variety of savory shreds, smokey slices, wedges, blocks or as a cream cheese alternative. Plus, these vegan cheeses are perfect for including in plant-forward holiday spreads and starting new holiday traditions.
Visit violifefoods.com to find more appetizers and snacks for your holiday gatherings.

Vegan Stuffed Mushrooms
Prep time: 20 minutes
Cook time: 20 minutes
Servings: 4
- 12 button mushrooms
- 2 tablespoons olive oil, divided
- 1 large sweet onion, diced
- 2 medium zucchinis, diced
- 4-6 sun dried tomatoes, chopped
- 2-3 garlic cloves, minced
- 1 large handful spinach
- 1 pinch rosemary
- salt, to taste
- freshly ground black pepper, to taste
- 1 pack Violife Just Like Cheddar Shreds
- finely chopped chives
- Preheat oven to 350 F.
- Use damp kitchen towel to clean mushrooms. Remove stalks from mushrooms. Rub with 1 tablespoon olive oil and place on lined baking sheet with empty sides up.
- In frying pan, saute onions in remaining olive oil until soft then add zucchinis, tomatoes and garlic. Add spinach until wilted. Remove from heat and add rosemary, salt, to taste, and pepper, to taste.
- Stuff each mushroom with vegetable mixture and sprinkle with cheese shreds. Bake 15-20 minutes. Sprinkle with finely chopped chives.
Vegan Brussels Sprouts Fritters
Prep time: 20 minutes
Cook time: 10 minutes
Servings: 8
- 35 ounces Brussels sprouts
- 3 green onions, finely chopped
- 1/4 cup gluten-free all-purpose flour
- 2 teaspoons salt
- 1 teaspoon black pepper
- pink pepper
- 1 teaspoon paprika
- 1/4 teaspoon garlic powder
- 1 flax egg (2 tablespoons flax and 2 tablespoons water)
- 1 pack Violife Just Like Cheddar Shreds
- 2-4 tablespoons olive oil
- mint, roughly chopped
- Wash Brussels sprouts and finely slice. Place in bowl with green onions.
- In separate bowl, whisk flour, salt, black pepper, pink pepper, paprika and garlic powder.
- Add dry ingredients and flax egg to Brussels sprouts mixture then add cheddar shreds. Mix well and let rest in refrigerator 10 minutes.
- In frying pan, heat olive oil. Use hands to make one patty with 2 tablespoons of mixture.
- Shallow fry 4 minutes on each side. Remove and place on plate with paper towels to drain excess oil. Repeat with remaining mixture. Garnish with mint.
Source: Violife

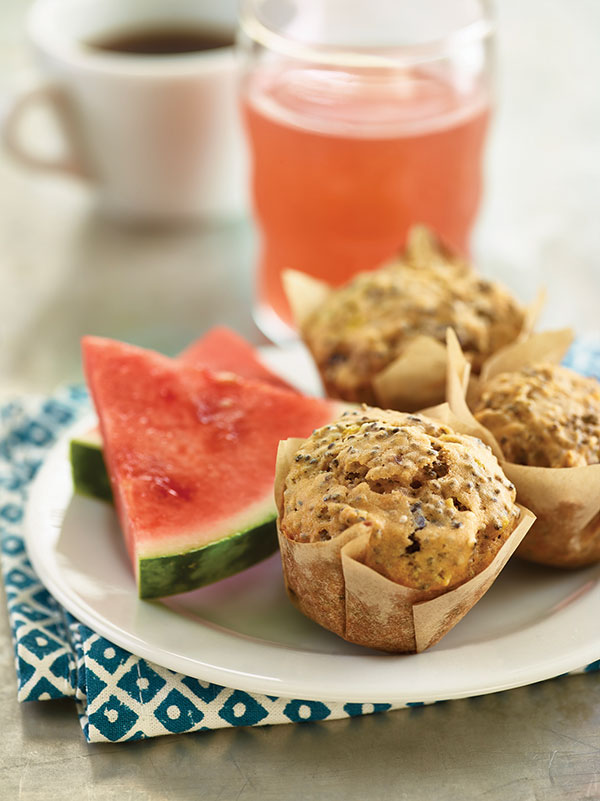
Sweet Ideas for Easy Back-to-School Breakfasts
(Family Features) A healthy breakfast can give your student a boost that lasts all day long. Mornings tend to be rushed, but it’s still possible to prepare easy breakfasts that power little learners throughout the school day.
Fresh fruit is a breakfast staple, and a nutritious option like watermelon is a sweet way to satisfy hunger (and thirst). As a refreshing ingredient or standalone treat, watermelon includes just 80 calories and no fat. It’s an excellent source of vitamin C (25%) and because it’s made of 92% water, it’s a flavorful way to encourage kids to start a busy day well hydrated.
A bowl of watermelon cut into cubes, balls or fun shapes is a winning idea, but you can also think outside the rind with these ways to give watermelon a place at your breakfast table:
- Top a grain-based cereal like corn flakes or oatmeal with bite-size bits.
- Make Watermelon Donuts for a grab-and-go delight, perfect on hectic mornings.
- Freeze cubes overnight and use them in place of ice with your favorite smoothie ingredients.
- Put a twist on a breakfast favorite with these Watermelon Oat Flour Waffles.
- Add a layer of oat crumble to a bowl of watermelon balls for a savory, satisfying treat.
Kid-Friendly Cuts
It’s no secret that kids gravitate toward fun foods. Watermelon is a versatile fruit that offers plenty of serving options that let kids get hands-on and creative.
Slices
A classic watermelon slice may be basic, but it does have a few tricks up its sleeve. With the rind on, it’s an instant finger food with a built-in “handle.” Add a wooden stick for watermelon you can eat like a sucker or pop it in the freezer for a cool way to start the day.
Cubes
Simple and versatile cubes are a solution for banishing breakfast boredom. You can cube a melon and use them differently every day of the week by eating them on their own, mixing in a fruit salad, layering with other ingredients, blending in a smoothie and more.
Sticks
There’s nothing like a dipper to get kids’ attention. A watermelon stick offers a bit of rind to hold onto and a juicy strip of sweet melon that’s perfect for dunking in a cup of yogurt or fruit dip.
Cutouts
Cut watermelon into thin slices and use cookie cutters to create a treat that shows off creativity.
Get in a school morning groove with more easy breakfast ideas at watermelon.org .
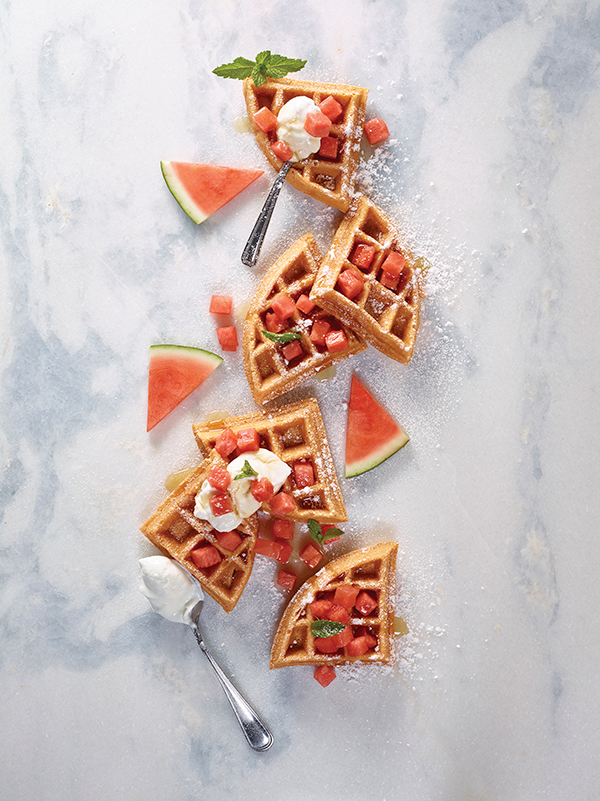
Watermelon Oat Flour Waffles
Yield: 8 waffles
Waffles:
- 1 cup old-fashioned or regular oats
- 3/4 cup all-purpose flour
- 1 tablespoon baking powder
- 1/2 teaspoon salt
- 1 cup watermelon juice
- 1/2 cup vegetable oil
- 4 egg whites
- nonstick cooking spray
Garnish:
- 2 cups plain Greek yogurt
- 3 cups watermelon, diced 1/2 inch
- fresh mint leaves
- powdered sugar (optional)
- honey (optional)
- Preheat Belgian or regular waffle iron.
- In blender, process oat flakes into flour.
- In bowl, mix oat flour, all-purpose flour, baking powder and salt. Mix in watermelon juice and oil.
- Whip egg whites into stiff peaks and fold into batter.
- Spray hot waffle iron with nonstick cooking spray. Pour batter into waffle iron and bake 3-4 minutes, or according to waffle iron instructions. Repeat with remaining batter.
- Garnish waffles with yogurt; watermelon cubes; mint sprigs; powdered sugar, if desired; and honey, if desired.
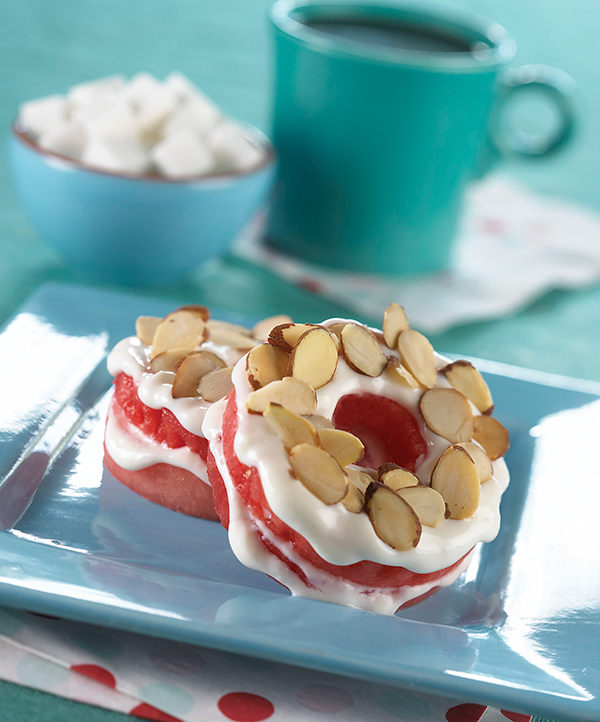
Watermelon Donuts
Servings: 1
- 2 slices seedless watermelon, 1 1/2 inches thick
- 2 tablespoons nonfat plain Greek yogurt
- 1 pinch sugar
- vanilla, to taste
- 9 slivered almonds
- Cut out donut shapes from watermelon slices.
- Sweeten Greek yogurt with sugar and vanilla, to taste, to create frosting.
- Frost half of watermelon donuts with half of frosting. Add layer of remaining watermelon donuts and top with remaining frosting.
- Sprinkle toasted almonds over top and serve.

Infuse Bright, Nutritional Flavor into Summer
(Family Features) When families fire up their grills and turn to favorite summer recipes for filling meals, nutritional considerations are often not the focus. However, this doesn’t have to be the case. This year, you can rethink traditional seasonal menus by opting for main courses – and even desserts – that offer healthier returns by incorporating ingredients like whole oranges, which provide a multitude of nutritional benefits.
Adding an ingredient like California Valencia oranges to your family’s dishes means you’re including a rich source of vitamin C (70% of the daily value) and an excellent source of folate (20% of the daily value) in your seasonal spread. As a balance of sweet and tart, the extra juicy oranges reach their peak in summer, making them perfect for warm-weather recipes, juicing or as portable snacks to take along on adventures.
Plus, their anti-inflammatory benefits help support the body, especially as outdoor activities increase in the warm weather. The potassium found in oranges also helps support cell function, healthy blood pressure levels, bone health and hydration.
When it comes to meal planning, oranges are a highly versatile fruit that can be added to both sweet and savory dishes, as well as beverages, cocktails, sauces, frozen desserts, smoothies and more. To introduce a depth of flavor and burst of nutrition to dishes, add a sprinkle of zest, segments or fresh-squeezed juice, or even grill the fruit to bring out the flavor.
Try combining them with tastes of the Mediterranean for dinner with Orange and Harissa Glazed Beef Kebabs or end your meal with a refreshing sweet treat like Orange Ice Cream the entire family can enjoy.
By introducing the sweetness of oranges to your warm-weather menu, you can infuse fresh flavor while rethinking family favorites. Visit CaliforniaCitrusGrowers.com for more information on California oranges.
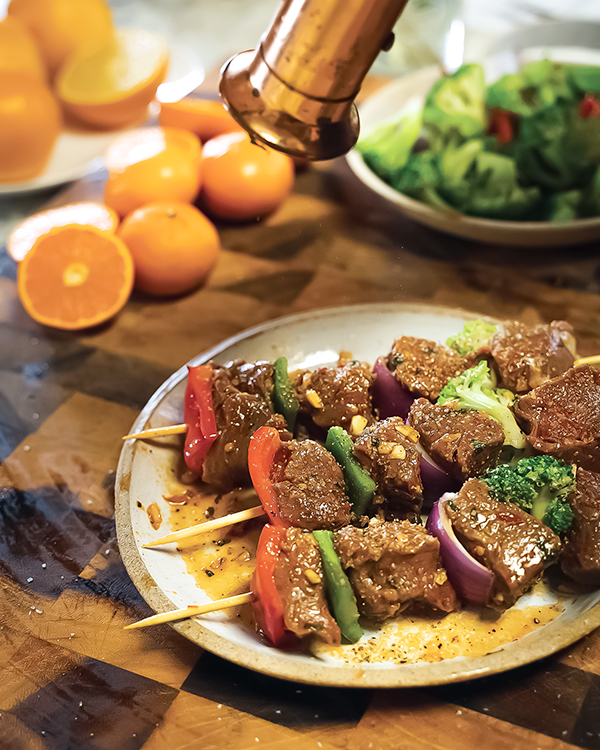
Orange and Harissa Glazed Beef Kebabs
Prep time: 2 hours
Cook time: 20 minutes
Servings: 2
- 1/2 cup California Valencia orange juice, freshly squeezed
- 2 California Valencia oranges, zested and segmented
- 2 tablespoons harissa paste
- 2 tablespoons honey
- 2 tablespoons olive oil
- 1 tablespoon fresh mint leaves, roughly chopped
- 2 garlic cloves, finely chopped
- 8 ounces beef tenderloin, cut into 2-inch cubes
- 1 green bell pepper, cut into 2-inch squares
- 1 red onion, cut into 2-inch squares
- 16 broccoli florets, raw
- kosher salt, to taste
- black pepper, to taste
- cooked couscous
- mandarin chutney
- In mixing bowl, combine orange juice and zest, harissa, honey, oil, mint and garlic; mix well.
- Add beef cubes and toss to coat; marinate 2 hours in refrigerator.
- Using long skewers, build kebabs, alternating beef, peppers, onions and broccoli on each.
- Heat grill to medium-high heat.
- Season kebabs with salt and pepper, to taste. Grill until vegetables are cooked through and beef reaches desired doneness.
- Serve over bed of couscous and top with mandarin chutney.
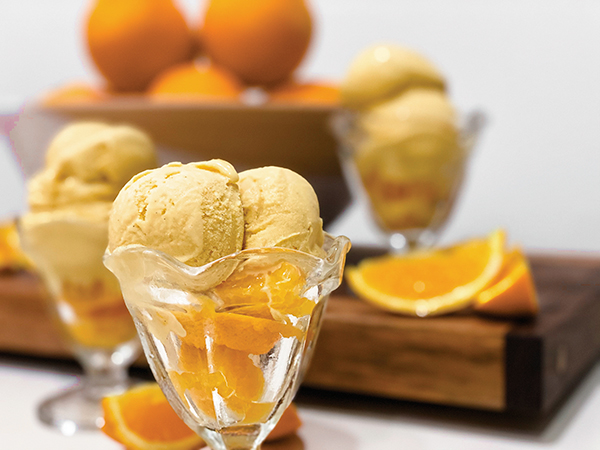
Orange Ice Cream
Prep time: 1 hour
Servings: 6
- 2 cups California Valencia orange juice, freshly squeezed
- 1 1/2 cups whole milk
- 1 1/2 cups heavy cream
- 1/2 vanilla bean
- 2 tablespoons glucose syrup or corn syrup
- 1/4 cup non-fat dry milk powder
- 2/3 cup granulated sugar
- 3 egg yolks
- 2 California Valencia oranges, zest only
- California Valencia orange slices, for garnish
- Prepare ice cream making vessel or unit, such as old-fashioned churner or ice cream machine with motor.
- Reduce orange juice to 1 cup; ice down to chill.
- In saucepan over medium heat, combine milk, cream, vanilla scraped pod and seeds, and glucose syrup until hot; remove from heat. Steep 30 minutes.
- In bowl, combine milk powder and sugar. Add dry mixture into hot cream mixture. Whisk to combine. Return mixture to medium heat.
- In separate heat-safe bowl, combine egg yolks and orange zest.
- In small increments, pour hot mixture over yolks and zest. Mix vigorously while pouring.
- Cook to 185 F.
- Remove from heat and pour through fine strainer. Hand-blend until smooth.
- Ice down immediately. Add cooled, reduced orange juice. Hand blend to combine.
- Spin and freeze then follow directions according to machine or vessel to make ice cream.
- Serve with orange slices.
Source: California Citrus Growers

Lemon Cheesecake with Fresh Fruit
Fresh fruit is finally in season. When the sun is out and kids are hitting the pool, it’s also time to indulge in some sweet fruit flavors. Watermelon, berries, bananas and more can all be found near perfect ripeness at grocery stores or farmer’s markets during the warm summer months.
On a hot day, there is almost nothing better than trying something new that sounds delicious. Throw your apron on, prepare your kitchen and get baking.
If you’re craving something sweet with no ideas where to start, try this sweet Lemon Cheesecake with Fresh Fruit. It’s tangy and rich, and allows you to escape to the summer oasis of your dreams, at least for a few minutes.
It has the smooth, creamy texture of cheesecake mixed with a hint of tart lemon juice. Topped with raspberries, mint and oranges, the burst of fresh fruit enhances the cheesecake flavor. It’s the perfect sweet treat for summer for people of all ages with its bright colors and varying flavors.
In a bowl, mix graham cracker crumbs, sugar and melted butter then press into a springform pan.
Beat cream cheese, sweetened condensed milk, three eggs, lemon juice and vanilla extract then pour it on top of the graham cracker mixture.
Bake for 50-55 minutes before cooling completely in the fridge and adding fruit and mint leaves.
The outcome is a fluffy cheesecake with a small hint of lemon topped with your favorite fresh fruits. It’s a delightful, sweet and satisfying recipe your family can make again and again to enjoy during those warm summer months.
Find more recipes perfect for summer at Culinary.net.
Did you make the recipe? We would love to see it! Use #MyCulinaryConnection on your favorite social network and let us see your work!
Watch video to see how to make this recipe!
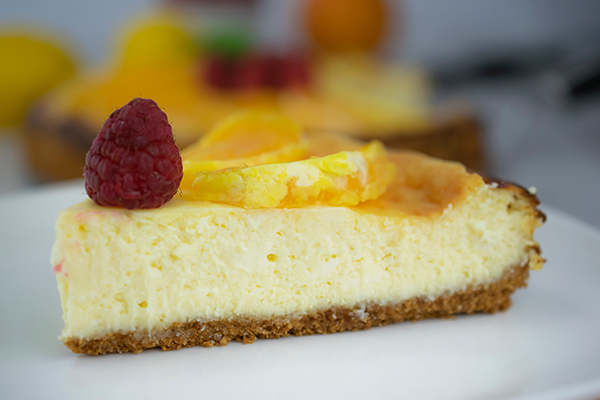
Lemon Cheesecake with Fresh Fruit
Servings: 6-8
- 1 1/4 cups graham cracker crumbs
- 1/4 cup sugar
- 1/4 cup butter, melted
- 2 packages (8 ounces each) cream cheese, softened
- 1 can (14 ounces) sweetened condensed milk
- 3 eggs
- 1/4 cup fresh lemon juice
- 1 teaspoon vanilla extract
- 1 orange, peeled and separated
- 8 raspberries
- 3 mint leaves, for garnish
- Heat oven to 350 F.
- In medium bowl, combine graham cracker crumbs, sugar and melted butter. Press firmly into 9-inch springform pan.
- In large bowl, beat cream cheese until fluffy. Gradually beat in sweetened condensed milk until smooth. Add eggs, fresh lemon juice and vanilla extract; mix until combined.
- Pour into pan. Bake 50-55 minutes, or until center springs back when lightly pressed.
- Chill in refrigerator until completely cooled. Arrange orange slices around border of cake and place raspberries in middle. Top with mint leaves.