
A Full, Fresh Menu Fit for a Brunch Feast
(Family Features) Birthdays, holidays or just casual Saturdays are all perfect excuses to enjoy brunch with your favorite people. Bringing everyone together with quiches, pastries, appetizers, desserts and more offers an easy way to kick back and relax on a warm weekend morning.
These recipes for Easy Brunch Quiche, Savory Cheese Balls and Lemon Blueberry Trifle provide a full menu to feed your loved ones from start to finish, regardless of the occasion.
Find more brunch inspiration by visiting Culinary.net.
A Savory Way to Start the Celebration
Serving up exquisite flavor doesn’t have to mean spending hours in the kitchen. You can bring the cheer and favorite tastes with simple appetizers that are equal measures delicious and visually appealing.
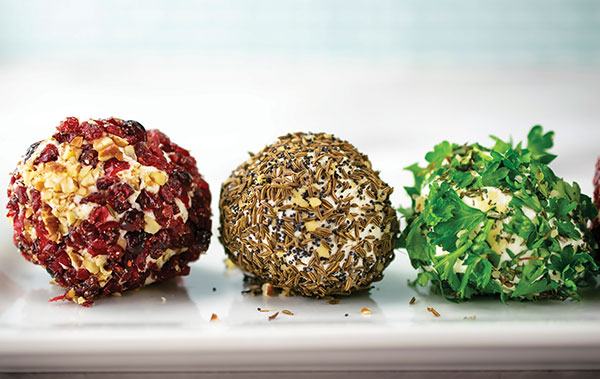
These Savory Cheese Balls are easy to make and perfect for get-togethers and brunch celebrations. Texture and color are the name of the game with this recipe, and the result is a beautiful array of red, gold and green, all on one plate.
To find more recipes fit for brunch, visit Culinary.net.
Savory Cheese Balls
Servings: 6-12
- 2 packages (8 ounces each) cream cheese
- 2 tablespoons caraway seeds
- 1 teaspoon poppy seeds
- 2 cloves garlic, minced, divided
- 1/4 cup parsley, chopped
- 2 teaspoons thyme leaves, chopped
- 1 teaspoon rosemary, chopped
- 1/4 cup dried cranberries, chopped
- 2 tablespoons pecans, chopped
- crackers (optional)
- fruit (optional)
- vegetables (optional)
- Cut each cream cheese block into three squares. Roll each square into ball.
- In small bowl, combine caraway seeds, poppy seeds and half the garlic.
- In second small bowl, combine parsley, thyme, rosemary and remaining garlic.
- In third small bowl, combine cranberries and pecans.
- Roll two cheese balls in seed mixture, two in herb mixture and two in cranberry mixture.
- Cut each ball in half and serve with crackers, fruit or vegetables, if desired.
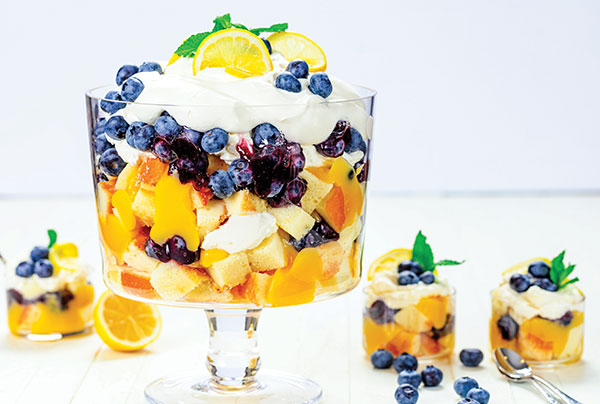
Finish Brunch with a Light, Layered Treat
After enjoying eggs, bacon, French toast and pancakes or any other brunch combination you crave, it’s tough to top a fresh, fruity treat to round out the meal. Dish out a delicious dessert to cap off the morning and send guests out on a sweet note that’s perfectly light and airy.
The zesty zip of lemon curd in this Lemon Blueberry Trifle brings out the sweetness of whipped cream made with Domino Golden Sugar, fresh blueberries and cubed pound cake for a vibrant, layered bite. Plus, it’s a bright, beautiful centerpiece you can feel proud of as soon as guests try their first bite.
Find more dessert recipes fit for brunch and other favorite occasions at DominoSugar.com.
Lemon Blueberry Trifle
Prep time: 45 minutes
Servings: 8-10
Lemon Curd:
- 1 cup Domino Golden Sugar
- 2 tablespoons cornstarch
- 1/4 cup freshly squeezed lemon juice
- 1 tablespoon lemon zest
- 6 tablespoons water
- 1/4 teaspoon salt
- 6 egg yolks
- 1/2 cup (1 stick) unsalted butter, at room temperature, cut into 1/2-inch cubes
Whipped Cream:
- 2 cups heavy whipping cream, cold
- 2 tablespoons Domino Golden Sugar
- 2 teaspoons pure vanilla extract
Trifle:
- 1 cup blueberry jam
- 12 ounces fresh blueberries, plus additional for garnish, divided
- 1 pound cake, cubed
- lemon slices, for garnish
- mint, for garnish
- To make lemon curd: In medium saucepan, stir sugar and cornstarch. Stir in lemon juice, lemon zest, water and salt. Cook over medium heat, stirring constantly, until thickened. Remove from heat and gradually stir in three egg yolks; mix well until combined. Stir in remaining egg yolks. Return to heat and cook 2 minutes, stirring constantly. Remove from heat.
- Stir in butter; mix until incorporated. Cover with plastic wrap, touching surface of lemon curd to prevent curd forming skin. Refrigerate until completely cool.
- To make whipped cream: In large bowl, beat cream, sugar and vanilla until soft peaks form. Do not overbeat.
- To make trifle: Mix blueberry jam with 12 ounces fresh blueberries. Place one layer cubed pound cake in bottom of trifle dish. Top with layer of blueberries. Add dollops of lemon curd and whipped cream. Repeat layering ending with whipped cream.
- Decorate trifle with lemon slices, fresh blueberries and mint.

Say Goodbye to Basic Brunch
The same old brunch menu can become tiresome and dull. Adding something new to the table with fresh ingredients and simple instructions can enhance your weekend spread and elevate brunch celebrations.
Try this Easy Brunch Quiche that is sure to have your senses swirling with every bite. This quiche is layered with many tastes and a variety of ingredients to give it crave-worthy flavor, from broccoli and bacon to mushrooms, eggs and melty cheese.
Visit Culinary.net to find more brunch recipes.
Easy Brunch Quiche
Serves: 12
- 1 package (10 ounces) frozen broccoli with cheese
- 12 slices bacon, chopped
- 1/2 cup green onions, sliced
- 1 cup mushrooms, sliced
- 4 eggs
- 1 cup milk
- 1 1/2 cups shredded cheese, divided
- 2 frozen deep dish pie shells (9 inches each)
- Heat oven to 350 F.
- In medium bowl, add broccoli and cheese contents from package. Microwave 5 minutes, or until cheese is saucy. Set aside.
- In skillet, cook chopped bacon 4 minutes. Add green onions; cook 2 minutes. Add mushrooms; cook 4 minutes, or until bacon is completely cooked and mushrooms are tender. Drain onto paper towel over plate. Set aside.
- In medium bowl, whisk eggs and milk until combined. Add broccoli and cheese mixture. Add 1 cup cheese. Stir to combine. Set aside.
- In pie shells, divide drained bacon mixture evenly. Divide broccoli mixture evenly and pour over bacon mixture. Sprinkle remaining cheese over both pies.
- Bake 40 minutes.
- Cool at least 12 minutes before serving.
Note: To keep edges of crust from burning, place aluminum foil over pies for first 20 minutes of cook time. Remove after 20 minutes and allow to cook uncovered until completed.
Source:

Take Homemade Family Favorites to New Heights
(Family Features) Gathering together to enjoy a meal at the family table or a sweet treat at the end of a long day is what time with loved ones is all about. Turning to beloved classics can bring everyone running to the kitchen to share the flavors of those familiar favorites.
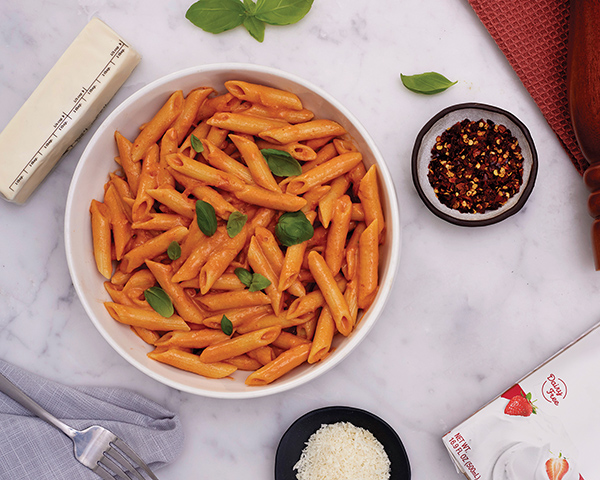
Savor the timeless taste of pasta with this Penne Alla Vodka, a classic dish high on flavor and low on hassle so you can have a meal ready in just 30 minutes. Plus, it offers an alternative to traditional recipes by using Country Crock Plant Cream, a new dairy-free substitute for heavy whipping cream perfect for using in a variety of your favorite dishes.
Made with delicious plant-powered ingredients, it provides the taste of heavy whipping cream without the heaviness. As a 100% vegan, dairy-free and soy-free solution, it’s a 1-for-1 swap for heavy whipping cream in cooking and baking recipes, making it ideal to have on hand year-round.
When it’s time to settle down for the night, end the day on a high note with the sweetness of Strawberry Shortcake. Toss strawberries with sugar, create your own whipped plant cream and make shortcakes from scratch for a true taste of home.
Visit CountryCrock.com for more ways to elevate weeknight meals and desserts.
Penne Alla Vodka
Prep time: 10 minutes
Total time: 30 minutes
Servings: 5
- 1 tablespoon Country Crock Plant Butter with Olive Oil
- 1/2 cup chopped white or yellow onion
- 1/2 teaspoon finely chopped garlic
- 1/2 cup tomato paste
- 1 pinch red pepper flakes
- 1/4 cup (2 fluid ounces) vodka
- 16 fluid ounces Country Crock Plant Cream
- 1/4 cup (2 fluid ounces) water
- 3 cups dry penne pasta, cooked and drained
- 1/4 cup grated vegan Parmesan cheese
- 1/2 teaspoon kosher salt
- 1/4 cup loosely packed fresh basil leaves
- In pan over moderate heat, melt plant butter. Add onions and garlic. Cover and cook until onions are translucent, about 5 minutes.
- Add tomato paste and red pepper flakes. Cook until tomato paste starts to lightly brown.
- Add vodka and stir well, scraping bits of browned tomato paste from bottom of pan. Cook over high heat until liquid is reduced by about half to concentrate flavors.
- Add plant cream and water; stir to incorporate tomato paste evenly. Bring to simmer.
- Toss in cooked pasta. Add vegan Parmesan, salt and fresh basil.

Strawberry Shortcake
Prep time: 20 minutes
Cook time: 12 minutes
Servings: 8
Strawberries:
- 2 pounds strawberries, hulled and sliced
- 6 tablespoons sugar
Whipped Plant Cream:
- 2 cups Country Crock Plant Cream, directly from refrigerator
- 2 tablespoons powdered sugar
- 2 teaspoons vanilla extract
Shortcakes:
- 3/4 cup chilled Country Crock Plant Cream, plus additional for brushing, divided
- 1 tablespoon lemon juice
- 2 cups flour
- 2 tablespoons sugar
- 2 teaspoons baking powder
- 1/2 teaspoon baking soda
- 1/2 teaspoon salt
- 1/2 cup (1 stick) Country Crock Plant Butter Sticks with Avocado Oil, melted
- 1 tablespoon turbinado sugar
- To make strawberries: In bowl, toss sliced strawberries and sugar. Let berries sit 30 minutes-2 hours before serving.
- To make whipped plant cream: In chilled bowl, using electric hand mixer or stand mixer on high, whisk chilled plant cream, powdered sugar and vanilla extract until plant cream thickens and stiff peaks form.
- To make shortcakes: Preheat oven to 475 F.
- In small bowl, mix 3/4 cup plant cream and lemon juice; set aside 2-3 minutes, or until it begins to curdle.
- In large bowl, whisk flour, sugar, baking powder, baking soda and salt. Stir in plant butter and plant cream mixture.
- Knead dough a few times then shape into 1-inch-tall circle. Cut circle into eight wedges. Transfer wedges onto baking sheet lined with parchment paper. Brush tops of biscuits generously with additional plant cream and sprinkle turbinado sugar on top.
- Bake 10-12 minutes, rotating sheet halfway through baking. Biscuits should be golden brown. Cool before assembling.
- Split each biscuit in half. Spoon strawberries over half of biscuits. Add dollop of whipped plant cream on top. Layer other biscuit halves on top followed by more strawberries and plant cream.
Source: Country Crock Plant Cream

Whip Up a Bountiful Weekend Brunch
(Family Features) Fresh air, warm sun and delicious foods make brunch a favorite weekend event. Set the stage (and the table) for an inviting experience with recipes that cover all the bases from snacks and desserts to a mouthwatering main course.
Tide the appetite of your guests with Spiced Grass-Fed Lamb Over Hummus served with toasted flatbread or tortilla chips before dishing out Overnight Apple Cinnamon French Toast Casserole for a simple centerpiece. Just as those delectable dishes are vanishing, pull Brown Sugar Pound Cake out of the oven and pair with sweetened whipped cream and fresh fruit for a sweet finishing touch.
Visit Culinary.net to find more ways to broaden your brunch menu.
Wake Up to a Wonderful Brunch
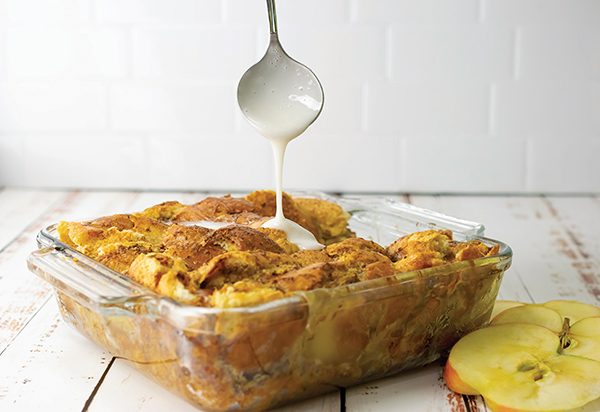
Perfect for any brunch occasion is a delicious dish that can be made a day in advance, simplifying your morning prep before guests arrive with growling stomachs.
Prepared the day before and chilled overnight, this Overnight Apple Cinnamon French Toast Casserole is ready to bake to perfection in the morning with a gooey interior and crisp exterior filled with mouthwatering flavor. Drizzle with glaze then dish out to loved ones for a delicious way to make brunch easy.
Find more breakfast and brunch recipes at Culinary.net.
Overnight Apple Cinnamon French Toast Casserole
Servings: 12
- Nonstick cooking spray
- 1 package (20 ounces) French bread, cubed, divided
- 1 can (20 ounces) apple pie filling
- 9 eggs
- 1 cup half-and-half
- 2 teaspoons ground cinnamon
- 1 cup powdered sugar, plus additional (optional)
- 2 tablespoons milk, plus additional (optional)
- Spray 8-by-8-inch glass baking dish with nonstick cooking spray.
- In baking dish, add 10 ounces cubed French bread in bottom of dish. Pour apple filling over bread. Top with remaining cubed French bread. Set aside.
- In medium bowl, whisk eggs, half-and-half and cinnamon. Pour evenly over bread.
- Cover with aluminum foil and chill overnight.
- Heat oven to 325 F.
- Remove foil and bake 50-60 minutes.
- Let cool 10-15 minutes.
- In small bowl, whisk powdered sugar and milk. Add additional, if needed, until pourable glaze is reached. Drizzle over casserole before serving.
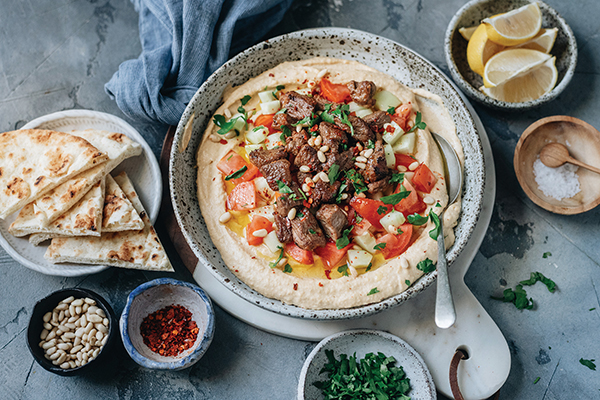
A Fresh, Flavorful Brunch Bite
Brunch is a perfect opportunity to entertain friends and family with delicious recipes that will delight their taste buds. For example, this smooth hummus is paired with tender New Zealand grass-fed lamb loin chops and fresh toppings for flavor in every bite.
Ready in less than 30 minutes, this Spiced Grass-Fed Lamb Over Hummus recipe is made using Atkins Ranch lamb, which is available at your local Whole Foods Market and hails from New Zealand where the animals are grass-fed 365 days a year and allowed to roam and graze freely over lush green hills and pastures. The result is a lean, finely textured, flavorful meat that tastes just as nature intended.
Visit beefandlambnz.com for more recipes, cooking tips and information.
Spiced Grass-Fed Lamb Over Hummus
Prep time: 15 minutes
Cook time: 5 minutes
Servings: 4-6
Lamb:
- 4 Atkins Ranch grass-fed lamb loin chops
- 1 teaspoon cumin powder
- 1/4 teaspoon salt
- 1 tablespoon extra-virgin olive oil
Hummus:
- 1 can (15 ounces) chickpeas
- 3 cloves garlic, chopped
- 1/4 cup tahini
- 3 tablespoons fresh lemon juice
- 1/2 teaspoon salt
- 1/2 teaspoon cumin
- 1/2 teaspoon paprika
- 3 tablespoons olive oil
For serving:
- 1 Persian cucumber, small diced
- 1 small tomato, diced
- 2 tablespoons roasted pine nuts (or 2 tablespoons pomegranate seeds)
- parsley, chopped
- lemon wedges
- toasted flatbread or tortilla chips
- To make lamb: Remove lamb from bone, dice meat into small cubes and transfer to medium bowl.
- Add cumin powder and salt. Toss to coat. Marinate while preparing hummus.
- To make hummus: Drain chickpeas, reserving 1 tablespoon liquid. Rinse chickpeas under running water then drain.
- In bowl of food processor, pulse chickpeas, chickpea liquid and garlic until chickpeas and garlic are chopped.
- Add tahini, lemon juice, salt, cumin, paprika and olive oil. Mix until smooth paste forms. Taste and adjust by adding more salt, lemon juice or olive oil, as desired.
- Transfer hummus to large platter and spread it out.
- In large skillet, heat extra-virgin olive oil over high heat until hot. Add lamb and cook 30 seconds without moving.
- Turn lamb over and cook 30-60 seconds, repeating until all sides are browned. Remove from pan and let rest 5 minutes.
- To serve, place cucumbers and tomatoes in well of hummus then top with lamb, pine nuts and parsley.
- Top with squeeze of lemon juice and serve with flatbread or tortilla chips.
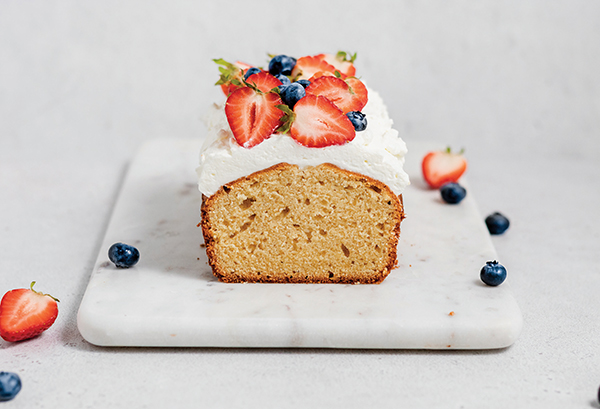
Satisfy Cake Cravings with a Brunch-Worthy Dessert
Whether your brunch feast consists of bacon and eggs, pancakes and waffles or a combination of favorites, you can cap it off with a sweet treat for the perfect ending. After all, no celebration is complete without dessert.
Once the table is cleared of the main courses, dish out decadent bites of this Brown Sugar Pound Cake baked with high-quality ingredients like C&H Sugars to end the meal on a sweet note. Top with whipped cream and your crowd's favorite fruits like strawberries and blueberries or serve the toppings separately for a customizable treat.
Visit chsugar.com for more brunch recipe ideas.
Brown Sugar Pound Cake
Prep time: 20 minutes
Cook time: 1 hour
Servings: 8
- 1 3/4 cups all-purpose flour, plus additional for coating pan, divided
- 1 cup packed C&H Light Brown Sugar
- 1 cup (2 sticks) butter, softened
- 4 eggs
- 1 teaspoon vanilla extract
- 1/2 teaspoon baking powder
- 1/4 teaspoon salt
- sweetened whipped cream, for topping (optional)
- fresh fruit, such as strawberries and blueberries, for topping (optional)
- Preheat oven to 350 F.
- Grease and flour 9-by-5-by-3-inch loaf pan. In large bowl, beat sugar and butter until fluffy. Beat in eggs one at a time. Add vanilla. In separate bowl, combine 1 3/4 cups flour, baking powder and salt. Gradually add to sugar mixture. Pour batter into pan.
- Bake 1 hour, or until toothpick inserted in center comes out clean. Remove from pan and turn out on rack to cool completely.
- Top with sweetened whipped cream and fresh fruit, if desired.
Source: C&H Sugar
Beef + Lamb New Zealand

'Tis the Holiday Baking Season
(Family Features) One of the best parts of the holidays is the aromas and flavors of the season, from walnuts and cinnamon to peppermint and nutmeg. Sweet treats and mouthwatering desserts can bring family and friends around the table to celebrate the season together, one bite at a time.
During your festive gatherings this year, choose walnuts as the star baking ingredient. As many home cooks turn to wholesome ingredients that offer health benefits this holiday baking season, California walnuts make for a perfect addition to almost any dish and are an excellent source of omega-3 ALA (2.5g/oz). With a buttery flavor that elevates traditional and modern recipes, home bakers can do more with walnuts in the kitchen.
Part pumpkin, part cheesecake, this Walnut Pumpkin Cream Cheese Tart spices up the classic pumpkin pie recipe. Top it, or other favorite desserts, with light and airy Vanilla Walnut Whipped Cream flavored with honey and vanilla to complement festive dishes.
This holiday season, pick up a bag of walnuts for all your baking needs. To discover more festive dessert ideas, visit walnuts.org.
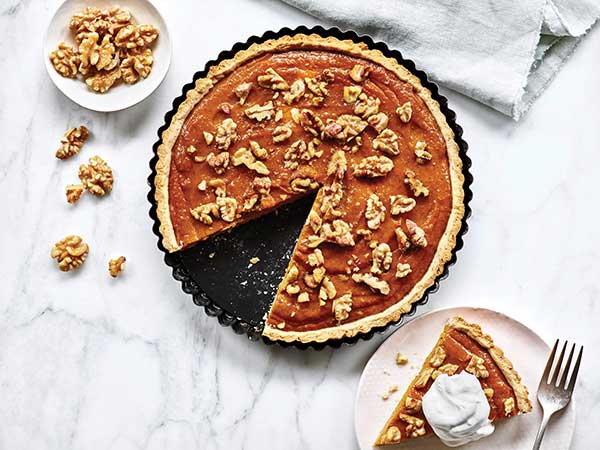
Walnut Pumpkin Cream Cheese Tart
Total time: 2 hours, 30 minutes
Servings: 12
Sweet Tart Crust:
- 1 1/4 cups flour
- 1/3 cup California walnuts, finely chopped
- 1/3 cup powdered sugar
- 1/3 cup salted butter, softened
- 1 large egg
- nonstick cooking spray
Filling:
- 1 can (15 ounces) pumpkin
- 4 ounces low-fat cream cheese, softened
- 1/2 cup brown sugar, packed
- 2 teaspoons pumpkin pie spice
- 1 teaspoon vanilla extract
- 1 egg, plus 1 egg yolk
- 1/2 cup California walnuts, coarsely chopped
- whipped cream, for serving (optional)
- To make sweet tart crust: In medium bowl, stir flour, walnuts and powdered sugar. Stir in butter and egg. Using fork, stir well until soft dough forms. Gather into ball and wrap tightly.
- Refrigerate at least 1 hour, or until dough is easy to handle.
- Preheat oven to 350 F and coat 9-inch tart pan with removable bottom with nonstick cooking spray.
- Lay pastry dough on lightly floured board and roll into 11-inch circle. Press dough into bottom and sides of prepared pan and poke with fork on bottom and sides. Bake 20 minutes.
- To make filling: In medium bowl, whisk pumpkin and cream cheese until smooth. Add brown sugar, pumpkin pie spice, vanilla extract, egg and egg yolk, beating until incorporated.
- Pour into prepared crust and top with walnuts. Bake 40 minutes, or until filling is set when pan is gently tapped.
- Remove from oven and let cool. Cover and refrigerate until ready to serve.
- Serve each slice with dollop of whipped cream, if desired.
Vanilla Walnut Whipped Cream
Total time: 8 minutes
Servings: 14
- 2 1/2 cups California walnuts, divided
- 1 cup water
- 2 tablespoons powdered sugar
- 1-2 teaspoons honey, divided
- 1 teaspoon vanilla extract
- 1 pinch salt
- In blender, puree 2 cups walnuts and water 2 minutes, or until light and fluffy.
- Add powdered sugar, 1 teaspoon honey, vanilla extract and salt; blend 30 seconds. Add remaining honey if sweeter taste is desired.
- To achieve thicker whipped cream, add remaining walnuts and puree until light and fluffy.
- Store tightly covered in refrigerator until ready to use.
Source: California Walnuts

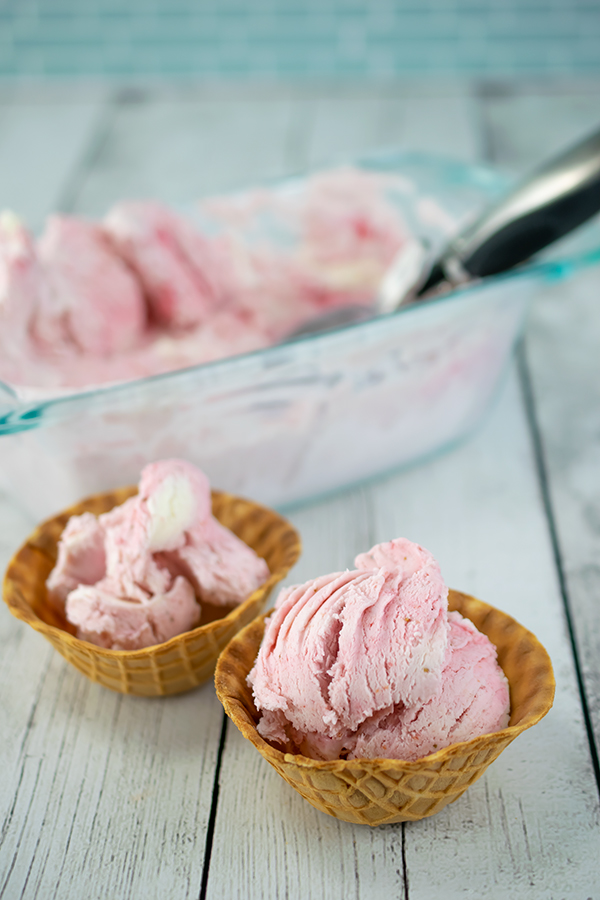
3-Ingredient Strawberry Ice Cream
(Culinary.net) When it’s beyond hot outside and the kids are begging for a delicious afternoon snack, sometimes it’s difficult to know where to turn. The pantry is full and the refrigerator is stocked, yet nothing sounds appetizing when it’s scorching outside.
Combining three simple ingredients you probably already have in your kitchen can save the day and provide a refreshing and scrumptious snack.
Try this 3-Ingredients Strawberry Ice Cream on warm days ahead. It’s chilled to perfection with fresh strawberries and fluffy whipping cream to create a creamy texture perfect for the kiddos.
Start by pureeing 1 pound of fresh strawberries. Add 1 pint of whipping cream and sweetened condensed milk to a mixing bowl then beat until stiff peaks form.
Fold the strawberry puree in with the whipping cream mixture. Pour into a loaf pan and freeze for 5 hours.
Before serving, let ice cream soften for 5-10 minutes.
It’s delicious, rich and has sweet strawberry flavor that can help satisfy nearly any sweet tooth. It’s a wonderful treat after long summer days spent playing outside, splashing in the pool or just relaxing, soaking up the sun.
Find more summer dessert recipes at Culinary.net.
If you made this recipe at home, use #MyCulinaryConnection on your favorite social network to share your work.
Watch video to see how to make this recipe!
3-Ingredient Strawberry Ice Cream
Servings: 4-6
- 1 pound fresh strawberries, stems removed
- 1 pint heavy whipping cream
- 1 can (14 ounces) sweetened condensed milk
- In blender, puree strawberries.
- In bowl of stand mixer, beat whipping cream and sweetened condensed milk until stiff peaks form. Fold in strawberry puree. Pour into loaf pan. Freeze 5 hours.
- Before serving, let ice cream soften 5-10 minutes.

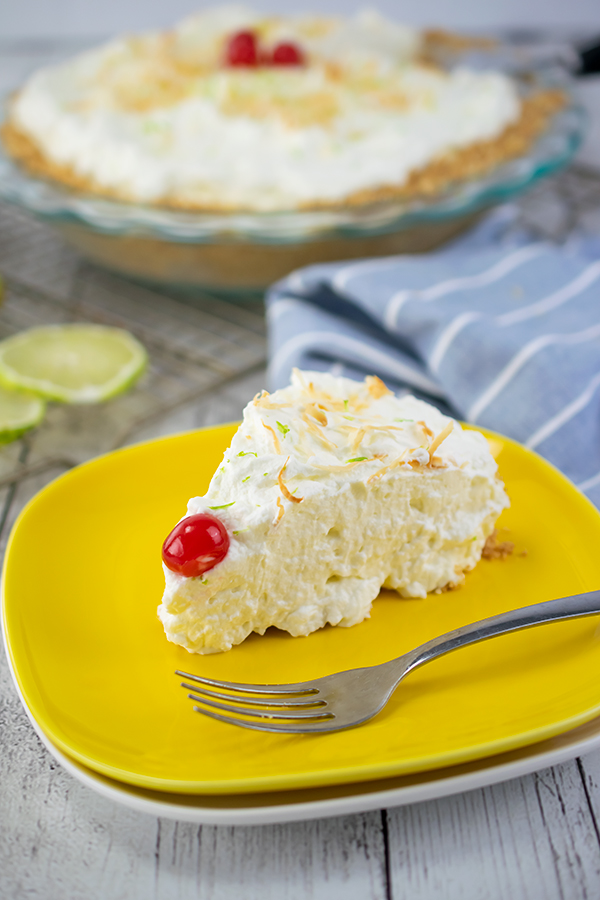
Coconut Key Lime Cream Pie
(Culinary.net) Summer is the time to relax, refresh and indulge in sweet and heavenly treats. While you’re lounging poolside and watching the kids play, enjoy a cool, creamy and absolutely divine dessert that’s perfect on a hot day.
This luscious Coconut Key Lime Cream Pie has a smooth texture with toasted shredded coconut on top. It’s sweet, but not too sweet, and will leave your taste buds wanting more as soon as you take your first bite.
Fresh out of the refrigerator, it’s ideal for everyone to share on those days when it’s just too warm outside to not have a chilled snack.
Also topped with lime zest and maraschino cherries, visually this pie is a winner with fun pops of color that will leave your mouth watering.
To make this cool, creamy creation, add vanilla wafers to a blender to make crumbs. Add melted butter and blend. Add crumb mixture to the bottom of a pie pan and press against the sides. Refrigerate to make crust.
In another large bowl, beat cream cheese, condensed milk and coconut extract.
In a different large bowl, beat whipping cream until it starts to thicken. Add powdered sugar and lime juice. Reserve 1 cup of the whipped topping.
Add lime juice, coconut flakes and the reserved whipped topping to the cream cheese mixture then stir to combine.
Add cream cheese mixture to the pie crust and smooth it out. Top with whipped topping then garnish with toasted coconut, lime zest and maraschino cherries.
It’s the perfect pie to enjoy whether you’re outside enjoying some sunshine or inside, taking a break from the summer fun. After being chilled, all of the flavors combine to leave you with a delicious, one of a kind treat.
Find more summer recipes at Culinary.net.
If you made this recipe at home, use #MyCulinaryConnection on your favorite social network to share your work.
Watch video to see how to make this recipe!
Coconut Key Lime Cream Pie
Servings: 6-8
- 1 package (11 ounces) vanilla wafers
- 1/3 cup butter, melted
- 2 cups heavy whipping cream
- 1/4 cup confectioners’ sugar
- 1/2 cup Key lime juice, divided
- 1 package (8 ounces) cream cheese, softened
- 1 can (14 ounces) sweetened condensed milk
- 1 teaspoon coconut extract
- 1 cup shredded coconut
- 1/4 cup toasted shredded coconut
- lime zest
- maraschino cherries
- In blender, pulse vanilla wafers into crumbs. Add melted butter and pulse until combined. Press crumbs into bottom and up sides of greased 9 1/2-inch deep-dish pie plate. Refrigerate 30 minutes.
- In large bowl, beat whipping cream until it thickens. Add confectioners’ sugar and 1 tablespoon lime juice; beat until stiff peaks form. Remove 1 cup; set aside.
- In separate large bowl, beat cream cheese until smooth. Add sweetened condensed milk and coconut extract; beat until blended. Add remaining lime juice and shredded coconut; stir until combined. Add reserved whipped cream. Stir until combined. Pour into crust.
- Refrigerate 4 hours.
- Before serving, garnish with toasted coconut, lime zest and maraschino cherries.

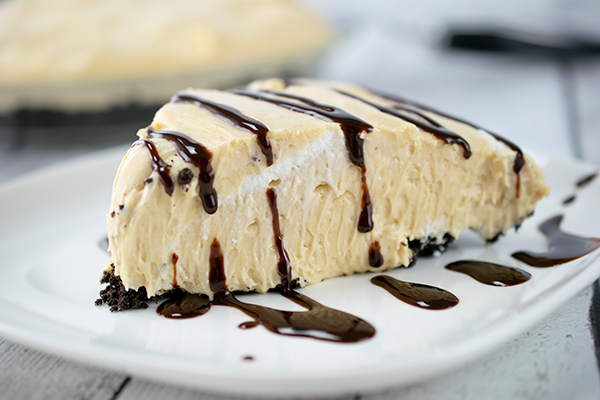
Fluffy Peanut Butter Pie
(Culinary.net) If you’ve ever taken a bite of something and the only word that came to mind was “yum,” you know what it’s like to experience this dessert. It’s fluffy, sweet, perfectly crumbly and tastes delicious. It’s rich but light. It’s a dessert that will likely never go out of style.
You can stop guessing what it may be: this treat is a scrumptious bite of Fluffy Peanut Butter Pie drizzled with chocolate syrup. You will understand the craze once you sink your fork into the chilled triangle resting on your plate. With a chocolate cookie crust and a thick, delicious peanut butter filling, this pie is everything many people want in a dessert.
Although it tastes like you have been in the kitchen all day, it’s a simple-to-make, delightful treat with luscious peanut butter flavor that melts in your mouth.
To make this pie, remove the filling from 20 chocolate cookies and crush them with a rolling pin until they are just crumbs. Mix cookie crumbs with melted butter and mold into a pie dish to create the crust.
Next, in a mixer, combine cream cheese and reserved cookie filling. Then add sweetened condensed milk, peanut butter, lemon juice and vanilla extract while you continue mixing.
In a mixing bowl, beat whipping cream until stiff peaks form. Fold peanut butter mixture in with the whipping cream.
Layer the peanut butter and whipping cream mixture on top of the crust in the pie pan. Chill for about 4 hours then drizzle with chocolate syrup just before serving.
This dessert is perfect for anyone with a sweet tooth. House guests, birthday parties or even just a simple treat after a meal; it’s an any-occasion kind of pie.
Find more dessert recipes at Culinary.net.
Watch video to see how to make this recipe!
Fluffy Peanut Butter Pie
Servings: 6-8
- 20 chocolate cream-filled cookies
- 1/4 cup butter, melted
- 1 package (8 ounces) cream cheese, softened
- 1 cup smooth peanut butter
- 1 can (14 ounces) sweetened condensed milk
- 3 tablespoons lemon juice
- 1 teaspoon vanilla extract
- 1 cup whipping cream
- chocolate syrup
- Remove cream filling from chocolate cookies; set aside. With rolling pin, finely crush chocolate cookies.
- In medium bowl, combine finely crushed cookies with melted butter.
- Press crumb mixture firmly into bottom and sides of 9-inch pie plate; chill while preparing filling.
- In large bowl, beat cream cheese until fluffy. Add reserved cookie cream filling, peanut butter and sweetened condensed milk; beat until smooth. Stir in lemon juice and vanilla extract.
- In medium bowl, beat whipping cream until stiff peaks form. Fold whipped cream into peanut butter mixture. Mix until combined.
- Pour into crust. Chill 4 hours, or until set. Drizzle chocolate syrup over pie before serving.
- Cover leftovers and store in refrigerator.

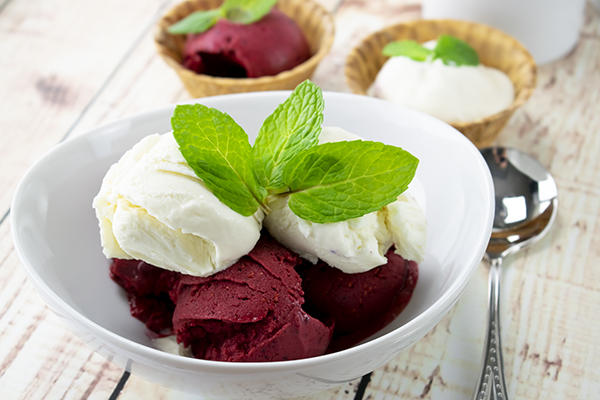
Very Berry and Creamy Coconut Ice cream
Sometimes food can be presented so beautifully, it’s hard to take that first bite. However, once you dig your spoon into the bowl, there is no going back.
Imagine a bite that is chilled, sweet and creamy all at the same time. It’s luscious, fruity and absolutely divine. It’s a summertime ice cream recipe you’ll cherish and make again and again throughout the season.
This delicious Very Berry and Creamy Coconut Ice Cream was created with summertime relaxation in mind. It’s melt-in-your-mouth delicious, especially when it’s made with fresh ingredients right at home for a perfect addition to nearly any poolside event.
This ice cream features the rich tartness of frozen fruit and a sweet creaminess from the coconut milk. The two flavors of ice cream create a unique combination that’s out-of-this-world delicious.
To make the Berry Ice Cream, blend 2 pounds of frozen berries, sweetened condensed milk, honey and salt until smooth then freeze for four hours.
To make the Coconut Ice Cream, beat 2 cups of whipping cream in a mixer until stiff peaks form. In a bowl, combine sweetened condensed milk, coconut milk, salt and 1 cup of the whipped cream. Whisk then add remaining whipped cream and whisk until combined. Place in a dish and freeze for four hours.
Once properly chilled, both ice creams are ready to scoop and serve. Garnish with mint leaves for an extra pop of color, if desired.
Enjoy a delightful treat with your loved ones as you make memories that will last a lifetime. Out in the heat or indoors cooling off, it’s a spoonful of summertime that’s hard to skip.
Find more sweet treats for summer at Culinary.net.
Watch video to see how to make this recipe!
Very Berry and Creamy Coconut Ice Cream
Yield: 11 cups
Berry Ice Cream:
- 2 pounds frozen berries (such as raspberries, blueberries, strawberries and blackberries)
- 1/2 cup sweetened condensed milk
- 1 tablespoon honey
- 1/2 teaspoon salt
Coconut Ice Cream:
- 2 cups heavy whipping cream
- 1/2 cup sweetened condensed milk
- 1/2 cup coconut milk
- 1/2 teaspoon salt
- mint leaves, for garnish (optional)
- To make berry ice cream: In blender, pulse frozen berries, sweetened condensed milk, honey and salt until smooth, scraping down sides.
- Pour mixture into 5-by-9-inch loaf pan. Freeze uncovered 4 hours, or until set.
- To make coconut ice cream: In large mixing bowl, beat whipping cream until stiff peaks form.
- In medium bowl, whisk sweetened condensed milk, coconut milk, salt and 1 cup whipped cream until combined. Add remaining whipped cream and whisk until combined.
- Pour into 5-by-9-inch loaf pan. Freeze uncovered 4 hours, or until set.
- Scoop desired amount of each ice cream into bowls to serve. Garnish with mint leaves, if desired.

Mint Brownies
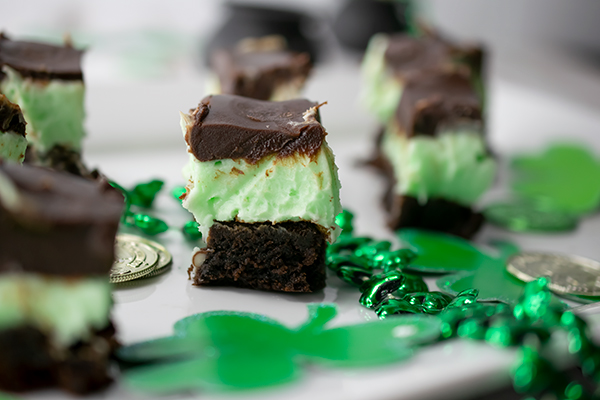
(Culinary.net) How lucky you must be to come across this recipe just in time for St. Patrick’s Day. This one is a twisted combination of mint and sweet chocolate that’s sure to have almost anyone’s taste buds screaming “yum.” This dessert might just be the pot of gold at the end of your rainbow this year.
These Mint Brownies have three delicious layers. First, a supreme brownie on bottom. Then a fluffy, green mint layer that’s full of flavor and color. Last, but definitely not least, a chocolate layer on top made with chocolate chips, butter and a little whipping cream.
All of these layers create a smooth, sweet, minty, bite-sized dessert perfect for any occasion but especially St. Patrick’s Day. The green mint color really pops off the plate, giving it some extra flare and an appetizing glow.
To start, create the soft, chocolate filled brownie. Combine brownie mix, vegetable oil, one egg, water and the chocolate syrup pouch. Bake and cool completely.
Then it’s time for some colorful, festive fun. Make the filling with powdered sugar, butter, whipping cream, softened cream cheese, a splash of peppermint extract and a few drops of green food coloring. Beat and pour over the cooled brownie pan.
The last layer is simple. In a saucepan, melt whipping cream, chocolate chips and butter until smooth. When it’s cooled to lukewarm, pour it over the filling for the final layer.
Refrigerate the Mint Brownies for two hours before serving. Cut them into bite-size pieces for small chunks that will melt in your mouth.
Find more seasonal dessert recipes at Culinary.net.
Watch video to see how to make this recipe!
Mint Brownies
Servings: 9-12
- Nonstick cooking spray
- 1 box supreme brownie mix with chocolate syrup pouch
- 3 tablespoons water
- 1/3 cup vegetable oil
- 1 egg
Filling:
- 3 1/2 cups powdered sugar
- 1/4 cup butter, softened
- 1/4 cup whipping cream
- 5 ounces cream cheese, softened
- 1/2 teaspoon peppermint extract
- 5 drops green food color
Topping:
- 1/2 cup whipping cream
- 1 bag (12 ounces) chocolate chips
- 1/2 cup butter
Heat oven to 350 F.
- Spray 8-by-8-inch pan with nonstick cooking spray.
- In large bowl, mix brownie mix, water, oil and egg until combined. Pour into prepared baking pan. Bake 35 minutes. Cool completely, about 1 hour.
- To make filling: In large bowl, beat powdered sugar, butter, whipping cream, cream cheese, peppermint extract and food coloring. Spread over cooled brownies. Refrigerate 1 hour, or until set.
- To make topping: In saucepan, melt whipping cream, chocolate chips and butter until smooth. Cool until lukewarm, about 10 minutes. Pour over filling; spread to cover. Refrigerate 2 hours, or until set.
- Before serving, let brownies set 10 minutes at room temperature.
Tips: Cut brownies with wet knife for cleaner cuts. Store covered in refrigerator.

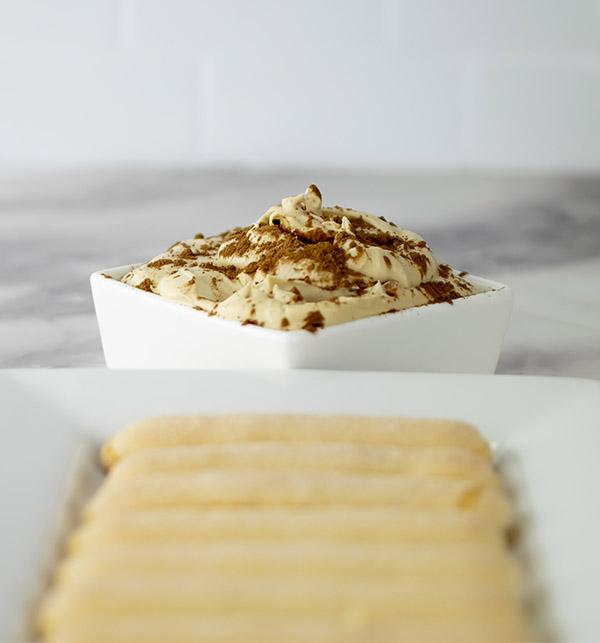
Easy Tiramisu Dip
(Culinary.net) Do you know that moment when something sweet hits your taste buds and a smile instantly spreads across your face? It’s almost magic to some. To others it’s just simply bliss. This holiday season, try something that’s simple yet sophisticated for an easy way to ensure smiles all around.
Try an Easy Tiramisu Dip because whether you’re relaxing at home, having a small get-together with friends or joining your annual family gathering virtually, this dip is sure to spread culinary cheer.
The recipe starts with “easy,” and it holds true to its name. With a short list of ingredients and only a handful of instructions, this is something you can whip up (literally) in just a few moments. Also, using minimal tools in the kitchen is always a plus for at-home chefs. The only appliance needed to make this recipe is a mixer.
The outcome is fluffy, rich and sweet with a hint of espresso. It’s not overpowering, however, so little ones or non-coffee lovers can still enjoy this delicious dip.
This is also a unique dessert because it can be served cool or chilled. If you are planning to take a sweet treat to a party this holiday season, this is nearly perfect. No oven time needed and simple to serve to kids and adults alike.
Serve with ladyfingers or fruit to bring that sweetness to a whole new level, and it’s topped with a final sprinkle of cocoa powder to give it that extra appeal. You do eat with your eyes first after all.
Give this one a try and see the faces of your loved ones light up with joy this season. This creamy, tasty dip is sure to impress.
For more easy dessert recipes, visit Culinary.net.
Watch video to see how to make this recipe!
Easy Tiramisu Dip
Servings: 4
- 1 cup heavy whipping cream
- 1 tablespoon espresso powder
- 4 ounces cream cheese, softened
- 8 ounces Mascarpone cheese
- 1/2 cup powdered sugar
- 1 teaspoon vanilla extract
- 2 teaspoons cocoa powder
- wafers or fruit, for dipping
- In medium bowl, whisk heavy whipping cream and espresso powder until blended.
- In large bowl, use hand mixer to beat cream cheese until smooth. Add Mascarpone cheese and beat until combined. Gradually add powdered sugar, beating after each addition. Add vanilla extract; beat mixture. Add espresso mixture; beat until soft peaks form.
- Keep refrigerated until ready to serve.
- Spoon mixture into serving bowl. Sprinkle with cocoa powder. Serve with wafers or fruit.